Introduction
This comprehensive guide is designed to help your organization successfully implement and adopt LaunchDarkly feature flags as part of your Center of Excellence initiative. Whether you’re a program manager setting objectives or a developer implementing SDKs, this guide provides structured, step-by-step guidance to ensure successful LaunchDarkly adoption across your development teams.
What You’ll Find Here
Program Management
Establish clear objectives, key results, and measurable success criteria for your LaunchDarkly implementation. This section helps program managers and leadership:
- Define OKRs aligned with business objectives
- Set up governance and best practices
- Track adoption metrics and success indicators
SDK Implementation
Technical guidance for developers implementing LaunchDarkly SDKs in their applications. This section includes:
- Preflight Checklists - Step-by-step implementation guides
- Configuration best practices
- Security and compliance considerations
- Testing and validation procedures
Getting Started
New to LaunchDarkly? Start with the Program Management section to understand the strategic approach and objectives.
Ready to implement? Jump to the SDK Preflight Checklist for hands-on technical guidance.
Looking for specific guidance? Use the search functionality to quickly find relevant information.
How to Use This Guide
This guide is structured as a progressive journey:
- Plan - Establish program objectives and success criteria
- Prepare - Complete preflight checklists for your technology stack
- Implement - Follow step-by-step SDK integration guides
- Validate - Test and verify your implementation
- Scale - Apply best practices across your organization
Each section builds upon the previous one, but you can also jump to specific topics based on your immediate needs.
Need Help?
- LaunchDarkly Documentation: launchdarkly.com/docs
- LaunchDarkly Developer Hub: developers.launchdarkly.com
- LaunchDarkly Help Center: support.launchdarkly.com
- LaunchDarkly Academy: launchdarkly.com/academy
Overview
This topic explains the objectives and key results for the LaunchDarkly Program. We recommend using the following guidelines when creating objectives and key results:
Objectives
Write objectives as clear, inspirational statements that describe what you want to achieve. Each objective should be:
- Measurable through specific key results
- Aligned with broader program goals
- Reviewed and updated regularly to reflect changing priorities
Limit each objective to three to five key results.
Key results
Key results measure progress toward your objective. They must be specific, measurable, and verifiable.
Use quantitative metrics:
- State exact numbers, percentages, or timeframes
- Define what you measure and how you measure it
- Include baseline values when comparing improvements
- Specify the time period for measurement
Focus on outcomes:
- Measure results, not activities
- Track what changes, not what you do
- Use leading indicators that predict success
- Include lagging indicators that confirm achievement
Ensure clarity:
- Use clear language that anyone can understand
- Avoid vague terms like “improve” or “better”
- Include specific targets or thresholds
- Define success criteria explicitly
Set realistic targets:
- Aim for 70% to 80% achievement probability
- Set stretch goals that require effort to reach
- Review historical performance to inform targets
Include time-bound elements:
- Set clear deadlines or timeframes
- Define measurement periods
- Align timing with objective review cycles
Active OKRs
This section contains the current OKRs for the LaunchDarkly Program.
Application teams onboard quickly and correctly with minimal support
Key Results
- Time to provision and access LaunchDarkly with correct permissions is less than one day per team
- Less than three hours of ad hoc support requested per team during onboarding
- Less than five support tickets created per team during onboarding
- All critical onboarding tasks complete and first application live in a customer-facing environment within two sprints
Tasks
To achieve this objective, complete the following tasks:
- Create self-service documentation with step-by-step guides and video tutorials when necessary
- Configure single sign-on (SSO) and identity provider (IdP) integration
- Define teams and member mapping
- Assign all flag lifecycle related actions to at least one member in each project
- Define how SDK credentials are stored and made available to the application
- Create application onboarding checklist and a method to track completion across teams
Team members find flags related to their current task unambiguously
Key Results
- More than 95% of new flags created per quarter comply with naming convention
- More than 95% of active users access dashboard filters and shortcuts at least once per month
- More than 95% of new flags created per quarter include descriptions with at least 20 characters and at least one tag
- More than 95% of release flags created per quarter link to a Jira ticket
- Zero incidents of incorrect flag changes due to ambiguity per quarter
Tasks
To achieve this objective, complete the following tasks:
- Create naming convention document
- Document flag use cases and when and when not to use flags
- Create a method to track compliance with naming convention
- Enforce approvals in critical environments
Team members de-risk releases consistently
Key Results
- Starting Q1 2026, 90% of features requiring subject matter expert (SME) testing released per quarter are behind feature flags
- More than 75% of P1/P2 incidents related to new features per quarter are remediated without new deploys
- Mean time to repair (MTTR) reduced by 50% compared to baseline for issues related to new features by end of Q2 2026
Tasks
To achieve this objective, complete the following tasks:
- Define and document release strategies:
- Who does what when
- How to implement in the platform using targeting rules and release pipelines
- How to implement in code
- Define and document incident response strategies
- Integrate with software development lifecycle (SDLC) tooling
- Enable project management
- Enable communication
- Enable observability and application performance monitoring (APM)
- Enable governance and change control
LaunchDarkly usage is sustainable with minimal flag-related technical debt
Key Results
- More than 95% of active flags have a documented owner at any point in time
- More than 95% of active flags have an up-to-date description and tags and comply with naming conventions at any point in time
- Median time to archive feature flags after release is less than 12 weeks
- 100% of flags older than six months are reviewed quarterly
- Flag cleanup service level agreements (SLAs) are established and followed for 100% of projects
Tasks
To achieve this objective, complete the following tasks:
- Implement actionable dashboards to visualize flag status including new, active, stale, and launched
- Define flag archival and cleanup policies
- Implement code references integration
Archived OKRs
This section contains previous OKRs and their outcomes.
Projects and environments
Map your applications and deployment environments to LaunchDarkly projects and environments. The key principle: fewer is better.
Quick answers
How many projects do I need? Start with one project per product or tightly coupled set of services. Only create separate projects when teams need complete independence.
How many environments do I need? Most organizations need 2-3 environments: Development, Staging, and Production. Use targeting rules to handle multiple deployment environments within these.
Data model
LaunchDarkly organizes feature flags using a hierarchical structure:
- Projects contain feature flags and environments
- Feature flags exist at the project level in all environments of that project
- Environments contain the targeting rules for each flag
- SDKs connect to a single environment and receive the state of every flag for that environment
Applications exist as a top-level resource outside of projects.
Key concepts
Projects group related applications that need to coordinate releases:
- Share feature flags across all applications in the project
- Enable prerequisites and approvals for coordinated launches
- Define who can access and modify flags
Environments represent stages in your development lifecycle:
- Each has its own targeting rules and approval workflows
- SDKs connect to one environment at a time
- Use targeting rules to consolidate multiple deployment environments
Next steps
- Learn how to map applications to projects
- Learn how to map deployment environments to LaunchDarkly environments
Projects
Default recommendation: Start with one project per product. Create separate projects only when teams have no release dependencies.
Decision framework
Use this framework to determine whether to create a separate project:

Use an existing project when
Code executes in the same process, application, or web page:
- Frontend and backend for a single-page application
- Multiple services in a monolith
- Components within the same web application
Applications are tightly coupled:
- Frontend depends on specific backend API versions
- Services communicate via internal APIs with hard dependencies
- Components must be released in lockstep
Create a separate project when
Applications are loosely coupled:
- Services communicate via public APIs with version management
- Services can be released independently
- Applications serve different products or business units
No coordination is needed:
- Applications have no release dependencies
- Teams work independently with no shared releases
- Applications serve different customer segments
Key benefits of shared projects
Sharing projects for tightly coupled applications provides:
- Prerequisites for coordinated releases across frontend and backend
- Approvals for collaborative change management
- Single pane of glass for release visibility
Important: Each flag needs a clear owner, even in shared projects. Avoid shared responsibility for individual flags.
What projects contain
Projects scope these resources:
- Feature flags: Shared across all environments in the project
- Flag templates: Standardized flag configurations
- Release pipelines: Automated release workflows
- Context kinds: Custom context type definitions
- Permissions: Project-scoped roles control access
Coordinating releases across projects
When applications in separate projects need to coordinate releases, use these strategies:
- Request metadata: Pass API version or client metadata in requests for server-side coordination
- Delegated authority: Grant teams permission to manage flags in other projects
To learn more about coordination strategies, read Coordinating releases.
Corner cases
Global flags
Scenario: Many loosely coupled microservices in separate projects need to change behavior based on shared state.
Solution: Pass shared state as custom context attributes. Identify a single source of truth and propagate evaluation results from the owner of the state, rather than duplicating the state across projects.
Onboarding new teams
Scenario: A new team joins and needs to integrate with existing applications.
Process:
- Determine if the new team has dependencies on flags in existing projects
- If dependencies exist, include the team in the shared project
- If no dependencies exist, create a separate project
- Document the coordination strategy if projects are separate
Organizing flags within projects
Use views to organize flags by tags and metadata within projects. This provides flexible grouping without creating additional projects.
To learn more, read Views.
Environments
Key principle: Less is more. Most organizations need only 2-3 LaunchDarkly environments regardless of how many deployment environments they have.
Default recommendation
Start with these environments:
- Development: No approvals, rapid iteration
- Staging: Optional approvals, testing before production
- Production: Required approvals, critical environment
Use targeting rules with custom attributes to handle multiple deployment environments within each LaunchDarkly environment.
Why consolidate environments?
Each LaunchDarkly environment adds operational overhead:
- Maintain targeting rules across multiple environments
- Synchronize flag states manually
- Manage separate SDK credentials
- Review and approve changes in each environment
Consolidate deployment environments using targeting rules instead.
To learn more about syncing flag settings across environments, read Syncing flag settings across environments.
When to create separate environments
| Scenario | Create separate environment? | Solution |
|---|---|---|
| Per developer | No | Use individual user targeting or custom attributes |
| Per PR or branch | No | Pass PR number or branch name as custom attributes |
| Per tenant or customer | No | Use targeting rules with tenant context attributes |
| Per geographic region | No | Pass region as a custom attribute |
| Federal vs public cloud with compliance requirements | Yes | Compliance mandates complete isolation |
| Production vs development with different approval workflows | Yes | Different stakeholders and approval requirements |
| Different data residency requirements | Yes | Legal or regulatory requirements mandate separation |
Solutions for common scenarios
Per-developer testing
Instead of creating developer environments, use:
Individual user targeting: Create rules like If user equals "alice@example.com" then serve Available
Custom attributes: Pass developer, workstation, or branch_name as context attributes
Local overrides: Use SDK wrappers or test frameworks to mock flag values
Per-PR or ephemeral environments
Pass deployment metadata as custom attributes:
Context:
- pr_number: "1234"
- hostname: "pr-1234.staging.example.com"
- git_sha: "abc123"

Rule: If pr_number equals "1234" then serve Available
Multi-tenant deployments
Pass tenant information as context attributes:
Context:
- tenant_id: "acme"
- subscription_tier: "enterprise"

Rule: If tenant_id is one of ["acme", "initech"] then serve Available
Mapping process
Follow these steps:
- List deployment environments: Document where your application runs
- Group by compliance and approval requirements: Separate only when compliance mandates it or approval workflows differ significantly
- Define custom attributes: Document attributes needed to distinguish consolidated environments
- Mark production as critical: Enable required approvals and UI warnings
Mark production environments as critical to require approvals and prevent accidental changes. To learn more, read Critical environments.
Real-world examples
Multiple regions → Single production environment
You have: US-East, US-West, EU, APAC production deployments
Create: 1 Production environment
Pass context attribute: region: "eu"
Create rules when needed: If region equals "eu" then serve Available
Federal compliance → Separate environments
You have: Federal and Public clouds with different compliance requirements
Create: 2 environments (Federal, Public)
Why separate: Compliance mandates complete isolation
Within each: Use environment: "dev" attribute to distinguish dev/staging/prod deployments
Team-specific staging → Single staging environment
You have: Staging-TeamA, Staging-TeamB, Staging-TeamC
Create: 1 Staging environment
Pass context attribute: team: "team-a"
Create rules when needed: If team equals "team-a" then serve Available
Flag lifecycle management
Feature flags are temporary by nature unless explicitly designated as permanent. Without a lifecycle process, temporary flags accumulate as technical debt. This page covers how to classify flags, track their status, and clean them up.
Mark temporary vs. permanent at creation
Only temporary flags are subject to stale detection and archive-readiness checks. Classify flags at creation time:
| Temporary | Permanent |
|---|---|
| Release flags | Kill switches |
| Experiment flags | Operational flags |
| Migration flags | Entitlement flags |
Document the cleanup plan up front
Use the flag description to record:
- Purpose and expected behavior of each variation
- Responsible party or team
- Expected removal date
- Side effects or dependencies on other flags or services
Create the cleanup pull request at the same time as the feature pull request. The cleanup PR removes the flag checks and the dead code path, ready to merge once the feature is fully rolled out.
Include flag archival in your definition of done
A feature is not done when it ships. It is done when the temporary flag is archived.
Understand flag status signals
LaunchDarkly tracks flag status per environment:
| Status | Meaning |
|---|---|
| New | Created fewer than 7 days ago, never evaluated |
| Active | Being evaluated with multiple variations, recent configuration changes, or the flag is toggled off |
| Launched | Evaluated in the past 7 days, serving only one variation, no configuration changes in 7 days, and toggled on |
| Inactive | No evaluations for at least 7 days |
Understand cleanup stages
At the project level, LaunchDarkly surfaces two cleanup stages:
Ready for code removal: The flag meets all of these criteria:
- Temporary flag
- “Launched” status in all critical environments
- 30 or more days old
- Not a prerequisite for another flag
Ready to archive: The flag meets all of these criteria:
- Temporary flag
- “Inactive” status in all critical environments
- 30 or more days old
- No code references
- Not a prerequisite for another flag
Set up code references
The ld-find-code-refs utility scans your codebase and reports flag usage back to LaunchDarkly. It is available as a GitHub Action, GitLab CI job, or Docker container.
When all code references to a flag are removed and the scanning tool reruns, LaunchDarkly creates an extinction event confirming removal. A flag with no code references can then meet the criteria for the “Ready to archive” cleanup stage.
Customize lifecycle settings
In Project Settings > Lifecycle settings, configure the criteria for when LaunchDarkly considers a flag ready to archive:
- Minimum flag age
- How long targeting must be unchanged before code removal
- How long evaluations must be absent before archiving
- Whether the flag must not be a prerequisite
- Whether the flag must be serving one variation
- Whether the flag must be temporary
Build cleanup into your workflow
Flag cleanup works best when it is part of the team’s existing process, not a separate initiative. Choose a strategy that fits your team’s cadence:
Attach a cleanup ticket to every feature epic: When a team creates an epic for a flagged feature, add a cleanup ticket to the same epic. The ticket covers removing the flag checks, deleting the dead code path, and archiving the flag in LaunchDarkly. The epic is not closed until the cleanup ticket is done. Use flag links to connect the flag to the ticket in Jira, Trello, or other tracking systems.
Dedicate time for flag cleanup days: Schedule a quarterly cleanup day where teams review the “Needs code removal” and “Ready to archive” lists and work through the backlog. This works well for organizations where cleanup tickets tend to get deprioritized in favor of new work.
Assign cleanup to on-call or rotation: Some teams add flag cleanup to their on-call or bug rotation responsibilities. Engineers on rotation pick up flags from the cleanup list between other tasks.
Schedule regular reviews: Add a recurring calendar event for monthly or quarterly flag reviews. Walk through the “Needs code removal” and “Ready to archive” lists as a team during this session. Use the review to create cleanup tickets, reassign orphaned flags, and track progress against the previous review.
Use the Cleanup shortcut, custom shortcuts and filters
The built-in Cleanup shortcut appears in the left sidenav and surfaces flags that are ready to archive. You can also create additional ones to cover other flag types or combinations. Filter the Flags list by lifecycle stage, maintainer, or tag, then click the bolt icon above the list to save the filtered view as a new shortcut. Other ideas may be shortcuts for “Needs code removal” and “Ready to archive” so the lists are one click away when you need them.
Shortcuts are personal. Only you can see the shortcuts you create.
Use Views to organize flags by team
Views are different from shortcuts. A view is a project-level grouping of flags and segments that is visible to everyone in your account. Use views to organize flags by team or domain, for example “frontend,” “backend,” or “payments.” A flag can belong to more than one view.
Views also support access control. You can restrict access to a view so that only certain members or teams can see and modify the flags linked to it. This lets you scale to thousands of flags in a single project while keeping each team focused on the flags they own.
Use views alongside lifecycle management to assign flag ownership. When a team owns a view, they are responsible for the flags in it, including cleanup.
When to use feature flags
When you create a feature flag in LaunchDarkly, you create a decision point that changes an application’s behavior at runtime. Flags are a simple but powerful primitive that applies to many use cases. This page helps you decide whether a use case is a good fit for a feature flag.
Three questions to ask
Most good use cases fall into one of three buckets: dynamic, contextual, or delegated. If you answer “yes” to one or more of these questions, a flag is likely the right tool.
Dynamic
Ask: does this need to change at runtime?
Deploys are the slowest, riskiest way to change behavior. A flag lets you flip a decision in seconds, without a rebuild, a rollout, or a rollback. Use it in the middle of an incident, during a launch window, or in response to a customer issue. Scheduled and time-bound changes fit here too, because the mechanism is the same and only the timing is automated.
Good fits include:
- Release of new features or behavior
- Circuit breakers around flaky dependencies or expensive operations
- Rate limits and throttles tuned in response to load
- Operational toggles such as maintenance mode or read-only mode
- Scheduled launches that enable behavior at a set time
- Auto-expiring targeting such as internal access for 30 days
- Coordinated releases across services
Contextual
Ask: does this depend on who, where, or what?
Flag rules evaluate against a context, so the same line of code behaves differently for different users, tenants, regions, requests, or deployments. This is what makes flags different from an if statement on an environment variable.
Good fits include:
- Per-user or per-tenant entitlements and beta access
- Per-request routing such as A/B tests, shadow traffic, and canaries
- Per-deployment behavior distinguished by a runtime context attribute, such as blue/green or region-specific rollouts
- Progressive rollouts by percentage, cohort, or attribute
Delegated
Ask: does someone else need to control this?
A feature flag delegates control of behavior to any person or system without code changes. When you add a flag to a decision point, you gain:
- Control through the UI and API
- A full audit log and change history
- Governance with right-sized access control policies and approval workflows
Good fits include:
- Ops and on-call toggling a circuit breaker during an incident
- Support enabling a workaround for a specific customer
- Product turning on a feature for a launch partner
- Automation through triggers and the API, reacting to monitoring or business events
When not to use feature flags
Every flag has an ongoing cost: evaluation calls, a cleanup task, and one more piece of behavior someone must understand when reading the code. Skip the flag when one of these cases applies.
Handling secrets or credentials
Secrets create two distinct problems with the same answer: use a secrets manager.
- Storing secrets in flag values. Flag payloads deliver to every SDK that requests them and appear in analytics events. Anything in a variation is effectively public to your client fleet.
- Targeting on secrets or credentials. Attributes you target on travel with every evaluation event. A raw token or password in a context attribute is a leak waiting to happen. Hash it, or target on a derived claim instead.
Replacing configuration management
If a value never changes at runtime, it is configuration, not a flag. A good test is whether the application would fail to start without it. Database hostnames, API base URLs, and region identifiers belong in configuration. Flipping them with a flag means your app cannot boot until LaunchDarkly responds.
Flags can augment configuration by overriding a default or rolling out a new value gradually. They should not be the source of truth for values that gate startup.
Serving as a content management system or data store
Flags are a control plane, not a database. Variations ship in the SDK payload and count against evaluation and network budgets. Keep flag payloads lean:
- Keep variations small, such as a boolean, a string, or a short enum.
- Avoid large or deeply nested JSON. If the dynamic part is one field, make that one field the flag.
- Do not treat flags as a source of truth for data that belongs in a database, a CMS, or a config service.
Every minor code change
Not every commit or trivial change needs a flag. The overhead of flag creation, testing both paths, and cleanup outweighs the benefit for small, low-risk changes. Flag features as a whole, not individual lines of code. Reserve flags for:
- Significant features
- Experiments
- High-risk changes
- Operational controls such as kill switches
Next steps
After you confirm your use case is a good fit, determine how many flags you need.
SDK Preflight Checklist
Audience: Developers who are implementing the LaunchDarkly SDKs
Init and Config
- SDK is initialized once as a singleton early in the application’s lifecycle
- Application does not block indefinitely for initialization
- SDK configuration integrated with existing configuration/secrets management
- Bootstrapping strategy defined and implemented
Client-side SDKs
Browser SDKs
Mobile SDKs
Serverless functions
Using Flags
- Define context kinds and attributes
- Define and document fallback strategy
- Use
variation/variationDetail, notallFlags/allFlagsStatefor evaluation - Flags are evaluated only where a change of behavior is exposed
- The behavior changes are encapsulated and well-scoped
- Subscribe to flag changes
Init and Config
Baseline Recommendations
This table shows baseline recommendations for SDK initialization and configuration:
| Area | Recommendation | Notes |
|---|---|---|
| Client-side init timeout | 100–500 ms | Don’t block UI. Render with fallbacks or bootstrap. |
| Server-side init timeout | 1–5 s | Keep short for startup. Continue with fallback values after timeout. |
| Private attributes | Configured | Redact PII. Consider allAttributesPrivate where appropriate. |
| Javascript SDK Bootstrapping | localStorage | Reuse cached values between sessions. |
SDK is initialized once as a singleton early in the application’s lifecycle
Applies to: All SDKs
Prevent duplicate connections, conserve resources, and ensure consistent caching/telemetry.
Implementation
- MUST Expose exactly one
ldClientper process/tab via a shared module/DI container (root provider in React). - SHOULD Make init idempotent: reuse the existing client if already created.
- SHOULD Close the client cleanly on shutdown. In serverless, create the client outside the handler for container reuse.
- NICE-TO-HAVE Emit a single startup log summarizing effective LD config (redacted).
Validation
- Pass if metrics/inspector show one stream connection per process/tab.
- Pass if event volume and resource usage do not scale with repeated imports/renders.
Application does not block indefinitely for initialization
Applies to: All SDKs
A LaunchDarkly SDK is initialized when it connects to the service and is ready to evaluate flags. If variation is called before initialization, the SDK returns the fallback value you provide. Do not block your app indefinitely while waiting for initialization. The SDK continues connecting in the background. Calls to variation always return the most recent flag value.
Implementation
- MUST Set an initialization timeout
- Client-side: 100–500 ms.
- Server-side: 1–5 s.
- SHOULD Race initialization against a timer if using an SDK that lacks a native timeout parameter.
- MAY Render/serve using bootstrapped or fallback values, then update when flags are ready.
- MAY Subscribe to change events to proactively respond to flag updates.
- MAY Configure a persistent data store to avoid fallback values in the event that the SDK is unable to connect to LaunchDarkly services.
Note: For client-side SDKs, this guidance also applies to
identifycalls. See Implementing Identify Timeouts for examples.
Validation
- Pass if with endpoints blocked the app renders using fallbacks or bootstrapped values within the configured timeout.
- Pass if restoring connectivity updates values without a restart.
How to emulate:
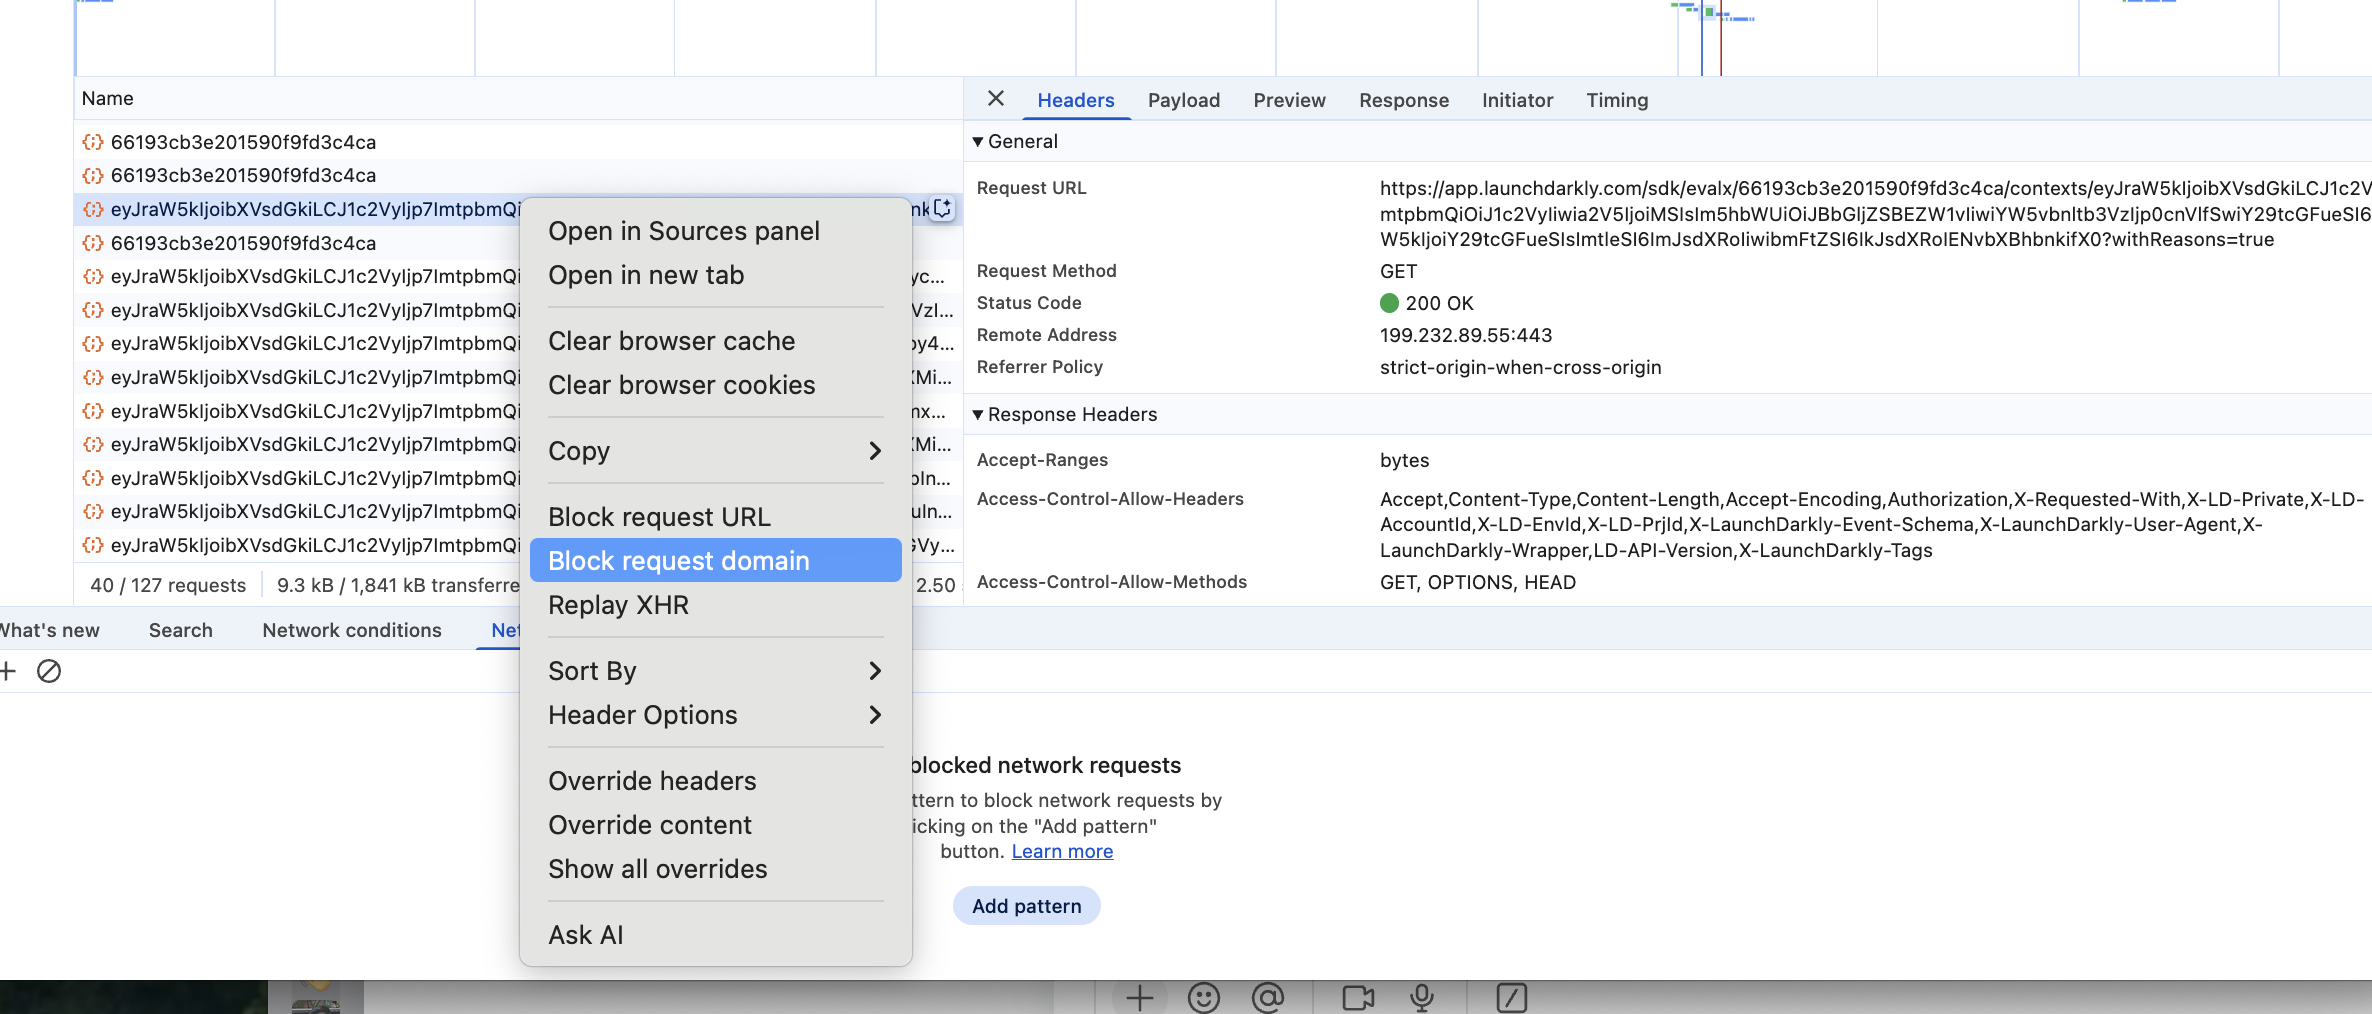
- Point streaming/base/polling URIs to an invalid host
- Block the SDK domains in the container or host running the tests: stream.launchdarkly.com, sdk.launchdarkly.com, clientsdk.launchdarkly.com, app.launchdarkly.com
- In browsers, block
clientstream.launchdarkly.com,clientsdk.launchdarkly.com, and/orapp.launchdarkly.comin DevTools.
For implementation strategies, read the Emulating LaunchDarkly Downtime section in the cookbook.
If you use the Relay Proxy, read Emulating Relay Proxy issues for cold and warm relay test scenarios.
SDK configuration integrated with existing configuration/secrets management
Applies to: All SDKs
Use your existing configuration pipeline so LD settings are centrally managed and consistent across environments. Avoid requiring code changes setting common SDK options.
Implementation
- MUST Load SDK credentials from existing configuration/secrets management system.
- MUST NOT Expose the server-side SDK Key to client applications
- SHOULD Use configuration management system to set common SDK configuration options such as:
- HTTP Proxy settings
- Log verbosity
- Enabling/disabling events in integration testing or load testing environments
- Private attribute
Validation
- Pass if rotating the SDK key in the vault results in successful rollout and the old key is revoked.
- Pass if a repository scan finds no SDK keys or environment IDs committed.
- Pass if startup logs (redacted) show expected config per environment and egress connectivity succeeds with 200/OK or open stream.
Bootstrapping strategy defined and implemented
Applies to: JS Client-Side SDK in browsers, React SDK, Vue SDK
Prevent UI flicker by rendering with known values before the SDK connects and retrieves flags.
Implementation
- SHOULD Enable
bootstrap: 'localStorage'for SPAs/PWAs to reuse cached values between sessions. - SHOULD For SSR or static HTML, embed a server-generated flags JSON and pass to the client SDK at init.
- MUST Document which strategy each app uses and when caches expire.
- SHOULD Reconcile bootstrapped values with live updates and re-render when differences appear.
Validation
- Pass if under offline/slow network the first paint uses bootstrapped values with no visible flash of wrong content.
- Pass if clearing storage falls back to safe defaults and live updates correct the UI on reconnect.
- Pass if evaluations are recorded after successful initialization.
Client-side SDKs
The following items apply to all client-side and mobile SDKs.
Application does not block on identify
Calls to identify return a promise that resolves when flags for the new context have been retrieved. In many applications, using the existing flags is acceptable and preferable to blocking in a situation where flags cannot be retrieved.
Implementation
- MAY Continue without waiting for the promise to resolve
- SHOULD Implement a timeout when identify is called
For implementation examples, see Implementing Identify Timeouts in the cookbook.
Validation
- Pass The application is able to function after calling identify while the SDK domains are blocked: clientsdk.launchdarkly.com or app.launchdarkly.com
Application does not rapidly call identify
In mobile and client-side SDKs, identify results in a network call to the evaluation endpoint. Make calls to identify sparingly. For example:
Good times to call identify:
- During a state transition from unauthenticated to authenticated
- When an attribute of a context changes
- When switching users
Bad times to call identify:
- To implement a
currentTimeattribute in your context that updates every second - Implementing contexts that appear multiple times in a page such as per-product
Browser SDKs
The following items apply only to the following SDKs:
- Javascript Client SDK
- React SDK
- Vue SDK
Send events only for variation
Avoid sending spurious events when allFlags is called. Sending evaluation events for allFlags will cause flags to never report as stale and may cause inaccuracies in guarded rollouts and experiments with false impressions.
Implementation
- MUST Set
sendEventsOnlyForVariation: truein the SDK options
Validation
- Pass calls to allFlags do not generate evaluation/summary events
Bootstrapping strategy defined and implemented
Prevent UI flicker by rendering with known values before the SDK connects and retrieves flags. To learn more about bootstrapping, read Bootstrapping.
Implementation
- SHOULD Enable
bootstrap: 'localStorage'or bootstrap from a server-side-SDK
Validation
- Pass if under offline/slow network the first paint uses bootstrapped values with no visible flash of wrong content.
Mobile SDKs
The following items apply to mobile SDKs.
Configure application identifier
The Mobile SDKs automatically capture device and application metadata. To learn more about automatic environment attributes, read Automatic Environment Attributes.
We recommend that you set the application identifier to a different value for each separately distributed software binary.
For example, suppose you have two mobile apps, one for iOS and one for Android. If you set the application identifier to “example-app” and the version to “1.0” in both SDKs, then when you create a flag targeting rule based only on application information, the flag will target both the iOS and Android application. This may not be what you intend.
We recommend using different application identifiers in this situation, for instance, by setting “example-app-ios” and “example-app-android” in your application metadata configuration.
Implementation
- MUST Configure the application identifier in the SDK configuration to a unique value for each platform
You can override the application identifier using the application metadata options when configuring your SDK. To learn how to set a custom application identifier, read Application Metadata.
Validation
- Pass Separate applications appear in the LaunchDarkly dashboard for each platform, for example android, ios, etc.
Examples
Apple iOS/iPadOS/WatchOS
// Fetch the current CFBundleIdentifier
let defaultIdentifier = Bundle.main.object(forInfoDictionaryKey: "CFBundleIdentifier") as? String ?? "UnknownIdentifier"

// Create the ApplicationInfo object
var appInfo = ApplicationInfo()

// Override applicationIdentifier to include the -apple suffix
appInfo.applicationIdentifier("\(defaultIdentifier)-apple")

// Create an LDConfig object and set the applicationInfo property
let ldConfig = LDConfig(mobileKey: "your-mobile-key")
ldConfig.applicationInfo = appInfo
var config = LDConfig(mobileKey: mobileKey, autoEnvAttributes: .enabled)
config.applicationInfo = applicationInfo
Android
import com.launchdarkly.sdk.android.Components;
import com.launchdarkly.sdk.android.integrations.ApplicationInfoBuilder;
import com.launchdarkly.sdk.android.LDConfig;

// Fetch the current package name (application identifier)
String defaultPackageName = context.getPackageName(); // replace 'context' with your Context object

// Create the ApplicationInfoBuilder object
ApplicationInfoBuilder appInfoBuilder = Components.applicationInfo();

// Override applicationIdentifier to include the "-android" suffix
appInfoBuilder.applicationId(defaultPackageName + "-android");

// Build the ApplicationInfo object
ApplicationInfo appInfo = appInfoBuilder.createApplicationInfo();

// Create an LDConfig object and set the applicationInfo property
LDConfig ldConfig = new LDConfig.Builder()
        .mobileKey("your-mobile-key")
        .applicationInfo(appInfoBuilder) // Pass the ApplicationInfoBuilder here
        .build();
Serverless functions
The following applies to SDKs running in serverless environments such as AWS Lambda, Azure Functions, and Google Cloud Functions.
Initialize the SDK outside of the handler
Many serverless environments re-use execution environments for many invocations of the same function. This means that you must initialize the SDK outside of the handler to avoid duplicate connections and resource usage.
Implementation
- MUST Initialize the SDK outside of the function handler
- MUST NOT Close the SDK in the handler
Leverage LD Relay to reduce initialization latency
Serverless functions spawn many instances in order to handle concurrent requests. LD Relay can be deployed in order to reduce outgoing network connections, reduce outbound traffic and reduce initialization latency.
Implementation
- SHOULD Deploy LD Relay in the same region as the serverless function
- SHOULD Configure LD Relay as an event forwarder and configure the SDK’s event URI to point to LD Relay
- SHOULD Configure the SDK in proxy mode or daemon mode instead of connecting directly to LaunchDarkly
- MAY Call flush at the end of invocation to ensure all events are sent
- MAY Call flush/close when the runtime is being permanently terminated in environments that support this signal. Lambda does provide this signal to functions themselves, only extensions.
Consider daemon mode if you have a particularly large initialization payload and only need a couple of flags for the function.
Using Flags
Define context kinds and attributes
Choose context kinds/attributes that enable safe targeting, deterministic rollouts, and cross-service alignment.
Implementation
- MUST Define context kinds, for example
user,organization, ordevice. Use multi-contexts when both person and account matter. - MUST NOT Derive context keys from PII, secrets or other sensitive data.
- MUST Mark sensitive attributes as private. Context Keys cannot be private
- SHOULD Use keys that are unique, opaque, and high-entropy
- SHOULD Document the source/type for all attributes. Normalize formats, for example ISO country codes.
- SHOULD Provide shared mapping utilities to transform domain objects → LaunchDarkly contexts consistently across services.
- SHOULD Avoid targeting on sensitive information or secrets.
Validation
- Pass if a 50/50 rollout yields consistent allocations across services for the same context.
- Pass if sample contexts evaluated in a harness match expected targets/segments.
- Pass if a PII audit finds no PII in keys and private attributes are redacted in events.
- Pass if applications create/define contexts consistently across services
Define and document fallback strategy
Every flag must specify a safe fallback value that is used when the flag is unavailable. For more information on fallback values, read Maintaining fallback values.
Implementation
- MUST Pass the fallback value as the last argument to
variation()/variationDetail()with correct types. - MUST Define a strategy for determining when to audit and update fallback values.
- MUST Implement automated tests to validate the application is able to function in an at most degraded state when flags are unavailable.
Validation
- Pass if blocking SDK network causes the application to use the fallback path safely with no critical errors.
Use variation/variationDetail, not allFlags/allFlagsState for evaluation
Direct evaluation emits accurate usage events required for flag statuses, experiments, and rollout tracking.
Implementation
- MUST Call
variation()/variationDetail()at the decision point - MUST NOT Implement an additional layer of caching for calls to variation that would prevent accurate flag evaluation telemetry from being generated
Validation
- Pass accurate flag evaluation data is shown in the Flag Monitoring dashboard
Flags are evaluated only where a change of behavior is exposed
Generate evaluation events only when a change in behavior is exposed to the end user. This ensures that features such as experimentation and guarded rollouts function correctly.
Implementation
- MUST Evaluate flags only when the value is used
- SHOULD Evaluate flags as close to the decision point as possible
The behavior changes are encapsulated and well-scoped
Isolate new vs. old logic to ease future cleanup. A rule of thumb is never store the result of a boolean flags in a variable. This ensures that the behavior impacted by the flag is fully contained within the branches of the if statement.
Implementation
- SHOULD Place new/old logic in separate functions/components; avoid mixed branches.
- SHOULD Evaluate the flag inside the decision point (
if) to simplify later removal.
// Example: evaluation scoped to the component
export function CheckoutPage() {
  if (ldClient.variation('enable-new-checkout', false)) {
    return <NewCheckoutComponent />;
  }
  return <LegacyCheckoutComponent />;
}
Subscribe to flag changes
In applications with a UI or server-side use-cases where you need to respond to a flag change, use the update/change events to update the state of the application.
Implementation
- SHOULD Use the subscription mechanism provided by the SDK to respond to updates. To learn more about subscribing to flag changes, read Subscribing to flag changes.
- SHOULD Unregister temporary handlers to avoid memory leaks.
Validation
- Pass if the application responds to flag changes
Contexts
Contexts are the foundation of feature flag targeting in LaunchDarkly. Understanding how to define and use contexts effectively is critical for successful feature flag implementation.
What are contexts
Contexts represent the entities you want to target with feature flags. A context can be a user, session, device, application, request, or any other entity relevant to your use case.
Each context consists of:
- Key: A unique identifier for the context
- Attributes: Additional data used for targeting and rollouts
Targeting rules evaluate against one or more contexts to determine which variation of a feature flag to serve.
Outcomes
By understanding contexts, you will:
- Know more about contexts, what information to pass, and how to organize it
- Understand the best practices for passing data to the LaunchDarkly SDK
- Be able to successfully pass information to the SDK to be leveraged for feature flags
Topics
This section covers:
- Context fundamentals: Learn about keys, attributes, and meta attributes
- Client vs server SDKs: Understand how context handling differs between SDK types
- Choosing keys and attributes: Best practices for selecting identifiers and attributes
- Automatic attributes: Platform-provided context data
- Best practices: Do’s and don’ts for context implementation
- Context types: Detailed documentation of each context type used in your organization
Context fundamentals
Contexts are composed of three core elements: a unique key, custom attributes, and optional meta attributes.
Key
A string that uniquely identifies a context. The key:
- May represent an individual user, session, device, or any other entity you wish to target
- Must be unique for each context instance
- Cannot be marked as private
- Is used for individual targeting, experimentation, and as the default value for rollouts
Attributes
Each attribute can have one or more values. You can define custom attributes with any additional information you wish to target on.
Supported attribute types
Attributes can contain one or more values of any of these supported types:
- String
- Boolean
- Number
- Semantic Version (string format)
- Date (RFC3339 or Unix Timestamp in milliseconds)
Some operations within rule clauses such as “less than” and “greater than” only support specific types.
Nested attributes
You can target on nested objects in contexts using a JSON path notation. For example, to target on an iOS version within a nested device object, use /os/ios/version as the attribute path.
Meta attributes
Meta attributes are reserved by LaunchDarkly and may have special meaning or usage in the platform.
Key meta attributes
Key meta attributes include:
| Name | Description |
|---|---|
| key | Required. Cannot be private. Used for individual targeting, experimentation and the default value for rollouts |
| anonymous | When true, the context will be hidden from the dashboard and will not appear in autocomplete |
| name | Used in the contexts dashboard and autocomplete search |
| _meta/privateAttributes | List of attribute names whose values will be redacted from events sent to LaunchDarkly |
For a complete list, see Built-in and custom attributes in the LaunchDarkly documentation.
Code examples
Server SDK
In server-side SDKs, pass the context on every variation call:
ldclient.variation("release-widget", context, fallback);
Client SDK
In client-side SDKs, provide context at initialization and update via identify():
const ldclient = LaunchDarkly.initialize(clientId, context);

// Later, update the context
ldclient.identify(newContext);
Usage and billing
Usage is based on the number of unique context keys seen for your primary (most used) context, deduplicated across your entire account.
Limits are not hard lines. Overages do not impact the evaluation of feature flags in your application.
To learn more, read Usage metrics.
Client SDK vs server SDK
Context handling differs significantly between client-side and server-side SDKs due to their different operational models.
Context handling comparison
Client-side SDKs
Client-side SDKs handle one active user or session:
- Provide context at initialization and update via
identify() - SDK fetches variations for that specific context and caches them
- When calling
variation(), no need to provide context anymore - Evaluations happen remotely via an evaluation endpoint
Server-side SDKs
Server-side SDKs evaluate for many users:
- No context required at initialization
- SDK downloads all flag rules at startup
- Pass context on every
variation()call:variation(flag, context, fallback) - SDK calculates variations against locally cached rules
Evaluation flow
Server-side evaluation
Application Request → Create Context → Call variation(flag, context, fallback)
                                     ↓
                        SDK evaluates locally using cached rules
                                     ↓
                                Return variation
Client-side evaluation
Page Load → Initialize SDK with context → SDK fetches user's variations
                                        ↓
                              Cache variations locally
                                        ↓
                         Call variation(flag) // No context needed
When to use each
Use server-side SDKs when
- Evaluating flags for multiple different users or entities
- Running backend services or APIs
- Need to keep flag rules private
- Evaluating flags in high-security contexts
Use client-side SDKs when
- Evaluating flags for a single active session
- Running in browsers or mobile apps
- Need real-time flag updates for the current user
- Implementing user-specific feature rollouts
Updating contexts
Client-side context updates
Use identify() to update the context:
const ldclient = LaunchDarkly.initialize(clientId, context);

// User logs in
ldclient.identify({
  kind: "user",
  key: "user-123",
  name: "Jane Doe",
  email: "jane@example.com"
});
The SDK will fetch new variations for the updated context.
Server-side context changes
Simply pass a different context to variation():
// Evaluate for user 1
const variation1 = ldclient.variation("flag-key", userContext1, false);

// Evaluate for user 2
const variation2 = ldclient.variation("flag-key", userContext2, false);
No SDK reconfiguration needed.
Performance considerations
Client-side SDKs
- Initial page load includes SDK initialization time
- Subsequent evaluations are instant (served from cache)
identify()calls require network round-trip- Consider bootstrapping to eliminate initialization delay
Server-side SDKs
- Initialization happens once at application startup
- All evaluations are local and extremely fast
- No per-request network overhead
- Consider persistent stores for daemon mode deployments
Choosing keys and attributes
Selecting appropriate keys and attributes is critical for effective feature flag targeting and progressive rollouts.
Choosing a key
A well-chosen key balances consistency and risk distribution during progressive rollouts.
Key characteristics
Unique: Static 1:1 mapping to a context
Each context instance must have a unique key that always identifies the same entity.
Opaque: Non-sequential, not derived from sensitive information
Keys should not be predictable or contain sensitive data like email addresses or social security numbers.
High cardinality: Many unique values will be seen by the application
Ensure the key space is large enough to support meaningful percentage rollouts. Low cardinality (like “true”/“false”) prevents fine-grained rollout control.
Rollout consistency
The key is used as the default attribute for percentage rollouts. This applies to any attribute you plan on using for rollouts.
Example: Session consistency
To maintain consistency pre and post-login, use a session context instead of a user context for rollouts:
// Session context persists across authentication
const sessionContext = {
  kind: "session",
  key: generateSessionId(), // UUID stored in session storage
  anonymous: true
};
Configure rollouts by session key to ensure users see consistent behavior whether logged in or not.
Defining attributes
Create attributes that support your targeting and rollout use cases.
Do
Create multiple identifiers for different contexts and consistency boundaries
Define separate context kinds for user, session, device, etc., each with appropriate attributes:
const multiContext = {
  kind: "multi",
  user: {
    key: "user-123",
    name: "Jane Doe",
    createdAt: 1640000000000
  },
  session: {
    key: "session-abc",
    anonymous: true,
    startedAt: Date.now()
  }
};
Create attributes that support targeting and rollout use-cases
Include attributes you’ll actually use for targeting:
const userContext = {
  kind: "user",
  key: "user-123",
  email: "jane@example.com",
  plan: "enterprise",
  region: "us-west",
  betaTester: true
};
Define private attributes when targeting on sensitive information
Mark sensitive attributes as private to prevent them from being sent to LaunchDarkly:
const userContext = {
  kind: "user",
  key: "user-123",
  email: "jane@example.com",
  _meta: {
    privateAttributes: ["email", "ipAddress"]
  }
};
Do not
Use any values derived from PII or sensitive values as keys
Never use email addresses, phone numbers, or other PII directly as keys:
// Bad
const context = { kind: "user", key: "jane@example.com" };

// Good
const context = {
  kind: "user",
  key: "user-123",
  email: "jane@example.com",
  _meta: { privateAttributes: ["email"] }
};
Rapidly change attributes in client-side SDKs
Avoid using current timestamp or frequently changing values as attributes:
// Bad - causes excessive events
const context = {
  kind: "user",
  key: "user-123",
  lastActivity: Date.now() // Changes every render
};

// Good - use stable attributes
const context = {
  kind: "user",
  key: "user-123",
  sessionStart: sessionStartTime // Stable for session
};
Mix value types or sources for an attribute within the same project
Keep attribute types consistent across your codebase:
// Bad - inconsistent types
// iOS app sends: { plan: "enterprise" }
// Web app sends: { plan: 3 }

// Good - consistent types
// All apps send: { plan: "enterprise" }
Attribute naming conventions
Follow these conventions for consistency:
- Use camelCase for attribute names:
userId,planType,isActivated - Use clear, descriptive names: prefer
accountCreationDateoveracd - Prefix boolean attributes with
is,has, orcan:isActive,hasAccess,canEdit - Use standard date formats: RFC3339 strings or Unix timestamps in milliseconds
Multi-kind contexts
For complex targeting scenarios, use multi-kind contexts to evaluate against multiple entities simultaneously:
const multiContext = {
  kind: "multi",
  user: {
    key: "user-123",
    email: "jane@example.com",
    plan: "enterprise"
  },
  organization: {
    key: "org-456",
    name: "Acme Corp",
    industry: "technology"
  },
  device: {
    key: "device-789",
    platform: "iOS",
    model: "iPhone 14"
  }
};
This allows targeting rules like “serve to users in enterprise plan OR organizations in technology industry”.
Automatic environment attributes
Some SDKs automatically collect environment metadata and make it available as context attributes. This reduces boilerplate and provides consistent targeting capabilities.
ld_application
Automatically collected application metadata available in mobile and client-side SDKs.
Attributes
The ld_application context includes these attributes:
| Name | Description |
|---|---|
| key | Automatically generated by the SDK |
| id | Bundle Identifier |
| locale | Locale of the device, in IETF BCP 47 Language Tag format |
| name | Human-friendly name of the application |
| version | Version of the application used for update comparison |
| versionName | Human-friendly name of the version |
Use cases
Disable features on known bad builds
Target specific application versions to disable features on buggy releases:
IF ld_application version is one of 1.2.3, 1.2.4
THEN serve "Off"
This is valuable for mobile applications or heavily cached SPAs. Users may not update immediately.
Application-level configuration and customization
Serve different configurations based on application bundle ID or locale:
IF ld_application locale is one of es, es-MX, es-ES
THEN serve spanish-config
Determine when to sunset legacy behavior
Export context metrics to understand what application versions are still in use:
IF ld_application version < 2.0.0
THEN serve legacy-behavior
ELSE serve new-behavior
Use LaunchDarkly’s Data Export to analyze version distribution. This helps you decide when to drop support for older versions.
ld_device
Information about the platform, operating system, and device automatically collected by mobile SDKs.
Attributes
The ld_device context includes these attributes:
| Name | Description |
|---|---|
| key | Automatically generated by the SDK |
| manufacturer | Manufacturer of the device (Apple, Samsung, etc.) |
| model | Model of the device (iPhone, iPad, Galaxy S21) |
| /os | Operating system of the device. Includes properties for family, name, and version |
Use cases
Roll out by platform to reduce platform-specific issues
Start rollouts on platforms where you have stronger test coverage:
Rollout 10% by ld_device key
  IF ld_device /os/family is iOS
Release to tier 1 supported platforms before testing on lower tiers
Prioritize your primary platforms:
IF ld_device manufacturer is one of Apple, Samsung
THEN serve 20% rollout
ELSE serve 5% rollout
Platform-specific feature or hardware targeting
Target features that require specific hardware capabilities:
IF ld_device model is one of iPhone 14, iPhone 15
  AND custom-attribute has-nfc is true
THEN serve nfc-payment-feature
Operating system targeting
Access nested OS information using JSON paths:
IF ld_device /os/name is Android
  AND ld_device /os/version >= 13
THEN serve android-13-features
To learn more, read the LaunchDarkly documentation on automatic environment attributes.
Best practices
Guidelines for implementing contexts effectively and avoiding common pitfalls.
Context design
Do
Create attributes that support targeting and rollout use cases
Only add attributes you’ll actually use for targeting or analytics:
// Good - actionable attributes
const context = {
  kind: "user",
  key: "user-123",
  plan: "enterprise",      // For entitlement targeting
  region: "us-west",       // For regional rollouts
  betaTester: true         // For beta feature access
};

// Bad - unused attributes
const context = {
  kind: "user",
  key: "user-123",
  favoriteColor: "blue",   // Not used for targeting
  shoeSize: 10             // Not used for targeting
};
Create multiple identifiers for different contexts and consistency boundaries
Define separate contexts for user, session, device, etc.:
const multiContext = {
  kind: "multi",
  user: {
    key: "user-123",
    plan: "enterprise"
  },
  session: {
    key: "session-abc",
    anonymous: true
  },
  device: {
    key: "device-789",
    platform: "iOS"
  }
};
Define private attributes when targeting on sensitive information
Mark any PII or sensitive data as private:
const context = {
  kind: "user",
  key: "user-123",
  email: "jane@example.com",
  ipAddress: "192.168.1.1",
  _meta: {
    privateAttributes: ["email", "ipAddress"]
  }
};
Do not
Use values derived from PII or sensitive values as keys
Never use email, phone numbers, or other PII directly as keys:
// Bad - PII as key
const context = { kind: "user", key: "jane@example.com" };

// Good - opaque key, PII as private attribute
const context = {
  kind: "user",
  key: "user-123",
  email: "jane@example.com",
  _meta: { privateAttributes: ["email"] }
};
Rapidly change attributes in client-side SDKs
Avoid timestamp or frequently changing attributes:
// Bad - changes every render
const context = {
  kind: "user",
  key: "user-123",
  currentTime: Date.now()
};

// Good - stable attributes
const context = {
  kind: "user",
  key: "user-123",
  sessionStartTime: sessionStart
};
Mix value types or sources for an attribute within the same project
Keep attribute types consistent:
// Bad - inconsistent types across applications
// iOS: { accountType: "premium" }
// Web: { accountType: 1 }

// Good - consistent types
// All apps: { accountType: "premium" }
Flag evaluation
Do
Call variation/variationDetail where the flag will be used
Evaluate flags at the point of use:
// Good - evaluate where needed
function renderButton() {
  const showNewButton = ldClient.variation("new-button-ui", context, false);
  return showNewButton ? <NewButton /> : <OldButton />;
}

// Bad - evaluate unnecessarily
function loadPage() {
  const allFlags = ldClient.allFlags(); // Evaluates all flags
  // Only use one flag
  return allFlags['new-button-ui'];
}
Maintain fallback values that allow the application to function
Choose safe fallback values:
// Good - safe fallbacks
const maxRetries = ldClient.variation("max-retries", context, 3);
const featureEnabled = ldClient.variation("new-feature", context, false);

// Bad - no fallback or unsafe fallback
const maxRetries = ldClient.variation("max-retries", context); // undefined
const criticalFeature = ldClient.variation("payment-enabled", context, true); // unsafe default
Write code with cleanup in mind
Minimize flag usage to simplify cleanup:
// Good - single evaluation point
function PaymentForm() {
  const useNewPaymentFlow = ldClient.variation("new-payment-flow", context, false);
  return useNewPaymentFlow ? <NewPaymentForm /> : <OldPaymentForm />;
}

// Bad - multiple evaluation points
function PaymentForm() {
  if (ldClient.variation("new-payment-flow", context, false)) {
    // New flow code
  }
  const buttonText = ldClient.variation("new-payment-flow", context, false)
    ? "Pay Now"
    : "Submit Payment";
  // More evaluations...
}
Do not
Use allFlags/allFlagsState for use cases other than passing values to another application
Only use allFlags when absolutely necessary:
// Bad - unnecessary allFlags call
const flags = ldClient.allFlags();
if (flags['feature-x']) {
  // Use feature
}

// Good - targeted evaluation
if (ldClient.variation("feature-x", context, false)) {
  // Use feature
}

// Good - passing to another application
const flagState = ldClient.allFlagsState(context);
bootstrapFrontend(flagState);
Call variation/variationDetail without using the flag value
Don’t evaluate flags you won’t use:
// Bad - unused evaluation
ldClient.variation("feature-flag", context, false);
// Flag value never used

// Good - use the value
const enabled = ldClient.variation("feature-flag", context, false);
if (enabled) {
  enableFeature();
}
Use flags without a plan
Have a clear purpose and cleanup plan:
// Bad - unclear purpose
const flag1 = ldClient.variation("temp-flag", context, false);
const flag2 = ldClient.variation("test-something", context, false);

// Good - clear purpose and naming
const useNewCheckoutFlow = ldClient.variation(
  "checkout-flow-v2-rollout", // Clear name
  context,
  false // Safe fallback to old flow
);
// TODO: Remove this flag after 100% rollout - JIRA-123
Code references
Add ld-find-code-refs to your CI pipeline to track flag usage:
# .github/workflows/launchdarkly-code-refs.yml
name: LaunchDarkly Code References
on: push

jobs:
  find-code-refs:
    runs-on: ubuntu-latest
    steps:
      - uses: actions/checkout@v3
      - name: LaunchDarkly Code References
        uses: launchdarkly/find-code-references@v2
        with:
          project-key: my-project
          access-token: ${{ secrets.LD_ACCESS_TOKEN }}
Code references enable you to:
- Identify where flags are used in your codebase
- Understand the impact before making flag changes
- Find and remove flags when they’re no longer needed
- Manage technical debt associated with feature flags
Flag planning
Make flag planning part of feature design. Before creating a flag, ask:
- Is this flag temporary or permanent?
- Who is responsible for maintaining the targeting rules in each environment?
- How will this flag be targeted? (By user? By session? By organization?)
- Does this feature have any dependencies? (Other flags? External services?)
- What is the cleanup plan? (When can this flag be removed?)
Minimize flag reach
Use flags in as few places as possible:
// Good - single evaluation point
function App() {
  const useNewUI = ldClient.variation("new-ui", context, false);
  return <AppLayout newUI={useNewUI} />;
}

// Bad - evaluated throughout the application
function Header() {
  if (ldClient.variation("new-ui", context, false)) { /* ... */ }
}
function Sidebar() {
  if (ldClient.variation("new-ui", context, false)) { /* ... */ }
}
function Footer() {
  if (ldClient.variation("new-ui", context, false)) { /* ... */ }
}
A flag should have a single, well-defined scope. For larger features, consider breaking them into multiple flags using prerequisites.
Failure mode resilience
Connection loss
If the connection to LaunchDarkly is lost:
Client-side SDKs: Context cannot be updated via identify() until connectivity is re-established. Values from the in-memory cache will be served.
Server-side SDKs: Evaluation for any context can still take place using the in-memory feature store.
Initialization failure
If the SDK is unable to initialize:
Both SDK types: Locally cached values will be served if available, otherwise fallback values will be used.
Always provide sensible fallback values that allow your application to function:
// Good - safe degradation
const featureEnabled = ldClient.variation("new-feature", context, false);

// Bad - application breaks if SDK fails
const criticalConfig = ldClient.variation("api-endpoint", context); // undefined
Context types
This section documents the context types used in your organization. Each context type represents a different entity you can target with feature flags.
Available context types
Session
Unauthenticated user sessions that maintain consistency pre and post-login. Use for anonymous user tracking and experimentation.
User
Authenticated users with consistent experience across devices. Use for user-level entitlements and cross-device feature rollouts.
Build
Build metadata for version-aware feature management across applications and services. Use for build-specific targeting and microservice coordination.
Browser
Browser and platform detection for web applications. Use for browser-specific rollouts and progressive enhancement.
Request
Request or transaction-specific metadata for API services. Use for API versioning and endpoint-specific behavior.
Multi-kind contexts
You can combine multiple context types in a single evaluation for sophisticated targeting:
const multiContext = {
  kind: "multi",
  session: {
    key: sessionId,
    anonymous: true
  },
  user: {
    key: userId,
    name: userName
  },
  build: {
    key: "api-orders-2.5.0",
    version: "2.5.0"
  }
};
This enables targeting rules like “roll out to 20% of sessions OR all enterprise users on build version 2.5.0+”.
Adding custom context types
To document a new context type for your organization:
- Create a new markdown file in this directory named after your context kind
- Follow the table structure from existing context types
- Include implementation examples
- Document specific use cases for your context
- Add the new context type to the navigation in
SUMMARY.md
Session
Unauthenticated user sessions that maintain consistency pre and post-login.
Session contexts use these attributes:
| Attribute | Type | Source | Example | Private | Notes |
|---|---|---|---|---|---|
| key | String | Local/Session Storage | 7D97F0D3-B18C-4305-B110-0317BDB745DC | FALSE | Random UUID stored in session-bound storage |
| anonymous | Boolean | Static: true | true | FALSE | Always true for session contexts |
| startedAt | Number | Current time at session creation | 1640995200000 | FALSE | Unix timestamp in milliseconds |
Implementation example
Implement a session context like this:
const sessionContext = {
  kind: "session",
  key: getOrCreateSessionId(),
  anonymous: true,
  startedAt: Date.now()
};

function getOrCreateSessionId() {
  let sessionId = sessionStorage.getItem('ld-session-id');
  if (!sessionId) {
    sessionId = crypto.randomUUID();
    sessionStorage.setItem('ld-session-id', sessionId);
  }
  return sessionId;
}
Use cases
Progressive release for unauthenticated users
Use this when you roll out features to users before they log in. This ensures anonymous visitors see new features without authentication.
Maintain consistency across authentication
Use this when features should remain consistent before and after login. For example, a user sees a new checkout flow while browsing anonymously. They continue to see it after logging in during the same session.
Kill switch for resource-intensive features
Use this when you disable expensive features for unauthenticated users. For example, disable AI-powered recommendations or real-time chat for anonymous sessions. This reduces infrastructure costs.
Experimentation for pre-authentication paths
Use this when you run experiments on registration flows, shopping cart behavior, or add-to-cart functionality. Rolling out by session ensures consistent experience throughout the visitor’s journey.
User
Authenticated users with consistent experience across devices.
User contexts use these attributes:
| Attribute | Type | Source | Example | Private | Notes |
|---|---|---|---|---|---|
| key | String | User Database | 7D97F0D3-B18C-4305-B110-0317BDB745DC | FALSE | User identifier from database (UUID) |
| anonymous | Boolean | Static: false | false | FALSE | Always false for authenticated users |
| name | String | User Profile | Jane Doe | FALSE | User’s first and last name |
| String | User Profile | jane@example.com | TRUE | User’s email address | |
| createdAt | Number | User Database | 1640995200000 | FALSE | Unix timestamp in milliseconds |
Implementation example
Implement a user context like this:
const userContext = {
  kind: "user",
  key: currentUser.id,
  anonymous: false,
  name: `${currentUser.firstName} ${currentUser.lastName}`,
  email: currentUser.email,
  createdAt: currentUser.createdAt,
  _meta: {
    privateAttributes: ["email"]
  }
};
Use cases
Progressive release for features consistent across devices
Use this when you roll out features that work the same way on web, mobile, and tablet. For example, a new user profile layout or account settings feature.
User-level entitlements and overrides
Use this when you enable features for specific users or user groups. For example, beta features for internal employees or premium features for paying customers.
Experimentation for post-authentication activities
Use this when you run experiments on authenticated features like account management, saved preferences, or personalized recommendations. This ensures consistent experience across sessions and devices.
Enable legacy behavior based on user creation date
Use this when you maintain backward compatibility for existing users. For example, grandfather users created before a certain date into the old pricing model or feature set.
Build
Build metadata for version-aware feature management across applications and services.
Build contexts use these attributes:
| Attribute | Type | Source | Example | Private | Notes |
|---|---|---|---|---|---|
| key | String | Composite | api-orders-2.5.0 | FALSE | Service/App ID + Version |
| id | String | Build Configuration | api-orders | FALSE | Unique identifier for the service/app |
| name | String | Build Configuration | Order API | FALSE | Human-friendly name |
| version | String | Build Metadata | 2.5.0 | FALSE | Build version (semantic version) |
| versionName | String | Build Metadata | 2.5 | FALSE | Human-friendly version name |
| buildDate | Number | Build Metadata | 1640995200000 | FALSE | Unix timestamp when build was created |
| commit | String | Git Metadata | a1b2c3d | FALSE | Git commit SHA (short or full) |
Implementation example
Implement a build context like this:
const buildContext = {
  kind: "build",
  key: `${SERVICE_ID}-${VERSION}`,
  id: process.env.SERVICE_ID,
  name: "Order API",
  version: process.env.VERSION,
  versionName: "2.5",
  buildDate: parseInt(process.env.BUILD_TIMESTAMP),
  commit: process.env.GIT_COMMIT
};
Use cases
Disable features on known bad builds
Use this when you quickly disable features on buggy releases. For example, version 2.5.0 has a critical bug. Disable the problematic feature only for that version while users update.
Application-level configuration and customization
Use this when different applications in your ecosystem need different feature sets. For example, enable advanced analytics in the admin portal. Do not enable it in the customer-facing app.
Export metrics to determine when to sunset legacy behavior
Use this when you plan to remove old code paths. Export context metrics to understand what application versions are still in use. This helps you decide when to drop support for older versions.
Coordinate microservice deployments
Use this when you roll out features that require specific service versions. For example, enable a new API endpoint only when both frontend and backend deploy compatible versions.
Target by git commit
Use this when you enable or disable features for specific code commits. For example, a regression occurs in commit a1b2c3d. Disable the problematic feature only for that commit while you prepare a fix.
Browser
Browser and platform detection for web applications.
Browser contexts use these attributes:
| Attribute | Type | Source | Example | Private | Notes |
|---|---|---|---|---|---|
| key | String | Composite | chrome-120.0.6099.109 | FALSE | Browser Identifier + Version String |
| userAgent | String | Navigator API | Mozilla/5.0… | FALSE | Browser’s user-agent string |
| appName | String | Browser Detection | Chrome | FALSE | Browser app name (Firefox, Safari, Chrome) |
| /app/firefox/version | String | Browser Detection | 121.0 | FALSE | Firefox version |
| /app/chrome/version | String | Browser Detection | 120.0.6099.109 | FALSE | Chrome version |
| /app/safari/version | String | Browser Detection | 17.2 | FALSE | Safari version |
| /locale/tag | String | Navigator API | en | FALSE | Language code (en, es, de) |
Implementation example
Implement a browser context like this:
const browserContext = {
  kind: "browser",
  key: `${browserName}-${browserVersion}`,
  userAgent: navigator.userAgent,
  appName: browserName,
  app: {
    [browserName.toLowerCase()]: {
      version: browserVersion
    }
  },
  locale: {
    tag: navigator.language.split('-')[0]
  }
};
Use cases
Roll out by browser to reduce browser-specific issues
Use this when you start a rollout on browsers where you have strong test coverage. For example, roll out to Chrome at 20% while Safari remains at 5% until you verify compatibility.
Progressive enhancement based on browser capabilities
Use this when you enable features that require modern browser APIs. For example, enable WebGL-based visualizations only in browsers that support it. You can also use Service Workers only in compatible browsers.
Browser version targeting
Use this when your features require minimum browser versions. For example, enable features that use CSS Grid only on browsers with full Grid support. Use modern JavaScript features only on browsers with ES2020+ support.
Localization testing
Use this when you roll out internationalization features. For example, enable new translations for users with specific locale settings. You can also test RTL layout for Arabic or Hebrew language users.
Request
Request or transaction-specific metadata for API services.
Request contexts use these attributes:
| Attribute | Type | Source | Example | Private | Notes |
|---|---|---|---|---|---|
| key | String | Generated UUID | 7D97F0D3-B18C-4305-B110-0317BDB745DC | FALSE | Random UUID per request |
| anonymous | Boolean | Static: true | true | FALSE | Always true for request contexts |
| path | String | HTTP Request | /api/users | FALSE | HTTP request path |
| method | String | HTTP Request | POST | FALSE | HTTP request method |
| api-version | String | HTTP Header | v2 | FALSE | API version from X-API-Version header |
| request-client | String | HTTP Header | mobile-ios | FALSE | Name of the requesting client application |
Implementation example
Implement a request context like this:
const requestContext = {
  kind: "request",
  key: crypto.randomUUID(),
  anonymous: true,
  path: req.path,
  method: req.method,
  "api-version": req.headers['x-api-version'],
  "request-client": req.headers['x-client-name']
};
Use cases
Coordinate breaking changes across projects
Use this when you manage API versioning with feature flags. For example, serve new response formats only to requests specifying api-version: v2 or higher. This allows gradual migration.
Distribute risk by request or transaction
Use this when you roll out new behavior for specific endpoints. For example, enable new validation logic on the /api/orders endpoint at 10% while other endpoints remain unchanged.
Request-level rate limiting or special handling
Use this when you apply different behavior to specific request types. For example, enable aggressive caching only for GET requests. You can also apply stricter validation for POST/PUT/DELETE operations.
Client-specific behavior
Use this when you serve different responses based on the client. For example, return simplified responses for mobile clients to reduce bandwidth. You can also enable experimental features for internal testing tools.
Observability
Observability enables you to monitor and understand SDK behavior across your applications. Effective observability helps you identify issues, track usage patterns, and maintain healthy SDK implementations.
What is SDK observability
SDK observability provides visibility into how your applications interact with LaunchDarkly. This includes tracking SDK versions in use, monitoring connection health, and understanding evaluation patterns.
Key observability capabilities:
- Version tracking: Monitor which SDK versions are deployed across environments
- Connection monitoring: Track SDK connectivity and relay proxy usage
- End-of-life awareness: Identify SDKs approaching or past their support lifecycle
- Performance insights: Understand SDK behavior and resource usage
Outcomes
By implementing SDK observability, you will:
- Maintain up-to-date SDK versions across your organization
- Identify security risks from outdated SDKs
- Reduce support incidents through proactive monitoring
- Make informed decisions about SDK upgrades and migrations
Topics
This section covers:
- SDK version tracking: Use the SDK versions API to monitor deployed versions and identify upgrade needs
SDK version tracking
Track which SDK versions are deployed across your projects and environments to maintain security, compatibility, and access to the latest features.
Why track SDK versions
Tracking SDK versions helps you:
- Identify outdated SDKs that may have security vulnerabilities
- Understand which SDKs are approaching end-of-life
- Plan SDK upgrade initiatives across your organization
- Monitor relay proxy versions alongside client SDKs
- Maintain compliance with security policies
SDK versions API endpoint
LaunchDarkly provides a dedicated API endpoint to retrieve detailed SDK version usage data. The endpoint returns one record per unique SDK and project/environment combination, representing the maximum version observed in the last day.
Endpoint details
Endpoint:
GET https://app.launchdarkly.com/api/v2/usage/sdk-versions/details
Authentication: The endpoint requires an API access token with appropriate permissions. Include the token in the Authorization header.
Beta API header:
This endpoint is currently in beta. Include the LD-API-Version: beta header in your requests:
curl -H "Authorization: api-your-access-token" \
     -H "LD-API-Version: beta" \
     https://app.launchdarkly.com/api/v2/usage/sdk-versions/details
Data refresh: The endpoint refreshes hourly and returns the maximum version for each SDK observed in the last day.
Response data
The endpoint returns an array of SDK version records. Each record includes:
| Field | Description |
|---|---|
name | SDK name |
version | Observed SDK version |
type | SDK type |
projectId | Project identifier |
projectKey | Project key |
projectName | Project display name |
environmentId | Environment identifier |
environmentKey | Environment key |
environmentName | Environment display name |
applicationId | Application identifier if available |
ldLatestVersion | Latest available minor version from LaunchDarkly (truncated semver, e.g. 9.11). May be empty if the SDK type is unrecognized. The installed version may legitimately exceed this value while still showing EolAllClear. |
eolStatus | End-of-life status. Possible values: EolAllClear (supported), EolUnknown (SDK type not recognized), EolPast (past end-of-life), MajorVersionAvailable (new major version available, upgrade recommended) |
latestReleaseUrl | URL to latest SDK release |
connectionType | Connection type. Possible values: direct, relay |
relayVersion | Relay proxy version if connected through relay |
relayEolStatus | Relay proxy end-of-life status |
relayLatestVersion | Latest available relay proxy version |
relayLatestReleaseUrl | URL to latest relay proxy release |
Example requests
Python:
import requests

url = "https://app.launchdarkly.com/api/v2/usage/sdk-versions/details"
headers = {
    "Authorization": "api-your-access-token",
    "LD-API-Version": "beta"
}

response = requests.get(url, headers=headers)
sdk_versions = response.json()

for sdk in sdk_versions:
    print(f"{sdk['name']} v{sdk['version']} in {sdk['projectKey']}/{sdk['environmentKey']}")
    if sdk.get('eolStatus'):
        print(f"  EOL Status: {sdk['eolStatus']}")
JavaScript:
const url = 'https://app.launchdarkly.com/api/v2/usage/sdk-versions/details';
const options = {
  method: 'GET',
  headers: {
    'Authorization': 'api-your-access-token',
    'LD-API-Version': 'beta'
  }
};

async function main() {
  const response = await fetch(url, options);
  const sdkVersions = await response.json();

  sdkVersions.forEach(sdk => {
    console.log(`${sdk.name} v${sdk.version} in ${sdk.projectKey}/${sdk.environmentKey}`);
    if (sdk.eolStatus) {
      console.log(`  EOL Status: ${sdk.eolStatus}`);
    }
  });
}

main().catch(console.error);
Go:
package main

import (
    "encoding/json"
    "fmt"
    "net/http"
    "io"
)

type SDKVersion struct {
    Name            string `json:"name"`
    Version         string `json:"version"`
    ProjectKey      string `json:"projectKey"`
    EnvironmentKey  string `json:"environmentKey"`
    EOLStatus       string `json:"eolStatus"`
    LatestVersion   string `json:"ldLatestVersion"`
}

func main() {
    url := "https://app.launchdarkly.com/api/v2/usage/sdk-versions/details"

    req, err := http.NewRequest("GET", url, nil)
    if err != nil {
        fmt.Printf("error creating request: %v\n", err)
        return
    }
    req.Header.Add("Authorization", "api-your-access-token")
    req.Header.Add("LD-API-Version", "beta")

    res, err := http.DefaultClient.Do(req)
    if err != nil {
        fmt.Printf("error making request: %v\n", err)
        return
    }
    defer res.Body.Close()

    if res.StatusCode != http.StatusOK {
        fmt.Printf("unexpected status: %d\n", res.StatusCode)
        return
    }

    body, err := io.ReadAll(res.Body)
    if err != nil {
        fmt.Printf("error reading response: %v\n", err)
        return
    }

    var versions []SDKVersion
    if err := json.Unmarshal(body, &versions); err != nil {
        fmt.Printf("error parsing response: %v\n", err)
        return
    }

    for _, sdk := range versions {
        fmt.Printf("%s v%s in %s/%s\n", sdk.Name, sdk.Version, sdk.ProjectKey, sdk.EnvironmentKey)
        if sdk.EOLStatus != "" {
            fmt.Printf("  EOL Status: %s\n", sdk.EOLStatus)
        }
    }
}
Use cases
Identify outdated SDKs
Query the API to find SDKs running behind the latest available version. Because ldLatestVersion uses truncated semver (for example 9.11 rather than 9.11.0), a simple string comparison is unreliable — use a tuple comparison to avoid false positives when the installed version is a newer patch:
import requests

url = "https://app.launchdarkly.com/api/v2/usage/sdk-versions/details"
headers = {
    "Authorization": "api-your-access-token",
    "LD-API-Version": "beta"
}

def parse_version(v):
    try:
        return tuple(int(x) for x in v.split('.'))
    except (ValueError, AttributeError):
        return (0,)

response = requests.get(url, headers=headers)
sdk_versions = response.json()

outdated_sdks = [
    sdk for sdk in sdk_versions
    if sdk.get('ldLatestVersion')
    and parse_version(sdk.get('version', '')) < parse_version(sdk['ldLatestVersion'])
]

print(f"Found {len(outdated_sdks)} outdated SDK instances")
for sdk in outdated_sdks:
    print(f"  {sdk['name']} v{sdk['version']} in {sdk['projectKey']}/{sdk['environmentKey']}")
    print(f"    Latest: v{sdk['ldLatestVersion']}")
    print(f"    Release: {sdk['latestReleaseUrl']}")
Monitor end-of-life SDKs
Identify SDKs approaching or past their end-of-life:
import requests

url = "https://app.launchdarkly.com/api/v2/usage/sdk-versions/details"
headers = {
    "Authorization": "api-your-access-token",
    "LD-API-Version": "beta"
}

response = requests.get(url, headers=headers)
sdk_versions = response.json()

EOL_CLEAR = {'EolAllClear', 'EolUnknown', ''}

eol_sdks = [
    sdk for sdk in sdk_versions
    if sdk.get('eolStatus') and sdk['eolStatus'] not in EOL_CLEAR
]

print(f"Found {len(eol_sdks)} SDKs with EOL concerns")
for sdk in eol_sdks:
    print(f"  {sdk['name']} v{sdk['version']} in {sdk['projectKey']}/{sdk['environmentKey']}")
    print(f"    Status: {sdk['eolStatus']}")
Track relay proxy versions
Monitor relay proxy versions across your infrastructure:
import requests

url = "https://app.launchdarkly.com/api/v2/usage/sdk-versions/details"
headers = {
    "Authorization": "api-your-access-token",
    "LD-API-Version": "beta"
}

response = requests.get(url, headers=headers)
sdk_versions = response.json()

relay_connections = [
    sdk for sdk in sdk_versions
    if sdk.get('relayVersion')
]

print(f"Found {len(relay_connections)} SDKs connected through relay proxy")
for sdk in relay_connections:
    print(f"  {sdk['name']} v{sdk['version']} in {sdk['projectKey']}/{sdk['environmentKey']}")
    print(f"    Relay: v{sdk['relayVersion']}")
    if sdk.get('relayEolStatus'):
        print(f"    Relay EOL Status: {sdk['relayEolStatus']}")
Generate upgrade reports
Create comprehensive reports for SDK upgrade planning:
import requests
from collections import defaultdict

url = "https://app.launchdarkly.com/api/v2/usage/sdk-versions/details"
headers = {
    "Authorization": "api-your-access-token",
    "LD-API-Version": "beta"
}

response = requests.get(url, headers=headers)
sdk_versions = response.json()

# Group by SDK name
sdks_by_name = defaultdict(list)
for sdk in sdk_versions:
    sdks_by_name[sdk['name']].append(sdk)

# Generate report
print("SDK Upgrade Report")
print("=" * 80)

for sdk_name, instances in sdks_by_name.items():
    versions = set(inst['version'] for inst in instances)
    latest = instances[0].get('ldLatestVersion', 'Unknown')

    print(f"\n{sdk_name}")
    print(f"  Versions in use: {', '.join(sorted(versions))}")
    print(f"  Latest available: {latest}")
    print(f"  Total instances: {len(instances)}")

    # Count by environment
    envs = defaultdict(int)
    for inst in instances:
        envs[f"{inst['projectKey']}/{inst['environmentKey']}"] += 1

    print(f"  Deployments:")
    for env, count in sorted(envs.items()):
        print(f"    {env}: {count}")
Automation
Scheduled monitoring with PagerDuty notifications
Set up scheduled jobs to monitor SDK versions and create PagerDuty events. This example creates one event per SDK type that needs attention:
import requests
from collections import defaultdict

def check_sdk_versions():
    """Check SDK versions and create PagerDuty events for outdated SDKs"""
    url = "https://app.launchdarkly.com/api/v2/usage/sdk-versions/details"
    headers = {
        "Authorization": "api-your-access-token",
        "LD-API-Version": "beta"
    }

    response = requests.get(url, headers=headers)
    sdk_versions = response.json()

    # Group issues by SDK type
    issues_by_sdk = defaultdict(list)

    for sdk in sdk_versions:
        sdk_name = sdk['name']

        # Check for EOL status
        if sdk.get('eolStatus') and sdk['eolStatus'] not in ['EolAllClear', 'EolUnknown']:
            issues_by_sdk[sdk_name].append({
                'type': 'eol',
                'version': sdk['version'],
                'project': sdk['projectKey'],
                'environment': sdk['environmentKey'],
                'status': sdk['eolStatus']
            })

        # Check for outdated versions
        elif sdk.get('ldLatestVersion') and sdk.get('version') != sdk.get('ldLatestVersion'):
            issues_by_sdk[sdk_name].append({
                'type': 'outdated',
                'version': sdk['version'],
                'latest': sdk['ldLatestVersion'],
                'project': sdk['projectKey'],
                'environment': sdk['environmentKey']
            })

    # Create one PagerDuty event per SDK type with issues
    for sdk_name, issues in issues_by_sdk.items():
        create_pagerduty_event(sdk_name, issues)

def create_pagerduty_event(sdk_name, issues):
    """Create a PagerDuty Events API v2 event for a specific SDK type"""

    # Determine severity based on issue types
    has_eol = any(issue['type'] == 'eol' for issue in issues)
    severity = 'error' if has_eol else 'warning'

    # Build summary and details
    summary = f"{sdk_name}: {len(issues)} instance(s) need updating"

    # Group issues by type
    eol_issues = [i for i in issues if i['type'] == 'eol']
    outdated_issues = [i for i in issues if i['type'] == 'outdated']

    details = {
        'sdk_name': sdk_name,
        'total_issues': len(issues),
        'eol_count': len(eol_issues),
        'outdated_count': len(outdated_issues),
        'issues': issues
    }

    # Build custom details for better context
    custom_details = {}
    if eol_issues:
        custom_details['eol_instances'] = [
            f"{i['project']}/{i['environment']}: v{i['version']} ({i['status']})"
            for i in eol_issues[:5]  # Limit to first 5
        ]
    if outdated_issues:
        custom_details['outdated_instances'] = [
            f"{i['project']}/{i['environment']}: v{i['version']} (latest: v{i['latest']})"
            for i in outdated_issues[:5]  # Limit to first 5
        ]

    # PagerDuty Events API v2 payload
    payload = {
        'routing_key': 'your-integration-key-here',
        'event_action': 'trigger',
        'dedup_key': f'launchdarkly-sdk-{sdk_name.lower().replace(" ", "-")}',
        'payload': {
            'summary': summary,
            'severity': severity,
            'source': 'LaunchDarkly SDK Version Monitor',
            'custom_details': custom_details
        },
        'links': [
            {
                'href': 'https://app.launchdarkly.com',
                'text': 'LaunchDarkly Dashboard'
            }
        ]
    }

    # Send to PagerDuty Events API v2
    pagerduty_url = 'https://events.pagerduty.com/v2/enqueue'
    response = requests.post(pagerduty_url, json=payload)

    if response.status_code == 202:
        print(f"✓ PagerDuty event created for {sdk_name}")
    else:
        print(f"✗ Failed to create PagerDuty event for {sdk_name}: {response.text}")

# Run this script on a schedule using cron or similar
check_sdk_versions()
Example PagerDuty events created:
When this script runs against an account with outdated SDKs, it creates separate events:
-
Python Server SDK event:
- Summary: “Python Server SDK: 3 instance(s) need updating”
- Severity: warning
- Custom details showing which projects/environments need updates
-
React SDK event:
- Summary: “React SDK: 5 instance(s) need updating”
- Severity: warning
- Lists outdated instances
-
.NET Server SDK event:
- Summary: “.NET Server SDK: 1 instance(s) need updating”
- Severity: error (if EOL)
- Shows EOL status and affected deployments
Key features:
- Deduplication: Uses
dedup_keyper SDK type to prevent alert fatigue - Severity mapping: EOL SDKs trigger
error, outdated SDKs triggerwarning - Rich context: Custom details show specific projects and environments affected
- Actionable: Each alert focuses on a single SDK type for clear ownership
CI/CD integration
Integrate SDK version checks into your CI/CD pipeline:
# GitHub Actions example
name: Check SDK Versions

on:
  schedule:
    - cron: '0 9 * * 1'  # Weekly on Monday at 9 AM
  workflow_dispatch:

jobs:
  check-versions:
    runs-on: ubuntu-latest
    steps:
      - name: Check SDK Versions
        run: |
          response=$(curl -s \
            -H "Authorization: ${{ secrets.LD_API_TOKEN }}" \
            -H "LD-API-Version: beta" \
            https://app.launchdarkly.com/api/v2/usage/sdk-versions/details)

          echo "$response" | jq -r '.[] | select(.eolStatus and .eolStatus != "EolAllClear" and .eolStatus != "EolUnknown") |
            "\(.name) v\(.version) in \(.projectKey)/\(.environmentKey) - EOL: \(.eolStatus)"'
Real-world examples
The following examples use actual data from a LaunchDarkly account to demonstrate practical SDK version analysis.
Example API response structure
The API returns detailed information about each SDK instance. Here is a sample response showing the data structure:
[
  {
    "name": "Python Server SDK",
    "version": "9.8.0",
    "type": "server",
    "projectId": "aaaaaaaaaaaaaaaaaaaaaaaa",
    "projectKey": "api-backend",
    "projectName": "API Backend",
    "environmentId": "bbbbbbbbbbbbbbbbbbbbbbbb",
    "environmentKey": "production",
    "environmentName": "Production",
    "applicationId": "api-server-prod",
    "ldLatestVersion": "9.11",
    "eolStatus": "EolPast",
    "latestReleaseUrl": "https://github.com/launchdarkly/python-server-sdk/releases/latest",
    "connectionType": "direct",
    "relayVersion": "",
    "relayEolStatus": "",
    "relayLatestVersion": "",
    "relayLatestReleaseUrl": ""
  },
  {
    "name": "React Web SDK",
    "version": "0.2.4",
    "type": "browser",
    "projectId": "cccccccccccccccccccccccc",
    "projectKey": "customer-portal",
    "projectName": "Customer Portal",
    "environmentId": "dddddddddddddddddddddddd",
    "environmentKey": "production",
    "environmentName": "Production",
    "applicationId": "react-client-sdk",
    "ldLatestVersion": "3.3",
    "eolStatus": "MajorVersionAvailable",
    "latestReleaseUrl": "https://github.com/launchdarkly/react-client-sdk/releases/latest",
    "connectionType": "direct",
    "relayVersion": "",
    "relayEolStatus": "",
    "relayLatestVersion": "",
    "relayLatestReleaseUrl": ""
  },
  {
    "name": "Node.js Server SDK",
    "version": "9.10.5",
    "type": "server",
    "projectId": "eeeeeeeeeeeeeeeeeeeeeeee",
    "projectKey": "mobile-app",
    "projectName": "Mobile Application",
    "environmentId": "ffffffffffffffffffffffff",
    "environmentKey": "production",
    "environmentName": "Production",
    "applicationId": "NodeJSClient",
    "ldLatestVersion": "9.9",
    "eolStatus": "EolAllClear",
    "latestReleaseUrl": "https://github.com/launchdarkly/js-core/releases/latest",
    "connectionType": "direct",
    "relayVersion": "",
    "relayEolStatus": "",
    "relayLatestVersion": "",
    "relayLatestReleaseUrl": ""
  }
]
Analyzing relay proxy version distribution
A common scenario is identifying which relay proxy versions are deployed across your infrastructure. This example shows an organization with 41 relay proxy instances distributed across two versions:
import requests
from collections import defaultdict

url = "https://app.launchdarkly.com/api/v2/usage/sdk-versions/details"
headers = {
    "Authorization": "api-your-access-token",
    "LD-API-Version": "beta"
}

response = requests.get(url, headers=headers)
sdk_versions = response.json()

# Analyze relay proxy distribution
relay_by_version = defaultdict(list)
for sdk in sdk_versions:
    if sdk['name'] == 'LDRelay':
        relay_by_version[sdk['version']].append({
            'project': sdk['projectKey'],
            'environment': sdk['environmentKey']
        })

# Display results
print("Relay Proxy Version Distribution:")
print("=" * 60)
for version, instances in sorted(relay_by_version.items()):
    print(f"\nVersion {version}: {len(instances)} instances")
    print(f"Sample deployments:")
    for inst in instances[:5]:
        print(f"  - {inst['project']}/{inst['environment']}")
Sample output:
Relay Proxy Version Distribution:
============================================================

Version 8.17.3: 38 instances
Sample deployments:
  - mobile-demo/production
  - mobile-demo/test
  - stream-service/production
  - api-gateway/test
  - customer-portal/production

Version 8.17.4: 3 instances
Sample deployments:
  - core-platform/production
  - core-platform/test
  - core-platform/dev
Analysis: This output reveals that 38 relay proxy instances are running version 8.17.3, while only 3 have been upgraded to 8.17.4. This indicates a potential upgrade opportunity to standardize on the newer version.
Identifying version drift across environments
Version drift occurs when different environments run different SDK or relay proxy versions. This can lead to inconsistent behavior and makes troubleshooting difficult.
import requests
from collections import defaultdict

url = "https://app.launchdarkly.com/api/v2/usage/sdk-versions/details"
headers = {
    "Authorization": "api-your-access-token",
    "LD-API-Version": "beta"
}

response = requests.get(url, headers=headers)
sdk_versions = response.json()

# Track versions per project
project_versions = defaultdict(lambda: defaultdict(set))
for sdk in sdk_versions:
    project_versions[sdk['projectKey']][sdk['name']].add(
        (sdk['version'], sdk['environmentKey'])
    )

# Find projects with version drift
print("Projects with version drift:")
print("=" * 60)
for project, sdks in sorted(project_versions.items()):
    for sdk_name, versions in sdks.items():
        unique_versions = set(v[0] for v in versions)
        if len(unique_versions) > 1:
            print(f"\n{project} - {sdk_name}:")
            for version in sorted(unique_versions):
                envs = [v[1] for v in versions if v[0] == version]
                print(f"  v{version}: {', '.join(envs)}")
Sample output:
Projects with version drift:
============================================================

mobile-demo - LDRelay:
  v8.17.3: production, test
  v8.17.4: staging

api-gateway - Node.js Server SDK:
  v9.8.1: production
  v9.10.2: test, dev
Recommendation: Standardize on a single version across environments within each project to ensure consistent behavior and simplify troubleshooting.
SDK inventory report
Generate a comprehensive report of all SDKs in use across your organization:
import requests
from collections import defaultdict

url = "https://app.launchdarkly.com/api/v2/usage/sdk-versions/details"
headers = {
    "Authorization": "api-your-access-token",
    "LD-API-Version": "beta"
}

response = requests.get(url, headers=headers)
sdk_versions = response.json()

# Summarize SDK usage
print("SDK Inventory Report")
print("=" * 80)
print(f"\nTotal SDK instances: {len(sdk_versions)}")
print(f"Unique projects: {len(set(s['projectKey'] for s in sdk_versions))}")
print(f"Unique environments: {len(set(s['environmentKey'] for s in sdk_versions))}")

# SDK breakdown
sdk_counts = defaultdict(set)
for sdk in sdk_versions:
    sdk_counts[sdk['name']].add(sdk['version'])

print("\nSDK Distribution:")
print("-" * 80)
for sdk_name, versions in sorted(sdk_counts.items()):
    count = sum(1 for s in sdk_versions if s['name'] == sdk_name)
    print(f"{sdk_name}:")
    print(f"  Instances: {count}")
    print(f"  Versions: {', '.join(sorted(versions))}")

    # Show EOL status if available
    sample = next(s for s in sdk_versions if s['name'] == sdk_name)
    if sample.get('eolStatus') and sample['eolStatus'] != 'EolUnknown':
        print(f"  EOL Status: {sample['eolStatus']}")
    print()

# Environment coverage
env_counts = defaultdict(int)
for sdk in sdk_versions:
    env_counts[sdk['environmentKey']] += 1

print("\nEnvironment Coverage:")
print("-" * 80)
for env, count in sorted(env_counts.items(), key=lambda x: -x[1]):
    print(f"{env}: {count} SDK instances")
Sample output:
SDK Inventory Report
================================================================================

Total SDK instances: 46
Unique projects: 17
Unique environments: 8

SDK Distribution:
--------------------------------------------------------------------------------
.NET Server SDK:
  Instances: 1
  Versions: 8.11.1
  EOL Status: EolAllClear

Go Server SDK:
  Instances: 1
  Versions: 7.14.6
  EOL Status: EolAllClear

LDRelay:
  Instances: 41
  Versions: 8.17.3, 8.17.4

Node.js Server SDK:
  Instances: 2
  Versions: 9.10.2
  EOL Status: EolAllClear

Python Server SDK:
  Instances: 1
  Versions: 9.14.1
  EOL Status: EolAllClear

Environment Coverage:
--------------------------------------------------------------------------------
production: 19 SDK instances
test: 17 SDK instances
dev: 4 SDK instances
sit: 2 SDK instances
qa: 1 SDK instances
Insights from this data:
- Relay proxy is the most deployed component (41 instances)
- Production and test environments have the highest SDK coverage
- Most server-side SDKs show healthy EOL status
- Version standardization opportunity exists for relay proxy
Finding projects without SDK coverage
Identify projects that may not have SDK instrumentation:
import requests

# Fetch all projects (requires separate API call)
projects_url = "https://app.launchdarkly.com/api/v2/projects"
sdk_url = "https://app.launchdarkly.com/api/v2/usage/sdk-versions/details"
headers = {
    "Authorization": "api-your-access-token",
    "LD-API-Version": "beta"
}

# Get all projects
projects_response = requests.get(projects_url, headers=headers)
all_projects = set(p['key'] for p in projects_response.json()['items'])

# Get projects with SDK usage
sdk_response = requests.get(sdk_url, headers=headers)
projects_with_sdks = set(s['projectKey'] for s in sdk_response.json())

# Find projects without SDK instrumentation
projects_without_sdks = all_projects - projects_with_sdks

print(f"Projects without active SDK usage: {len(projects_without_sdks)}")
for project in sorted(projects_without_sdks):
    print(f"  - {project}")
This helps identify projects that may need SDK implementation or where SDKs have not reported telemetry recently.
Best practices
Monitor regularly
Schedule regular checks of SDK versions:
- Run automated checks weekly or monthly
- Alert teams when EOL SDKs are detected
- Track upgrade progress over time
Prioritize upgrades
Focus upgrade efforts based on risk:
- Critical: SDKs past end-of-life with known security issues
- High: SDKs approaching end-of-life
- Medium: SDKs more than two major versions behind
- Low: SDKs one minor version behind
Document versions
Maintain documentation of SDK versions:
- Record which versions are approved for use
- Document known issues with specific versions
- Track upgrade timelines and dependencies
Test upgrades
Test SDK upgrades thoroughly:
- Review release notes for breaking changes
- Test in non-production environments first
- Monitor error rates and performance after upgrading
- Have rollback plans ready
To learn more about SDK implementation best practices, read Preflight Checklist. To learn more about maintaining resilient SDK implementations, read Resilient SDK Implementation.
Billing
LaunchDarkly meters usage with several billing units. Understanding which unit applies to each SDK type and feature helps you keep usage predictable, attributable, and free of artificial growth.
Your available billing units vary by plan. This section covers the common, current units and excludes legacy ones. For authoritative definitions and how each unit is calculated, read the calculating billing documentation.
Billing units at a glance
The common, non-legacy billing units are:
| Billing unit | Applies to | What it measures |
|---|---|---|
| Client-side MAU, or cMAU | Client-side SDKs | Unique monthly active contexts the SDK evaluates |
| Service connections | Server-side SDKs | Time each server-side SDK instance stays connected to an environment |
| AI runs | AgentControl | Each time a model is invoked or a judge runs |
| Experimentation keys† | Experimentation | Unique monthly active contexts in experiments |
| Experimentation cMAU† | Experimentation | Unique monthly active contexts, typically user contexts, evaluated by LaunchDarkly server-side, client-side, AI, and edge SDKs and eligible to be included in an experiment. |
| Observability | Observability | Ingested sessions, errors, traces, and logs |
† The billing unit used depends on your plan and contract. If you have questions, reach out to your LaunchDarkly account representative.
The two SDK usage units grow for different reasons. cMAU grows with the number of unique context keys you evaluate. Service connections grow with how many server-side SDK instances connect and for how long.
This section covers the two SDK usage units in depth. For the remaining units, read the calculating billing documentation.
Outcomes
By understanding your billing units, you will:
- Know which metric each SDK contributes to
- Design context keys and SDK initialization to avoid artificial usage growth
- Use in-platform reporting to diagnose unexpected usage and trace it back to a source
Topics
This section covers:
- Service connections: How server-side SDK connections are billed and how to diagnose unexpected connection growth
- cMAU: How unique contexts are billed and how to keep client-side usage predictable
Service Connections
Service connections are the billing unit for server-side SDKs.
What a service connection is
A service connection is one instance of one server-side SDK connected to one LaunchDarkly environment for a period of time measured in minutes. LaunchDarkly treats roughly 43,800 connected minutes, or one full month of continuous connection, as a single service connection. Instances that connect for less than a full month count as a fraction of a connection.
Because billing follows connection time, your usage grows with how many server-side SDK instances connect and how long each stays connected. A single long-lived process that shares one client uses connection time efficiently. Many short-lived or duplicated clients multiply it.
Diagnosing unexpected usage
When service connections grow faster than expected, use both in-platform reporting and a review of where and how you initialize the SDK.
Use in-platform reporting
Open Organization settings and select Plan usage, then open the Service connections tab. Use the reporting to narrow down the source:
- Review the cumulative service connections your account has used over the billing period.
- Review the Peak concurrent connections chart to see the highest number of concurrent server-side connections observed in a single day.
- Filter by project, environment, SDK name, or SDK app ID to isolate which application drives growth.
The SDK app ID reflects the application metadata you configure, so setting accurate id and version information on every server-side application makes this attribution reliable.
To learn more, read the account usage metrics documentation and the service connections documentation.
Initialize the SDK once as a singleton
What to look for: Code paths that create a new server-side client per request, per class, or per module instead of reusing a shared instance.
What good looks like: Each process exposes exactly one client, created early in the application lifecycle and reused everywhere through a shared module or dependency injection container.
Why it matters: Each client instance opens its own connection and accrues its own connection time. Reusing one client per process keeps connection time proportional to your real footprint.
To learn more, read the preflight checklist item SDK is initialized once as a singleton early in the application’s lifecycle.
Watch for forked processes
What to look for: Application servers that fork worker processes to handle requests, common in Ruby and Python, where each worker initializes its own SDK client.
What good looks like: You initialize the SDK deliberately in each forked worker and account for the resulting connections, or you route evaluations through a shared connection where your framework supports it.
Why it matters: Each forked worker maintains its own connection while it lives. A server with many workers multiplies service connections even though it runs one application.
Watch for short-lived and serverless processes
What to look for: Short-lived processes, cron jobs, or serverless functions that initialize a fresh client on each invocation.
What good looks like: Long-running processes reuse a singleton client, and serverless functions initialize the client outside the handler so the platform can reuse it across invocations.
Why it matters: Frequent short connections still accrue connection time. Initializing outside the handler and reusing warm instances reduces both connection churn and initialization latency.
To learn more, read the preflight checklist items Initialize the SDK outside of the handler and Leverage LD Relay to reduce initialization latency.
Centralize where you initialize the SDK
What to look for: Initialization scattered across the codebase, so you cannot easily answer how many clients a deployment creates.
What good looks like: Initialization lives in one well-known place per process, and you can state how many connections each deployment opens.
Why it matters: Connection count is the input to your bill. Knowing exactly where you call init lets you predict service connections and spot unintended clients before they grow your usage.
cMAU
Client-side monthly active users, or cMAU, is the billing unit for client-side SDKs.
What cMAU is
cMAU is the number of unique monthly active contexts, typically user contexts, that your client-side SDKs evaluate. LaunchDarkly counts each unique context key once within a rolling 30-day window. Marking a context as anonymous only hides it from the dashboard, so it does not reduce cMAU. Unauthenticated visitors count just like authenticated users.
Because billing follows the count of unique context keys, the way you generate and reuse keys drives your cMAU. Unstable or duplicated keys inflate the count even when your real traffic stays flat.
Keep cMAU predictable
The following practices keep your unique context keys stable and deduplicated over time.
Stabilize keys for unauthenticated visitors
What to look for: A new key created on every visit, page load, session, or SDK initialization, or a visitor assigned a different identity as they move across your properties.
What good looks like: The same unauthenticated visitor reuses a stable persisted key across revisits and movement between properties until they authenticate.
Why it matters: Unauthenticated contexts still count toward cMAU, so unstable keys can create a large amount of artificial growth.
To learn how to persist an anonymous key, read Session.
Use a separate context kind for unauthenticated visitors
What to look for: A single context kind reused for a visitor both before and after they authenticate, where the key changes from a temporary value to a durable one.
What good looks like: Unauthenticated visitors evaluate under one context kind, such as session, and authenticated users evaluate under another, such as user.
Why it matters: LaunchDarkly bills on your primary context. Keeping unauthenticated and authenticated visitors in separate context kinds prevents both populations from collapsing into one larger bucket of unique keys.
To learn more about these kinds, read Session and User.
Move authenticated users to a durable user ID
What to look for: Users continuing to evaluate flags under unauthenticated or transient identities even after sign-up or login.
What good looks like: Once a user authenticates, the SDK switches to a durable organization user identifier so repeat activity is deduplicated correctly over time.
Why it matters: Stable authenticated keys are one of the cleanest ways to avoid unnecessary cMAU growth for repeat users.
Standardize context kind and key design across platforms
What to look for: Different teams, properties, or platforms using different context kinds, key formats, or identity rules for the same end user.
What good looks like: Web, mobile, and other platforms all follow one documented context model with consistent key and kind semantics.
Why it matters: Consistency reduces duplicate counting and makes usage much more predictable.
Document your standardized context kinds in Context Types. That section also covers contexts in general.
Review where your context keys come from
What to look for: Client flows that generate fresh keys more often than intended, or evaluations that do not always pass an explicit context key.
What good looks like: The SDK initializes with a stable context, and identity transitions happen intentionally rather than repeatedly or implicitly.
Why it matters: The number of initializations or identify calls is not a billable metric. cMAU is driven entirely by keys. Focus your review on where your context keys come from and whether you always pass one, since initialization and identify patterns are where unstable keys tend to originate.
Centralize context creation
What to look for: Multiple teams or apps each generating their own keys and attributes ad hoc.
What good looks like: A shared wrapper or library defines how contexts are created across your properties and applications.
Why it matters: Centralized identity logic reduces drift and gives your organization one place to enforce good cMAU hygiene.
Configure application metadata
What to look for: Application metadata missing from the configuration passed to the SDK.
What good looks like: Every application team sets application metadata with correct and unique id and version information.
Why it matters: Application metadata attributes cMAU usage back to individual teams and application versions. This makes it easier to trace a regression or bug that inflates cMAU back to its source.
To configure application metadata, read the SDK application metadata documentation. Mobile SDKs also cover this in the preflight checklist item Configure application identifier.
Diagnosing unexpected cMAU
When cMAU grows faster than expected, use both in-platform reporting and a review of your SDK implementation.
Use in-platform reporting
Open Organization settings and select Plan usage, then open the Client-side MAU tab. Use the reporting to narrow down the source:
- Filter the chart by project, environment, SDK name, or SDK app ID to isolate which application drives growth.
- Filter by anonymous contexts to see how much of your cMAU comes from contexts marked anonymous.
- Select Rolling 30D to view a rolling count of MAU over the billing period.
The SDK app ID reflects the application metadata you configure, so accurate metadata makes this attribution reliable.
To learn more, read the account usage metrics documentation.
Review your SDK implementation
After reporting points you at a source, trace the keys in that application:
- Confirm unauthenticated visitors reuse a persisted key rather than receiving a new one per visit.
- Confirm authenticated users evaluate under a durable key.
- Confirm every evaluation passes an explicit context key rather than generating one implicitly.
Implementation Patterns
This section explores common implementation patterns when integrating the SDK with your application.
These patterns aim to:
- Provide idiomatic integrations for the frameworks and libraries your application uses
- Make compliance with the Preflight Checklist easy and the default
- Reduce toil and friction
Context Management
LaunchDarkly contexts are data objects that represent users, devices, organizations, and other entities. Feature flags use these contexts during evaluation to determine which variation to use, based on your flag targeting rules. Each context contains attributes that describe what you know about that context, such as their name, location, device type, or organization they are associated with.
Centralization
It is important that your contexts are consistent within and across applications that share a project. Avoid mixing the creation of contexts in your business logic and provide helper functions and utility functions that map existing application domain objects to LaunchDarkly contexts.
Examples
Functional
You can create a helper function that transforms your application domain objects into LaunchDarkly contexts. This approach works well in any language and keeps context creation logic centralized.
Here is an example:
function createUserContext(myUserObject) {
    return {
    	kind: "user",
    	name: myUserObject.fullName,
    	email: myUserObject.email,
    	groups: myUserObject.groups.map(group => group.name)
    }
}
Class/Interface
You can define an interface that your domain objects implement to provide their own LaunchDarkly context representation. This approach leverages object-oriented design patterns and ensures consistency across your codebase.
Here is an example:
interface ToLaunchDarklyContext {
   toLaunchDarklyContext() -> LDContext
}

// Implement toLaunchDarklyContext on your user/request/account objects
Instrumentation
Context management should be integrated into your applications in a way that reduces the need to manually create them in business logic. For example, you might use middleware to automatically create contexts for incoming requests or use decorators to automatically create contexts for methods that require them.
Examples
Express/Node.js
You can use Express middleware to automatically create and attach LaunchDarkly contexts to incoming requests. This middleware pattern runs before your route handlers and makes the context available throughout the request lifecycle.
Here is an example:
app.use((req, res, next) => {
    const context = createUserContext(req.user);
    req.ldContext = context;
    // variation wrapper that automatically uses the context
    req.variation = (flagKey, fallback) => {
        return ldClient.variation(flagKey, req.ldContext, fallback);
    }
    next();
});
Python/Flask
Flask uses the @app.before_request decorator to run code before each request handler. You can use this to automatically build and attach LaunchDarkly contexts to the request. The repo smohdarif/flask-ld-web-and-api provides an example of implementing a Flask plugin that provides context injection middleware.
Here is an example:
# Add contexts to the request
@app.before_request
def build_request_context():
    add_context(create_request_context())

# variation helper automatically uses the context
@api_bp.get("/flag/<flag_key>")
def read_flag(flag_key):
    value = variation(flag_key, default=False)

    return jsonify({
        "flag": flag_key,
        "value": value,
        "context": get_context().to_dict() if get_context() else None
    })
Scoped Clients
The Go SDK supports Scoped Clients, which bind a LaunchDarkly context to an SDK client instance. You can create scoped clients in middleware and attach them to the Go request context, making them available throughout your request handlers without passing contexts explicitly.
Here is an example:
func LDScopedClientMiddleware(client *LDClient) func(http.Handler) http.Handler {
  return func(next http.Handler) http.Handler {
    return http.HandlerFunc(func(w http.ResponseWriter, r *http.Request) {
        scopedClient := NewScopedClient(client, ldcontext.New("context-key-123abc"))
        ctx := GoContextWithScopedClient(r.Context(), scopedClient)
        next.ServeHTTP(w, r.WithContext(ctx))
    })
  }
}
func requestLogic(r *http.Request) {
  featureFlagEnabled := MustGetScopedClient(r.Context()).BoolVariation("flag-key-123abc", false)
  // use featureFlagEnabled...
}
Automatic Instrumentation
This section covers middleware patterns for automatically tracking metrics and telemetry in your application.
Request metrics
In web application frameworks, you can automatically track metrics for errors and request duration/latency.
The following examples show automatic metrics implementations:
This method works best when you implement automatic context management.
Wrapping releases
Creating wrapper functions can be a useful way to encapsulate guarded releases outside of web frameworks.
Here is an example in JavaScript for a client-side application:
function guard(ldClient, fn, thisArg) {
  const trackDuration = (start) => {
    const duration = performance.now() - start
    ldClient.track('duration', duration)
    return duration
  }

  return function () {
    const start = performance.now()
    let result

    try {
      result = fn.apply(thisArg ?? this, arguments)
    } catch (e) {
      trackDuration(start)
      ldClient.track('error')
      throw e
    }
    // handle async functions
    if (result && typeof result.then === 'function') {
      return result
        .then((value) => {
          trackDuration(start)
          return value
        })
        .catch((e) => {
          trackDuration(start)
          ldClient.track('error')
          throw e
        })
    } else {
      trackDuration(start)
      return result
    }
  }
}

// Usage
const getNotifications = guard(ldClient, async (count) => {
  const apiPath = ldClient.variation('release-notifications-v2', false) ? '/api/v2/notifications' : '/api/v1/notifications'
  const response = await fetch(apiPath + `?count=${count}`)
  if (!response.ok) throw new Error('Failed to fetch notifications')
  return await response.json()
})

// Error and latency metrics are tracked automatically and associated
// with the feature flags we evaluated
const notifications = await getNotifications(10)
Routing Patterns
This section covers patterns for using feature flags to control route access and availability in your application.
Enabling routes
Feature flags are commonly used to enable or disable routes in your application. Instead of calling variation manually, you can encapsulate this pattern in decorators.
The following examples show route enabling implementations:
Python/Flask
Flask decorators allow you to wrap route handlers with additional logic. You can create a @require_flag decorator that evaluates a feature flag before allowing the route to execute. If the flag evaluates to the expected value, the request continues. Otherwise, it returns an error response.
Here is an example:
# See https://github.com/smohdarif/flask-ld-web-and-api/blob/main/launchdarkly/decorators.py#L18
@api_bp.get("/beta/experimental")
@require_flag("enable-experimental-api", default=False)
def experimental_feature():
    return jsonify({
        "message": "Welcome to the experimental API!",
        "status": "beta",
        "features": ["feature-1", "feature-2", "feature-3"]
    })
Express/Node.js
Express middleware functions can intercept requests before they reach route handlers. You can create a middleware factory that evaluates feature flags and either calls next() to continue or sends an error response. This middleware can also handle redirects for disabled routes.
Here is an example:
function requireFlag(flagKey, default=false, expectedValue=true, redirect_url) {
  return async (req, res, next) => {
    // implement context management to inject the context into the request
    const context = req.LD_CONTEXT
    const flag = await client.variation(flagKey, context, default);
    if (flag === expectedValue) {
      next();
    } else {
      if (redirect_url) {
        res.redirect(redirect_url);
      } else {
        res.status(404)
      }
    }
  };
}
UI and Views
This section covers patterns for controlling component visibility and UI elements using feature flags.
Showing/hiding components
In front-end applications, you can encapsulate the pattern of showing/hiding components in directives or higher order components.
React
Higher-order components, or HOCs, wrap other components to add behavior.
Here is an example:
function ldIf(flagKey, fallback=false, expectedValue=true) {
  return (component) => {
    return (props) => {
      const {flagValue = fallback } = useFlags()
      return flagValue === expectedValue ? component(props) : null;
    };
  }
}

const MyComponent = ldIf('show-my-component')(() => {
  return <div>My Component</div>;
});

function App() {
  return (
    <div>
      <MyComponent />
    </div>
  );
}
Angular
Structural directives like *ngIf control the presence of elements in the DOM. You can create a custom *ldIf directive that evaluates feature flags and conditionally renders template content. This approach integrates naturally with Angular templates and follows Angular’s directive patterns.
Here is an example:
<!--See: https://github.com/launchdarkly-labs/launchdarkly-angular-sdk-unofficial/tree/main -->
   <div *ldIf="'release-widget'; fallback: false; else: widgetUnavailableTemplate">
     <strong>release-widget:</strong> <span style="color: green;">AVAILABLE</span>
     <div style="margin-top:8px;padding:8px;background:#e8f5e8;border-radius:4px">[ Release Widget Available ]</div>
   </div>
Anti-patterns
Common SDK implementation mistakes that cause performance issues, data quality problems, or operational risk at scale.
Instantiating a new client per request
Each SDK client instance opens a streaming connection, downloads the full flag ruleset, and allocates an event buffer. Creating a client per request duplicates all of that state and opens redundant connections. At scale, this overwhelms connection limits and memory.
Create one LDClient instance per service per environment. Initialize at application startup, inject through your dependency injection framework, and share everywhere.
// Anti-pattern: new client per request
public Response handleRequest(Request req) {
    LDClient client = new LDClient("sdk-key"); // new connection every request
    boolean flag = client.boolVariation("my-flag", context, false);
    // ...
}

// Correct: singleton shared across requests
public Response handleRequest(Request req) {
    boolean flag = sharedClient.boolVariation("my-flag", context, false);
    // ...
}
To learn more, read SDK is initialized once as a singleton.
Caching flag values on top of the SDK
The SDK maintains a no-TTL in-memory cache of all flag rules. Adding Redis, Memcached, or an application-level cache on top introduces staleness with no performance benefit. The SDK’s variation() call is already an in-memory lookup with no network round-trip.
// Anti-pattern: redundant cache layer
const cachedFlags = {};
function getFlag(key, context) {
  if (!cachedFlags[key]) {
    cachedFlags[key] = ldClient.variation(key, context, false);
  }
  return cachedFlags[key]; // stale if flag changes
}

// Correct: call variation directly
function getFlag(key, context) {
  return ldClient.variation(key, context, false);
}
To learn more, read Use variation/variationDetail, not allFlags/allFlagsState for evaluation.
Hardcoding SDK keys
SDK keys are environment-specific secrets. Hardcoding them leads to wrong-environment evaluations and leaked credentials in source control. Store SDK keys in your secrets management system such as Secrets Manager, Kubernetes secrets, or Vault.
# Anti-pattern: hardcoded key
config = Config("sdk-live-abc123xyz")

# Correct: load from secrets management
config = Config(os.environ["LAUNCHDARKLY_SDK_KEY"])
To learn more, read SDK configuration integrated with existing configuration/secrets management.
Using identify() server-side
Server-side SDKs accept context directly in the variation() call. Every evaluation automatically registers the context in the Contexts list. Calling identify() server-side is redundant and generates unnecessary events.
The identify() method exists on server-side SDKs, but its only effect is adding a context to the Contexts list. Since variation() already does this as a side effect of evaluation, identify() is rarely necessary. It only helps when a context must appear in the Contexts list before any flags are evaluated for it. For example, import a batch of users so you can set up targeting rules in advance.
// Anti-pattern: unnecessary identify call
ldClient.Identify(context)
value, _ := ldClient.BoolVariation("my-flag", context, false)

// Correct: variation registers the context automatically
value, _ := ldClient.BoolVariation("my-flag", context, false)
identify() is a client-side concept for switching the active context during a session, such as after login or logout.
Initializing with blank or dummy contexts on client-side SDKs
Initializing a client-side SDK with a blank or placeholder context creates noise in the Contexts list and makes targeting unreliable. Always initialize with a real context that represents the current user or session.
// Anti-pattern: dummy context at init
const client = LDClient.initialize("client-id", { kind: "user", key: "anonymous" });
// later...
client.identify(realUser);

// Correct: initialize with a real context
const client = LDClient.initialize("client-id", {
  kind: "user",
  key: currentUser.id,
  plan: currentUser.plan
});
If the user is not yet known, use an anonymous context with anonymous: true so LaunchDarkly generates a stable key automatically.
Ignoring fallback values
Every variation() call accepts a fallback parameter. This is the value your users experience when the SDK has not initialized or cannot reach LaunchDarkly. A fallback of false on a kill switch is correct. A fallback of false on a feature that should be on by default can cause an outage.
Review fallback values during code review. Revisit them when a flag’s rollout changes or a temporary flag becomes long-lived. For permanent flags, periodically verify that fallback behavior is still correct.
// Anti-pattern: unconsidered fallback
const enabled = ldClient.variation("payment-processing", context, false);
// if LD is down, payments stop working

// Correct: fallback matches safe production behavior
const enabled = ldClient.variation("payment-processing", context, true);
// if LD is down, payments continue working
To learn more, read Fallback values.
Skipping close() on shutdown
Buffered analytics events are lost if the process exits without flushing. Call close() on the SDK client when a service terminates. Wire this into your Kubernetes preStop hook, shutdown handler, or process signal handler.
For edge workers and serverless functions, call flush() explicitly before the function exits. These environments lack long-running processes that flush automatically on an interval.
// Anti-pattern: no cleanup on shutdown
Runtime.getRuntime().addShutdownHook(new Thread(() -> {
    // application cleanup, but no LD client close
}));

// Correct: close the client on shutdown
Runtime.getRuntime().addShutdownHook(new Thread(() -> {
    ldClient.close();
}));
Creating per-developer LaunchDarkly environments
Proliferating environments for each developer adds overhead in environment management, SDK key distribution, and flag state synchronization. Use the LaunchDarkly CLI dev server and the Dev Toolbar instead. These tools pull flag values from a shared LaunchDarkly environment and allow local overrides without affecting other developers.
Local overrides are not synced back to LaunchDarkly. They exist only for the duration of the local session.
Resiliency
This topic covers strategies for making your application resilient when feature flags are unavailable due to network partitions or outages.
Application Resilience Goals
Design your application to be resilient even if LaunchDarkly or the network is degraded. Your application must:
- Start successfully even if the SDK cannot connect during initialization
- Function in at most a degraded state when LaunchDarkly’s service is unavailable
A degraded state is acceptable when new features are temporarily disabled or optimizations are bypassed. A degraded state is not acceptable when core functionality breaks, errors occur, or user data is corrupted.
Focus Areas
Resiliency can be achieved through SDK implementation and via external infrastructure components such as LD Relay. This section covers both strategies and their tradeoffs. Our general recommendation is to start with SDK implementation and only add LD Relay if you have a specific use case that requires it.
Future Improvements
LaunchDarkly’s ongoing work in Feature Delivery v2 (FDv2) focuses on strengthening SDK and service capabilities so customers can achieve true resilience without depending on additional infrastructure components.
Key Concepts
This section defines the fundamental concepts and metrics used when designing resilient LaunchDarkly integrations.
Initialization
Initialization is the process by which a LaunchDarkly SDK establishes a connection to LaunchDarkly’s service and retrieves the current flag rules for your environment. During initialization, the SDK performs these steps:
- Establishes a connection to LaunchDarkly’s streaming or polling endpoints
- Retrieves all flag definitions and rules for your environment
- Stores these rules in an in-memory cache
- Begins listening for real-time updates to flag rules
Until initialization completes, the SDK cannot evaluate flags using the latest rules from LaunchDarkly. If a flag evaluation is requested before initialization completes, the SDK returns the fallback value you provide.
Initialization is a one-time process that occurs when the SDK client is first created. After initialization, the SDK maintains a persistent connection in streaming mode or periodically polls in polling mode to receive updates to flag rules.
Fallback/Default Values
Fallback values, also called default values, are the values your application provides to the SDK when calling variation() or variationDetail(). These values are returned by the SDK when:
- The SDK has not yet initialized
- The SDK cannot connect to LaunchDarkly’s service
- A flag does not exist or has been deleted
- The SDK is in offline mode
Fallback values are defined in your application code and represent the safe, default behavior your application should exhibit when flag data is unavailable. These values ensure your application continues to function even when LaunchDarkly’s service is unreachable.
Critical principle: Every flag evaluation must provide a fallback value that represents a safe, degraded state for your application. Never assume flag data is always available.
Key Metrics
Understanding these metrics helps you measure and improve the resilience of your LaunchDarkly integration.
Initialization Availability
Initialization Availability measures the period where an SDK is able to successfully retrieve at worst stale flags.
High initialization availability means your application will rarely see fallback values served.
Low initialization availability means your application frequently starts without flag data and must rely entirely on fallback values, potentially leading to degraded functionality.
Initialization Latency
Initialization Latency measures the time between creating an SDK client instance and when it successfully retrieves flag rules and is ready to evaluate flags.
This metric is critical for:
- Application startup time - Long initialization latency can delay application readiness
- User experience - Client-side applications may show incorrect UI if initialization takes too long
- Serverless cold starts - High latency can impact function execution time
Best practices aim to minimize initialization latency through:
- Non-blocking initialization with appropriate timeouts
- Bootstrapping strategies for client-side SDKs
- Relay Proxy deployment for serverless and high-scale environments
Evaluation Latency
Evaluation Latency measures the time it takes for the SDK to evaluate a flag and return a value after variation() is called.
This metric is typically very low, under 1ms, because:
- Flag rules are cached in memory after initialization
- Evaluation is a local computation that does not require network calls
- The SDK uses efficient in-memory data structures
Evaluation latency can increase if:
- The SDK is evaluating many flags simultaneously under high load
- Flag rules are extremely complex with many targeting rules or large segments
- The SDK is using external stores like Redis that introduce network latency
Update Propagation Latency
Update Propagation Latency measures the time between when a flag change is made in the LaunchDarkly UI and when that change is reflected in SDK evaluations.
This metric is important for:
- Real-time feature rollouts - Understanding how quickly changes reach your applications
- Emergency rollbacks - Knowing how quickly you can disable a feature across all instances
- Consistency requirements - Ensuring multiple services see flag changes at roughly the same time
Update propagation latency depends on:
- SDK mode - Streaming mode provides near-instant updates typically under 200ms, while polling mode adds delay based on polling interval
- Network conditions - Latency between your infrastructure and LaunchDarkly’s service
- Relay Proxy configuration - Additional hop when using Relay Proxy, usually minimal
- Geographic distribution - Applications in different regions may receive updates at slightly different times
In streaming mode, updates typically propagate in under 200ms. In polling mode, updates propagate within the configured polling interval, typically 30-60 seconds.
SDK Implementation
This guide explains how to implement LaunchDarkly SDKs for maximum resilience and minimal latency. Following these practices ensures your application can start reliably and function in a degraded state when LaunchDarkly’s service is unavailable.
Key Points
-
The SDK automatically retries connectivity in the background - Even if initialization timeout was exceeded, the SDK continues attempting to establish connectivity and update flag rules automatically.
-
You do not need to manually manage connections or implement your own cache on top of the SDK - The SDK handles all connection management and caching automatically.
-
Fallback values are only served when the SDK hasn’t initialized or the flag doesn’t exist - Once initialization completes, the SDK uses cached flag rules for all evaluations. Fallback values are returned only during the initial connection period or when a flag key is invalid.
-
You can subscribe to flag updates to update application state - Most SDKs provide a mechanism to fire a callback when flag rules change. Use this to have your application react to updates when connectivity is restored instead of waiting for the next
variationcall. This is common in Single-Page Applications and Mobile Applications.
Preflight Checklist Items for Application Latency
The following items from the SDK Preflight Checklist are particularly important for improving application latency and resilience:
-
Application does not block on initialization - Set timeouts: 100-500ms client-side, 1-5s server-side. Prevents extended startup delays.
-
Bootstrapping strategy defined and implemented - For client-side SDKs. Provides flag values immediately on page load, eliminating initialization delay for first paint.
-
SDK is initialized once as a singleton early in the application’s lifecycle - Prevents duplicate connections and ensures efficient resource usage.
-
Define and document fallback strategy - Every flag evaluation must provide a safe fallback value. Enables immediate evaluation without waiting for initialization.
-
Use
variation/variationDetail, notallFlags/allFlagsStatefor evaluation - Direct evaluation is faster and provides better telemetry. -
Leverage LD Relay to reduce initialization latency - For serverless functions and high-scale applications. Reduces initialization time from hundreds to tens of milliseconds.
-
Initialize the SDK outside of the handler - For serverless functions. Allows container reuse, eliminating initialization latency for warm invocations.
Currently in Early Access, Data Saving Mode introduces several key changes to the LaunchDarkly data system that greatly improves resilience to outages. To learn more, read Data Saving Mode in the LaunchDarkly documentation.
Initialization Caching
In data saving mode, the SDK will poll for initialization and subsequently open a streaming connection to receive realtime flag configuration changes. We can achieve high initialization availability by adding a caching proxy between the SDK and the polling endpoint while leaving the direct connection to the streaming endpoint in place.

The standard datasystem will allow for falling back to polling when streaming is not available.
Fallback Values
Fallback values are critical to application resilience. They ensure your application continues functioning when LaunchDarkly’s service is unavailable or flag data cannot be retrieved. However, fallback values can become stale over time, leading to incorrect behavior during outages. This guide explains how to choose appropriate fallback values and maintain them effectively.
- Choosing Fallback Values - Strategies for selecting appropriate fallback values
- Monitoring Fallback Values - Runtime monitoring with SDK hooks and data export
- Maintaining Fallback Values - Processes and centralized management
- Automating Fallback Updates - Build-time automation
Choosing Fallback Values
The fallback value you choose depends on the risk and impact of the feature being unavailable. Consider these strategies:
Fail Closed
Definition: Turn off the feature when flag data is unavailable.
When to use:
- New features that haven’t been fully validated
- Features that have not been released to all users
- Features that could introduce significant load or stability issues if released to everyone at once
Example:
// New checkout flow - fail closed if flag unavailable
const useNewCheckout = ldClient.variation('new-checkout-flow', false);
if (useNewCheckout) {
  return <NewCheckoutComponent />;
}
return <LegacyCheckoutComponent />;
Fail Open
Definition: Enable the feature for everyone when flag data is unavailable.
When to use:
- Features that have been generally available, also known as GA, for a while and are stable
- Circuit breakers/operational flags where the on state is the norm
- Features that would have significant impact if disabled for everyone at once
Example:
// Enable caching when flag is unavailable. Failing closed would cause a significant performance degradation.
const enableCache = ldClient.variation('enable-caching', true);
For temporary flags that we intend to remove, consider cleaning up and archiving the flag instead of updating the fallback value to true.
Dynamic Fallback Values
Definition: Implement logic to provide different fallback values to different users based on context.
When to use:
- Configuration/operational flags that override values from another source (environment variables, configuration, etc.)
- Advanced scenarios requiring sophisticated fallback logic
Example:
function getRateLimit(request: RequestContext): number {
   // dynamic rate limit based on the request method
   return ldclient.variation('config-rate-limit', request, request.method === 'GET' ? 100 : 10)
}
Maintaining Fallback Values
Fallback values can become stale as flags evolve. Use these methods to ensure fallback values remain accurate and up-to-date.
Create a Formal Process
Establish a formal process for defining and updating fallback values:
Process steps:
- Define fallback values at flag creation - Require fallback values when creating flags
- Document fallback strategy - Document why each fallback value was chosen (failing closed vs. failing open)
- Review fallback values during flag lifecycle - Review fallback values when:
- Flags are promoted from development to production
- Flags are modified or targeting rules change
- Flags are deprecated or removed
- Update fallback values as flags mature - Update fallback values when flags become GA or stable
- Test fallback values - Include fallback value testing in your testing strategy
Documentation template:
Flag: new-checkout-flow
Fallback value: false - failing closed
Rationale: New feature not yet validated in production. Safer to use legacy checkout during outages.
Review date: 2024-01-15
Next review: When flag reaches 50% rollout
Monitoring Fallback Values
Monitor fallback value usage and identify stale or incorrect fallback values.
Runtime
SDK Hooks
- Implement a before evaluation hook
- Record the fallback value for each evaluation in a telemetry system
- Compare fallback values to current flag state and desired behavior
Example SDK Hook:
class FallbackMonitoringHook implements Hook {
  beforeEvaluation(seriesContext: EvaluationSeriesContext, data: EvaluationSeriesData) {
    // Always log the fallback value being used
    this.logFallbackValue(
      seriesContext.flagKey,
      seriesContext.defaultValue,
    );
    return data;
  }
}
API
Use the LaunchDarkly API to generate reports on fallback values:
Example: This fallback-report script demonstrates how to:
- Retrieve flag definitions from the LaunchDarkly API
- Compare flag fallthrough/off variations with fallback values in code
- Generate reports identifying mismatches
Use cases:
- Scheduled reports comparing flag definitions with code fallback values
- CI/CD integration to detect fallback value mismatches
- Periodic audits of fallback value accuracy
Note: This approach relies on telemetry from SDKs generated when variation/variationDetail are called. The API only reports one fallback value and cannot reliably handle situations where different fallback values are used for different users or applications.
Static Analysis
Use static analysis to analyze fallback values:
- Scan codebases for
variation()calls - Extract fallback values from source code
- Compare with flag definitions
AI Tools
Use AI tools to analyze fallback values:
- Use AI to analyze code and suggest fallback value updates. You can find an example prompt in the LaunchDarkly Labs Agent Prompts repository.
- Identify patterns in fallback value usage
- Generate recommendations based on flag lifecycle stage
- Use
ldclior the LaunchDarkly MCP to enable the agent to compare fallback values to flag definitions
Automating Fallback Updates
This approach centralizes fallback values in a configuration file and updates them automatically during your build process. The automation queries LaunchDarkly for current flag definitions and determines the appropriate fallback value for each flag.
Centralize Fallback Management
Wrapper Functions
Create wrapper functions around variation() and variationDetail() that load fallback values from a centralized configuration:
Example:
// fallback-config.json
{
  "new-checkout-flow": false,
  "cache-optimization-v2": true,
  "experimental-feature": false
}

// wrapper.ts
import fallbackConfig from './fallback-config.json';

export function variationWithFallback(
  client: LDClient,
  flagKey: string,
  context: LDContext
): LDEvaluationDetail {
  let fallbackValue = fallbackConfig[flagKey];
  if (fallbackValue === undefined) {

    // you may want to make this an error in preproduction environments to catch missing fallback values early
    console.warn(`No fallback value defined for flag: ${flagKey}`);
    // you can use naming convention or other logic to determine a default fallback value
    // for example, release flags may default to failing closed
    if (flagKey.startsWith('release-')) {
      fallbackValue = false;
    }
  }
  return client.variationDetail(flagKey, context, fallbackValue);
}
Benefits:
- Single source of truth for fallback values
- Easier to automate fallback value updates
- Logic can be shared across applications and services
Tradeoffs:
- Difficult to implement dynamic fallback values (e.g., different fallback values for different users or applications)
- Loss of locality: fallback values are no longer present in the variation call and require checking the fallback definition file
Process
- During build, query LaunchDarkly SDK polling endpoint for all flag definitions in an environment
- For each flag, intelligently determine the appropriate fallback value:
- If flag is OFF → use off variation
- If prerequisites exist and would not pass for all users → use off variation
- If flag has multiple variations in targeting (rules, rollouts, etc.) → use off variation
- If all targeting serves a single variation → use that variation
- Update fallback configuration files with determined values
- Validate that fallback values match expected types
Example Build Script
Fetch flag data from LaunchDarkly SDK polling endpoint:
#!/bin/bash
# Update fallback values from LaunchDarkly flags with intelligent fallback selection
# Uses the SDK polling endpoint which provides all flags for an environment

# Get the directory where this script is located
SCRIPT_DIR="$(cd "$(dirname "${BASH_SOURCE[0]}")" && pwd)"

curl -s -H "Authorization: ${LD_SDK_KEY}" \
  "https://sdk.launchdarkly.com/sdk/latest-all" \
  | jq -f "${SCRIPT_DIR}/parse-fallbacks.jq" \
  > fallback-config.json
Parse fallback values using intelligent logic (handles prerequisites, rollouts, and targeting rules):
# Recursive function to get recommended fallback for a flag
def get_fallback($flag; $allFlags):
  # Helper function to get off variation value
  def get_off_variation_value:
    if $flag.offVariation != null then
      $flag.variations[$flag.offVariation]
    else
      (debug("WARNING: Flag '\($flag.key)' has no offVariation set, omitting from output")) | empty
    end;

  # Helper function to check if flag has multi-variation rollouts
  def has_multi_rollout:
    (
      # Check rules for multi-variation rollouts (with null safety)
      (($flag.rules // []) | map(
        if .rollout and .rollout.variations then
          (.rollout.variations | map(select(.weight > 0)) | length) > 1
        else
          false
        end
      ) | any) or

      # Check fallthrough for multi-variation rollout (with null safety)
      (if $flag.fallthrough.rollout and $flag.fallthrough.rollout.variations then
        ($flag.fallthrough.rollout.variations | map(select(.weight > 0)) | length) > 1
      else
        false
      end)
    );

  # Helper function to get all unique variations served
  def get_all_variations:
    (
      # Legacy target variations
      ([$flag.targets[]?.variation] // []) +

      # Context target variations
      ([$flag.contextTargets[]?.variation] // []) +

      # Rule variations (either direct or from single-variation rollout)
      (($flag.rules // []) | map(
        if .variation != null then
          .variation
        elif .rollout and .rollout.variations then
          (.rollout.variations[] | select(.weight > 0) | .variation)
        else
          empty
        end
      )) +

      # Fallthrough variation
      (if $flag.fallthrough.variation != null then
        [$flag.fallthrough.variation]
      elif $flag.fallthrough.rollout and $flag.fallthrough.rollout.variations then
        [$flag.fallthrough.rollout.variations[] | select(.weight > 0) | .variation]
      else
        []
      end)
    ) | unique;

  # Step 1: Check prerequisites first
  if ($flag.prerequisites and ($flag.prerequisites | length) > 0) then
    # Check each prerequisite
    ($flag.prerequisites | map(
      . as $prereq |
      # Find the prerequisite flag in all flags
      ($allFlags[] | select(.key == $prereq.key)) as $prereqFlag |

      # Get the fallback value for the prerequisite flag (recursive call)
      get_fallback($prereqFlag; $allFlags) as $prereqFallback |

      # Check if prerequisite passes:
      # 1. If prereq flag is OFF, prerequisite fails
      # 2. If prereq fallback does not match expected variation value, prerequisite fails
      if ($prereqFlag.on == false) then
        false
      elif ($prereqFallback != $prereqFlag.variations[$prereq.variation]) then
        false
      else
        true
      end
    ) | all) as $allPrereqsPass |

    # If any prerequisite fails, return off variation
    if $allPrereqsPass == false then
      get_off_variation_value
    else
      # All prerequisites pass, continue with normal evaluation
      if $flag.on == false then
        get_off_variation_value
      elif has_multi_rollout then
        get_off_variation_value
      else
        get_all_variations as $variations |
        if ($variations | length) == 1 then
          $flag.variations[$variations[0]]
        else
          get_off_variation_value
        end
      end
    end
  else
    # No prerequisites, use normal evaluation logic
    if $flag.on == false then
      get_off_variation_value
    elif has_multi_rollout then
      get_off_variation_value
    else
      get_all_variations as $variations |
      if ($variations | length) == 1 then
        $flag.variations[$variations[0]]
      else
        get_off_variation_value
      end
    end
  end;

# Main processing: convert flags object to array and process each one
.flags | to_entries | map(.value) as $allFlags |
[$allFlags[] |
  . as $flag |
  {
    name: .key,
    value: get_fallback($flag; $allFlags)
  }
] | from_entries
Benefits
- Ensures fallback values match current flag definitions
- Reduces manual maintenance overhead
- Catches drift between code and flag definitions
- Supports automated flag lifecycle management
Considerations
- Uses the SDK polling endpoint (
https://sdk.launchdarkly.com/sdk/latest-all) which provides all flags for an environment - Requires an SDK key (not an API key) to authenticate
- The logic for determining fallback values is complex and handles prerequisites, rollouts, and targeting rules
- Prerequisites are evaluated recursively to determine if they would pass for all users
- Ensure your team is aware of how fallback values are generated from targeting state
- The generated fallback values represent the “safest” value for each flag during an outage
LD Relay
The LaunchDarkly Relay Proxy (LD Relay) can be deployed in your infrastructure to provide a local endpoint for SDKs, reducing outbound connections and potentially improving initialization availability. However, LD Relay introduces operational complexity and new failure modes that must be carefully managed.
Risks and Operational Burden
Using LD Relay introduces:
- Additional infrastructure: More services to deploy, monitor, scale, and secure
- Resource constraints: Insufficiently provisioned relay instances can become bottlenecks or points of failure
- Maintenance overhead: Your team must handle responsibilities previously managed by LaunchDarkly’s platform
Operationalizing LD Relay
Deploy Highly Available Infrastructure
Load balancer:
- Implement a highly available internal load balancer as the entry point for all flag delivery traffic
- If the load balancer is not highly available, it becomes a single point of failure
- Support routing to LaunchDarkly’s primary streaming network and LD Relay instances
Relay instances:
- Deploy multiple Relay Proxy instances across different availability zones
- Ensure each instance is properly sized and monitored
- Implement health checks and automatic failover
Persistent Storage
LD Relay can operate with or without persistent storage. Each approach has different tradeoffs:
With persistent storage such as Redis:
- Benefits:
- Enables scaling LD Relay instances during outages
- Allows restarting LD Relay instances without losing flag data
- Provides durable cache that survives Relay Proxy restarts
- Tradeoffs:
- Increases operational complexity. Additional service to manage.
- Requires configuring infinite cache TTLs to prevent lower availability and incorrect evaluations
- Prevents using AutoConfig. AutoConfig requires in-memory only operation.
- Additional monitoring and alerting requirements for cache health
Without persistent storage, in-memory only:
- Benefits:
- Simpler architecture with fewer components to manage
- Supports AutoConfig for dynamic environment configuration
- Lower operational overhead
- Tradeoffs:
- Relies on LD Relay cluster being able to service production traffic without restarting or adding instances during outages
- Lost cache on Relay Proxy restart. Requires re-initialization from LaunchDarkly’s service.
- Must ensure sufficient capacity and redundancy to handle outages without scaling
Monitor and Alert
Key metrics to monitor:
- Initialization latency and errors
- CPU/Memory utilization
- Network utilization
- Persistent store availability
When to use LD Relay
LD Relay can improve initialization availability in these scenarios:
Frequent Deployments or Restarts
Use LD Relay when: You deploy or restart services frequently, at least once per day.
Why: Frequent restarts mean frequent SDK initializations. LD Relay reduces initialization latency and provides cached flag data even if LaunchDarkly’s service is temporarily unavailable during a restart window.
Example scenarios:
- Kubernetes deployments with rolling restarts
- Serverless functions with frequent cold starts
- Containers that restart frequently for configuration updates
Critical Consistency Requirements
Use LD Relay when: Multiple services or instances must evaluate flags consistently, even during short outages of initialization availability.
Why: LD Relay provides a shared cache that multiple SDK instances can use, ensuring consistent flag evaluations across services even when LaunchDarkly’s service is temporarily unavailable.
Example scenarios:
- Microservices that must all evaluate the same flag consistently
- Multi-region deployments requiring consistent feature rollouts
- Applications where inconsistent flag evaluations cause data corruption or business logic errors
High Impact of Fallback Values
Use LD Relay when: Fallback values cause significant business impact, such as loss of business, not just degraded UX.
Why: When fallback values cause significant business impact such as payment processing failures, data loss, or compliance violations, LD Relay provides cached flag data to avoid serving fallbacks.
Example scenarios:
- Payment processing systems where fallback values cause transaction failures
- Compliance-critical features where fallback values violate regulations
- Safety-critical systems where degraded functionality is unacceptable
Additional information
For detailed information on LD Relay configuration, scaling and performance guidelines and refer to the LD Relay chapter.
To plan resiliency tests when the Relay Proxy or its upstream connection fails, read Emulating Relay Proxy issues.
Overview
This topic explains the LaunchDarkly Relay Proxy, a small service that runs in your own infrastructure. It connects to LaunchDarkly and provides endpoints to service SDK requests and the ability to populate persistent stores.
Resources and documentation:
Use cases
This table lists common use cases for the Relay Proxy:
| Name | Description |
|---|---|
| Restart resiliency for server-side SDKs | LD Relay acts as an external cache to server-side SDKs to provide flag and segments rules |
| Reduce egress and outbound connections | LD Relay can service initialization or streaming requests from SDKs instead of having them connect to LaunchDarkly directly. In event forwarding mode, LD Relay can buffer and compress event payloads from multiple SDK instances |
| Air-gapped environments and snapshots | LD Relay can load flags or segments from an archive exported via the LaunchDarkly API. Available for Enterprise plans only |
| Reduce initialization latency | LD Relay acts as a local cache for initialization requests |
| Support PHP and serverless environments | LD Relay can service short-lived processes via proxy mode and populate persistent stores for daemon-mode clients |
| Syncing big segments to a persistent store | LD Relay can populate big segment stores with membership information for use with server-side SDKs |
Modes of operation
Proxy Mode: SDKs connect to LD Relay to receive flags and updates.
Daemon Mode: LD Relay syncs flags to a persistent store. SDKs retrieve flags as needed directly from the store and do not establish their own streaming connection
Daemon Mode is used in environments where the SDK can not establish a long-lived connection to LaunchDarkly. This is common in serverless environments where the function is terminated after a certain amount of time or PHP.
Additional features
Event forwarding: LD Relay buffers, compresses, and forwards events from the SDKs to LaunchDarkly
Big Segment Syncing: LD Relay syncs big segment data to a persistent store
Scaling and Performance
Overview
This topic explains scaling and performance considerations for the Relay Proxy.
The computational requirements for LD Relay are fairly minimal when serving server-side SDKs or when used to populate a persistent store. In this configuration, the biggest scaling bottleneck is network bandwidth and throughput. Provision LD Relay as you would for an HTTPS proxy and tune for at least twice the number of concurrent connections you expect to see.
You should leverage monitoring and alerting to ensure that the LD Relay cluster has the capacity to handle your workload and scale it as needed.
Out of the box, LD Relay is fairly light-weight. At a minimum you can expect:
- 1 long-lived HTTPS SSE connection to LaunchDarkly’s streaming endpoint per configured environment
- 1 long-lived HTTPS SSE connection to the AutoConfiguration endpoint when automatic configuration is enabled
Memory usage increases with the number of configured environments, the payload size of the flags and segments, and the number of connected SDKs. Client-side SDKs have higher computation requirements as the evaluation occurs in LD Relay.
Event forwarding
LD Relay handles the following event forwarding patterns:
- Approximately 1 incoming HTTPS request every 2 seconds per connected SDK. This may vary based on flush interval and event capacity settings in the SDK.
- Approximately 1 outgoing HTTPS request every 2 seconds per configured environment. This may vary based on LD Relay’s configured flush interval and event capacity.
Memory usage increases with event capacity and the number of connected SDKs.
Scaling strategies
Each LD Relay instance maintains connections and manages configuration for the environments you assign to it. The number of environments a single instance can handle depends on your memory, CPU, and network resources. Monitor resource usage to determine when to scale.
When your environment count or size exceeds the limits of a single Relay instance, use one of these scaling approaches:
- Horizontal scaling: Add more Relay instances to share the load across your environments. This approach provides greater resilience and easier dynamic scaling.
- Vertical scaling: Increase the memory and CPU resources allocated to each Relay instance.
- Environment sharding: Distribute environments across multiple Relay instances so each Relay manages a subset of environments rather than all of them.
Environment sharding
Sharding distributes environment configurations across multiple Relay instances. Each Relay manages a subset of environments rather than all of them.
Use sharding in the following situations:
- Your environment count or size exceeds the limits of a single Relay instance.
- You need to seperate instances by failure or compliance domains.
- You need to simplify health checks for load balancers and container orchestrators.
Sharding provides the following advantages:
- Reduces memory and CPU load per Relay instance.
- Limits the impact of failures or configuration errors.
- Improves cache efficiency and stability by isolating workloads.
Seperation of concerns
LD Relay can perform several functions such as acting providing rules to server-side SDKs, evaluating flags for client-side SDKs, forwarding events, and populating persistent stores. You can configure LD Relay to perform one or more of these functions.
You may want consider using seperate LD Relay instances for different functions based on scaling characteristics and criticality. For example you might have seperate clusters for:
- Server-side SDKs
- Client-side SDKs (Evaluation)
- Event forwarding
- Populating persistent stores for daemon-mode or syncing big segments
This approach provides the following advantages:
- Easier to individually scale components and predict resource utilization
- Seperate concerns and increase reliabiity of critical components (e.g serving rules to server-side SDKs is more critical than event forwarding)
- Prevent client-side workloads from impacting server-side SDKs
This approach will generally increase the total cost of ownership of the deployment as you will need to deploy and manage multiple instances. It is more applicable to large deployments with a mix of use-cases.
Proxy Mode
Overview
This topic explains proxy mode configuration for the Relay Proxy.
This table shows recommended configuration options:
| Configuration | Recommendation | Notes |
|---|---|---|
| Automatic configuration | Enable if not using a persistent store for restart or scale resiliency | Automatic configuration allows you to avoid re-deploys when adding new projects or environments or rotating SDK keys. LD Relay cannot start if the automatic configuration endpoint is down even when a persistent store is used. If the ability to restart or add LD Relay nodes while LaunchDarkly is unavailable is critical, do not use automatic configuration |
| Event forwarding | Enable | Allow SDKs to forward events to LD Relay to reduce outbound connections and offload compression |
| Metrics | Enable | Enable at least one of the supported metrics integrations such as Prometheus |
| Persistent Stores | Optional. | Persistent stores can be used to allow the deployment of additional LD Relay instances while LaunchDarkly is unavailable. You may opt instead to provision LD Relay so it can handle at least 1.5x-2x of your production traffic in order to avoid the need to scale LD Relay during short outages. |
| Disconnected Status Time | Optional. | Time to wait before marking an environment as disconnected. The default is 1m and is sufficient for instances with reliable networks. If you are using LD Relay in an unreliable network environment, consider increasing this value |
Here is an example:
[Main]
; Time to wait before marking a client as disconnected.
; Impacts the status page
; disconnectedStatusTime=1m

;; For automatic configuration
[AutoConfig]
key=rel-abc-123
;; Event forwarding when setting the event uri to LD Relay in your SDK
[Events]
enable=true

;; Metrics integration for monitoring and alerting
[Prometheus]
enabled=true
Persistent Stores
Persistent stores can be used to improve reboot and restart resilience for LD Relay in the event of a network partition between your application and LaunchDarkly.
This table shows persistent store configuration options:
| Configuration | Recommendation | Notes |
|---|---|---|
| Cache TTL | Infinite with a negative number, localTTL=-1s | An infinite cache TTL means LD Relay maintains its in-memory cache of all flags, mitigating the risk of persistent store downtime. If the persistent store goes down with a non-infinite cache TTL, you may see partial or invalid evaluations due to missing flags or segments. |
| Prefix or Table name | Use the client-side id | The prefix or table name must be unique per environment. When using autoconfig, the placeholder $CID can be used. This is replaced with the client-side id of the environment. Using the same scheme when statically configuring environments allows for consistency if you switch between these options |
| Ignore Connection Errors | ignoreConnectionErrors=true when AutoConfig is disabled | By default, LD Relay shuts down if it cannot reach LaunchDarkly after the initialization timeout is exceeded. To have LD Relay begin serving requests from the persistent store after the timeout, you must set ignore connection errors to true |
| Initialization Timeout | Tune to your needs, default is 10s | This setting controls how long LD Relay attempts to initialize its environments. Until initialization succeeds, LD Relay serves 503 errors to any SDKs that attempt to connect. What happens when the timeout is exceeded depends on the setting of ignore connection errors. When ignore connection errors is false, which is the default, LD Relay shuts down after the timeout is exceeded. Otherwise, LD Relay begins servicing SDK requests using the data in the persistent store. |
Here is an example:
[Main]
;; You must set ignoreConnectionErrors=true in order for LD Relay to start without a connection to LaunchDarkly. You should set this when using a persistent store for flag availability.
ignoreConnectionErrors=true
;; How long will LD Relay wait for connection to LaunchDarkly before serving requests.
;; If ignoreConnectionErrors is false, LD Relay will exit with an error if it cannot connect to LaunchDarkly within the timeout.
initTimeout=10s;; Default is 10 seconds

;; NOTE: If you are using Automatic Configuration, LD Relay can not start without a connection to LaunchDarkly.
[AutoConfig]
key=rel-abc-123
; When using Automatic Configuration with a persistent store, you must use the $CID placeholder.
; Use a separate DynamoDB table per environment
envDatastoreTableName="ld-$CID"
; Or use a single table with unique prefix per environment
;envDatastorePrefix="ld-$CID"
;envDatastoreTableName="ld"

; When not using automatic configuration, set the prefix and/or table name for each environment.
; see https://github.com/launchdarkly/ld-relay/blob/v8/docs/configuration.md#file-section-environment-name


[Redis]
enabled=true
url=redis://host:port
; Always use an infinite cache TTL for persistent stores
localTtl=-1s

[DynamoDB]
enabled=true
; Always use an infinite cache TTL for persistent stores
localTtl=-1s
SDK Configuration
Configure the endpoints you want to handle using LD Relay. Events must be enabled if you set the events URI. To learn more about configuring endpoints, read Proxy mode.
Infrastructure
-
Minimum 3 instances in at least two availability zones per region.
- On-prem: Consider failure domains in your deployment such as separate racks and power
- Cloud: Follow the guidelines of your hosting provider to qualify for SLAs
-
Highly available load balancer with support for SSE connections
You should target 99.99 percent availability, which matches LaunchDarkly’s SLA for flag delivery.
Scaling and performance
In addition to the base scaling and performance guidelines, Proxy Mode has the following considerations:
Server-side SDKs
1 incoming long-lived HTTPS SSE connection per connected server-side SDK instance
Client-side SDKs
- 1 outgoing long-lived HTTPS SSE connection per connected client-side SDK instance with streaming enabled
- 1 incoming HTTPS request per connected client-side SDK every time a flag or segment is updated
LD Relay does not scale well with streaming client-side connections and should be avoided. It can handle polling requests to the base URI without issue. For browser SDKs, you can use LD Relay for initialization and the SaaS for streaming.
Do not point the stream URI of client-side mobile SDKs to LD Relay without careful consideration.
Daemon Mode
Overview
This topic explains daemon mode, a workaround for environments where normal operation is not possible. Avoid using it unless strictly necessary. Daemon Mode is not a solution for increasing flag availability.
- Using Daemon Mode
- Using Redis as a persistent feature store
- Using DynamoDB as a persistent feature store
Guidelines
Set useLDD=true in your SDK configuration
Daemon mode requires that you both enable daemon mode and configure the persistent store. Enabling daemon mode tells the SDK not to establish a streaming or polling connection for flags and instead rely on the persistent store. For SDK-specific configuration examples, see Using daemon mode.
Choose a unique prefix
It is critical that each environment has a unique prefix to avoid corrupting the data. When using autoconfig, you can do this automatically using the $CID placeholder. See the example below.
Restart LD Relay when persistent store is cleared
If the persistent store is missing information, either because updates were lost or the store was cleared, you should start LD Relay to repopulate the data. You may want to consider automatically restarting LD Relay or running an LD Relay instance in one-shot mode every time the persistent store starts.
Choosing a cache TTL for your SDK
The Cache TTL controls how long the SDK will cache rules for flags and segments in memory. Once the cache expires for a particular flag or segment, the SDK fetches it from the persistent store at evaluation time.
This table shows cache TTL options and their trade-offs:
| Option | Resilency | Evaluation Latency | Update Propogation Latency |
|---|---|---|---|
| Higher TTL | Higher | Lower | Higher |
| Lower TTL | Lower | Higher† | Lower |
| No Cache with TTL=0 | Lowest, persistent store must always be available | Highest, all evaluations require one or more network calls | Lowest, updates are seen as soon as they are written to the store |
| Infinite Cache with TTL=-1†† | Highest | Lowest with flags in memory | Updates are never seen by the SDK unless you configure stale-while-revalidate††† |
† In select SDKs such as the Java Server-Side SDK, you can configure stale-while-revalidate semantics so that flags are always served from the in-memory cache and refreshed from the persistent store asynchronously in the background
†† Only supported in some SDKs
††† Unless you have configured a stale-while-revalidate in a supported SDK
LD Relay Configuration
Here is an example:
; If using AutoConfig
[AutoConfig]
key=rel-abc-123
; Use a separate DynamoDB table per environment
envDatastoreTableName="ld-$CID"
; Or use a single table with unique prefix per environment
;envDatastorePrefix="ld-$CID"
;envDatastoreTableName="ld"

[Events]
; Enable event forwarding if using LD Relay as the event uri in your SDK
enable=true

[Prometheus]
enabled=true

[DynamoDB]
; change to true if using dynamodb
enabled=false
localTtl=-1s

[Redis]
; Change to true if using redis
enabled=false
url=redis://host:port
localTtl=-1s
;tls=true
;password=
SDK Configuration
In Daemon Mode, you configure both daemon mode and the persistent store in the SDK. To learn more about configuring daemon mode and the persistent store, read Daemon mode.
Scaling and performance
In addition to the base scaling and performance guidelines, Daemon Mode has the following additional characteristics:
In Daemon Mode, you only need one instance of LD Relay to keep the persistent store up to date. Multiple instances do not help scale with the number of connected clients. You should take steps to ensure at least one instance is running.
The persistent store has a read-bound workload and contains the flag and segment rules for your configured environments. The amount of data is typically quite small. The data matches the information returned by the streaming and polling endpoints. Here is how to check the payload size and content:
curl -LH "Authorization: $LD_SDK_KEY" https://sdk.launchdarkly.com/sdk/latest-all | wc -b
If you are using big segments in this environment, all of the user keys for every big segment in configured environments sync to the store. This can cause an increased write workload to the persistent store.
Emulating Relay Proxy issues
This topic explains how to test application behavior when the Relay Proxy is down or unreachable. This page covers two situations:
- No prior connection to LaunchDarkly to create the cache or populate the persistent data store
- The Relay Proxy already running with cache or persistent data store populated, then disconnected
Cold relay
A cold relay scenario covers the Relay Proxy starting when it cannot reach LaunchDarkly, or when your application targets a Relay Proxy that is not reachable during startup.
Point SDK URIs at an unreachable host
Follow the same approach as invalid endpoint tests for direct LaunchDarkly connections. Configure streaming, base, and polling URIs in the SDK so they target a host that accepts no connections instead of your Relay Proxy endpoint.
This path also exercises the case where the Relay Proxy is unreachable inside a customer’s own network while an application attempts to connect to it. The customer should verify proper alerting is triggered in their system during the cold relay test.
Read Init and Config for baseline SDK timeout and initialization guidance.
Misconfigure the Relay Proxy streaming URI
Deploy a Relay Proxy configuration that sets streamUri in the [Main] section to an endpoint that never accepts a connection. Set ignoreConnectionErrors to true so the process keeps running. Tune initTimeout to the wait you expect before the Relay Proxy serves from a persistent store when you use one.
This example shows the pattern:
[Main]
streamUri = "http://127.0.0.1:1"
ignoreConnectionErrors = true
initTimeout = 10s
You must still define the rest of the Relay Proxy configuration, the above is a snippet.
Warm relay
A warm relay scenario covers a Relay Proxy that already initialized against LaunchDarkly and is serving from its in-memory cache or from a persistent data store.
Complete these steps:
- Start the Relay Proxy with a normal configuration. Let it initialize and write flags to the persistent store when you use one.
- Block the LaunchDarkly streaming connection while the Relay Proxy keeps running. Use a firewall rule, a network partition, or the methods in Emulating LaunchDarkly Downtime.
- Start your application with SDK URIs pointed at the Relay Proxy.
- Verify the application reads real flag values from the Relay Proxy or its store. Confirm it does not rely solely on hardcoded fallback values in code.
If the Relay Proxy is misconfigured, behavior may be different than expected.
Observe connection state during tests
Use the Relay Proxy /status endpoint to inspect connection health during a test. The endpoint returns JSON. Do not treat HTTP 200 alone as proof that the Relay Proxy is healthy. Parse the JSON and read the reported fields.
The disconnectedStatusTime setting in [Main] controls how long a stream may stay interrupted before the status reflects a full disconnect. Read Proxy Mode for details.
The /status endpoint returns JSON:
- While LaunchDarkly streaming works, you see
"status": "connected"and"connectionStatus": { "state": "VALID" }. - Right after you block the stream, and before
disconnectedStatusTimeelapses, you see"connectionStatus": { "state": "INTERRUPTED" }. The top-level"status"can still be"connected"during that window. - After
disconnectedStatusTimeelapses, you see"status": "disconnected"and an overall degraded condition in the status payload.
Testing Frequency
Run Relay Proxy issue testing on a less frequent cadence such as in a full regression suite during a disaster recovery exercise.
Related topics
Reverse Proxies
Overview
This topic explains reverse proxy configuration settings for the Relay Proxy.
HTTP proxies such as corporate proxies and WAFs, and reverse proxies in front of Relay such as nginx, HAProxy, and ALB are common in LD Relay deployments. This table lists settings to configure:
| Setting | Configuration | Notes |
|---|---|---|
| Response buffering for SSE endpoints | Disable | It is common for reverse proxies to buffer the entire response from the origin server before sending it to the client. Since SSEs are effectively an HTTP response that never ends, this prevents the SDK from seeing events sent over the stream until the response buffer is filled or the request closes due to a timeout. Relay sends a special header that disables response buffering in nginx automatically: X-Accel-Response-Buffering: no |
| Forced Gzip compression for SSE endpoints | Disable if the proxy is not SSE aware | Gzip compression buffers the responses |
| Response Timeout or Max Connection Time for SSE Endpoints | Minimum 10 minutes | Avoid long timeouts because while the SDK client reconnects, you can end up wasting resources in the load balancer on disconnected clients. |
| Upstream or Proxy Read Timeout | 5 minutes | The timeout between successful read requests. In nginx, this setting is called proxy_read_timeout |
| CORS Headers | Restrict to only your domains | Send CORS headers restricted to only your domains when using LD Relay with browser SDK endpoints |
| Status endpoint | Restrict access | Restrict access to this endpoint from public access |
| Metrics or Prometheus port | Restrict access | Restrict access to this port |
AutoConfig
Overview
This topic explains AutoConfig for the Relay Proxy, which allows you to configure Relay Proxy instances automatically.
Custom Roles
These custom role policies allow members to create and modify LD Relay AutoConfigs.
All instances
For an LD Relay Admin type role with access to all LD Relay instances:
Here is an example:
[
  {
    "effect": "allow",
    "resources": ["relay-proxy-config/*"],
    "actions": ["*"]
  }
]
Specific instance by ID
Here is an example:
[
  {
    "effect": "allow",
    "resources": ["relay-proxy-config/60be765280f9560e5cac9d4b"],
    "actions": ["*"]
  }
]
You can find your auto-configuration ID from the URL when editing its settings or using the API:
Using AutoConfig
Selecting Environments
You can select the environments to include in a Relay Proxy configuration.
Examples
Production environment in all projects
Here is an example:
[
  {
    "actions": ["*"],
    "effect": "allow",
    "resources": ["proj/*:env/production"]
  }
]
Production environment in foo project
[
  {
    "actions": ["*"],
    "effect": "allow",
    "resources": ["proj/foo:env/production"]
  }
]
All environments in projects starting with foo-
[
  {
    "actions": ["*"],
    "effect": "allow",
    "resources": ["proj/foo-*:env/*"]
  }
]
Production in projects tagged “bar”
[
  {
    "actions": ["*"],
    "effect": "allow",
    "resources": ["proj/*;bar:env/production"]
  }
]
All non-production environments in any projects not tagged federal Deny has precedence within a single policy
[
  {
    "actions": ["*"],
    "effect": "allow",
    "resources": ["proj/*:env/*"]
  },
  {
    "actions": ["*"],
    "effect": "deny",
    "resources": ["proj/*:env/production", "proj/*;federal:env/*"]
  }
]
Guarded Releases
Guarded rollouts add an automated safety layer to your feature releases. They progressively increase traffic to a new variation while watching your metrics for regressions. When a metric shows a statistically significant negative impact, the rollout can roll back automatically before users feel the harm.
How guarded rollouts work
A guarded rollout compares the new variation against the control across the metrics you select. It uses sequential testing to decide whether the difference represents a real regression. The rollout also requires a minimum number of contexts at each step to keep its decisions reliable.
When the rollout detects a regression, it flags the affected metric. If you enable automatic rollback, LaunchDarkly reverts the release for you.
To learn more about the mechanism, read Guarded rollouts in the LaunchDarkly documentation.
Topics
This section covers:
- Data privacy and consent: Understand what telemetry guarded rollouts use and how to integrate consent and GDPR requirements.
Data privacy and consent for guarded rollouts
Navigating data privacy, user consent, and GDPR in European software delivery can feel daunting. Each organization must legally make its own framework choices. Development teams often get caught in compliance questions with no single, universal answer.
The fastest way out of that cycle is to simplify the technical choices your teams face. This page maps out what data guarded rollouts send, how the signals work, and what your integration options are. Use it as a readable reference for your engineering, product, and legal teams.
This page explains technical capabilities and trade-offs. It does not provide legal advice. Your legal and governance teams own all consent classifications.
Guarded rollouts prioritize release safety
The primary purpose of a guarded rollout is system safety and release stability. A guarded rollout acts as an automated safety layer during a feature release. It runs a live statistical comparison between your exposure groups, such as contexts receiving the new variation against the control group. When metrics show a regression or a spike in errors, the rollout can trigger an automatic rollback.
What guarded rollouts do: Detect regressions in stability and health metrics, then roll back a bad release before it harms users.
What guarded rollouts do not do: Marketing attribution, advertising profiling, or behavioral content personalization.
To learn more about the underlying mechanism, read Guarded rollouts in the LaunchDarkly documentation.
What telemetry guarded rollouts use
To evaluate how data flows through your stack, understand what each signal does technically. Each signal also interacts differently with the rollback engine. The following three categories cover the signals you need to classify.
In this model, both session replay and observability analytics are capabilities within the observability plugin. The plugin groups these signals, so you configure them together when you initialize the SDK.
Session replay
Session replay captures visual playbacks of user actions, such as UI interactions, form inputs, and mouse movements.
This is an auxiliary debugging and user experience tool. It operates independently and does not power the guarded rollout rollback engine. All obfuscation and redaction happen client-side, so you can mask sensitive fields before any data leaves the browser. To learn more, read Session replay.
Observability and metrics
The observability plugin tracks operational telemetry, including errors, latency distributions, and aggregate health metrics. Metrics can also track behavioral actions, such as click paths and feature engagement.
This is the primary engine that fuels guarded rollouts. The rollout maps these stability signals against your flag to detect regressions. To separate infrastructure health from behavioral tracking, disable product analytics while keeping error tracking active:
new Observability({
  productAnalytics: false  // Stops clicks, page views, and custom event capture
})
Setting productAnalytics: false preserves error monitoring, logs, metrics, and tracing. It stops collection of clicks, page views, and custom analytics events.
Custom metrics
Custom metrics let your teams define and send bespoke telemetry points. Examples include checkout conversion rates, API success rates, or business KPIs. Your application sends these through SDK events or the metric import API.
Custom metrics let a guarded rollout protect features using business-specific guardrails rather than generic infrastructure health. Because your team defines these metrics, you retain full control over the payload. You decide what data you send and whether you attach any user identifiers.
Three options for integrating consent
When you integrate guarded rollouts with an enterprise consent platform, you generally have three paths. Each path carries operational and data-completeness trade-offs.
Option 1: No consent gate
In this configuration, system safety signals flow for all sessions. The browser provisions localStorage for client-side state without a consent gate.
This provides a complete data sample and gives the rollout maximum accuracy to detect regressions. It requires no custom integration with a consent banner. It leaves the user experience unchanged.
Option 2: Fully consent-gated
Here, telemetry is strictly bound to user choice. Your application collects telemetry and writes client-side localStorage only when a user opts in to a designated category in your privacy banner.
This option is highly conservative. Your opt-out rate directly reduces your data sample size. Rollback accuracy degrades in proportion. For example, if an error only affects users who opted out, the rollout cannot see the signal to roll back. This option requires full integration with your consent handler.
Option 3: Hybrid model
This approach splits telemetry into two tiers based on technical identifiers:
- Ungated tier: Anonymous, non-identifiable operational signals flow for all sessions. Examples include aggregate latency and error distributions, keyed by opaque session-scoped identifiers.
- Gated tier: Identifiable context attributes, such as internal account IDs or emails, attach only after a user grants affirmative consent.
This option preserves full accuracy for core system-health rollbacks. More granular metrics that need user-cohort matching only compute for consented sessions. It requires a lighter integration than Option 2. The gate controls a specific context attribute rather than halting the entire network connection.
Comparing the three options
Use this table to compare the options at a glance:
| Option | Rollback accuracy | Integration effort | Identifiers sent |
|---|---|---|---|
| No consent gate | Full | None | Per your context design |
| Fully consent-gated | Reduced by opt-out rate | High | Consented sessions only |
| Hybrid model | Full for system health | Moderate | Anonymous always, identifiable on consent |
Your turn: Map each telemetry signal to a consent decision before you implement. This snapshot helps your legal and engineering teams agree on a single approach.
| Signal | Powers rollback? | Consent category | Chosen option |
|---|---|---|---|
| Session replay | |||
| Observability and metrics | |||
| Custom metrics |
Where responsibility sits
Keep a clear boundary between technical capability and legal responsibility when you communicate with stakeholders.
LaunchDarkly provides the technical capabilities to filter, gate, and toggle data flows. LaunchDarkly does not dictate consent language or legal classifications. The classification of guarded rollout telemetry within your privacy framework belongs to your legal and governance teams.
These three technical paths give your compliance teams the transparency they need. With clear options in front of them, they can make an informed, confident decision.
Related reading
To go deeper on the concepts this page references, read:
- Guarded rollouts for the rollback mechanism and sequential testing.
- Observability for error, log, and trace telemetry.
- Metrics for defining and importing custom metrics.
- Choosing keys and attributes for deciding which identifiers to attach to contexts.
Experimentation
This topic explains how to build and sustain an experimentation practice using LaunchDarkly Experimentation. A strong experimentation practice turns product decisions into measurable outcomes, reduces risk, and accelerates learning across your organization.
Why invest in an experimentation practice
Without a practice: Teams ship features based on intuition. Some changes underperform, others cause regressions, and there is no systematic way to know which is which until revenue or engagement data arrives weeks later.
With a practice: Every significant change has a measurable outcome before full rollout. Teams catch regressions early, double down on what works, and build a compounding knowledge base that makes each decision faster and more confident than the last.
Without a deliberate practice, experimentation efforts stall after an initial pilot. The guidance in this section addresses the organizational, strategic, and operational foundations that make experimentation succeed.
Your turn: List your top business goals and your current experimentation baseline. This snapshot helps you measure progress as you build your practice.
| Business goal | How you measure it today | Experiments run in the last quarter |
|---|---|---|
Focus areas
This section covers four focus areas. We recommend working through them in order:
- Building a culture of experimentation: Identify stakeholders, build awareness, gain leadership support, and scale beyond a single team.
- Building a goal tree: Define your organizational goals and the metrics that influence them.
- Rapid brainstorm: Quickly surface and prioritize a backlog of experiment ideas tied to business goals using cross-functional input.
- Problem-solution mapping: Generate experiment ideas tied to business goals and convert them into testable hypotheses.
- Test planning: Write complete test plans with hypotheses, SMART goals, treatment designs, metrics, and risk assessments.
- Experimentation process design: Define decision ownership, build a RACI, integrate with development workflows, and communicate results.
Prerequisites
Before running experiments in LaunchDarkly, your SDK implementation must support Experimentation. To learn more, read Preflight Checklist.
Building a culture of experimentation
This topic explains how to establish experimentation as an organizational practice, not a one-time activity owned by a single team.
Without culture-building: A single team runs a few experiments, but no one else adopts the practice. The pilot stalls when that team shifts priorities, and the organization loses the investment it made in tooling and training.
With culture-building: Experimentation becomes a shared capability. Multiple teams propose and run tests independently. Knowledge compounds across the organization, and the practice sustains itself even as teams and priorities change.
Identify stakeholders and roles
Every responsibility needs an owner. In smaller organizations, one person may fill multiple roles.
The following table describes common experimentation roles:
| Role | Responsibility |
|---|---|
| Executive sponsor | Champions experimentation at the leadership level, connects outcomes to business KPIs, and removes organizational blockers. |
| Program owner | Owns the experimentation roadmap, coordinates across teams, and tracks the overall health of the practice. |
| Test designer | Writes test plans, defines hypotheses, and selects metrics for individual experiments. |
| Developer | Implements feature flag variations, instruments metrics, and ensures experiments deploy correctly. |
| Data analyst | Monitors experiment results, validates statistical significance, and provides interpretation for stakeholders. |
| Product manager | Prioritizes experiment ideas against the product backlog and decides how to act on results. |
Your turn: Map these roles to people in your organization. If a role has no owner, that is a gap to address before launching your practice.
| Role | Person or team | Notes |
|---|---|---|
| Executive sponsor | ||
| Program owner | ||
| Test designer | ||
| Developer | ||
| Data analyst | ||
| Product manager |
Build awareness across the organization
Cover the following topics when introducing experimentation to new teams:
- What experimentation is and how it differs from feature flagging
- How LaunchDarkly Experimentation works at a high level
- What kinds of questions experimentation answers well
- How experiment results inform product decisions
- Real examples of experiments that produced meaningful outcomes
Tailor examples to your audience: technical metrics for engineering, conversion rates for product, revenue impact for leadership.
Gain leadership support
Leadership support determines whether experimentation survives past a pilot phase. When leaders actively sponsor the practice, teams treat it as core work.
To gain and maintain leadership support:
- Connect experiment outcomes to existing business KPIs leadership already tracks.
- Present early wins from one or two high-visibility experiments.
- Quantify the cost of not experimenting by highlighting past releases that underperformed.
- Report quarterly on experiments run, key findings, and business impact.
Your turn: Identify the business KPIs your leadership tracks and map each one to an experiment opportunity. This mapping gives you the language to pitch experimentation in terms leadership already cares about.
| Business KPI | Potential experiment opportunity |
|---|---|
Expand beyond the initial team
Start with a motivated team that has the technical foundation to run experiments. Use that team as a proof of concept for the rest of the organization.
Validate with an A/A test
Before the pilot team runs its first real experiment, run an A/A test. An A/A test serves both groups the same experience and validates your experimentation stack end to end: SDK integration, flag evaluation, metric event delivery, and results analysis.
Run an A/A test when:
- A team runs its first experiment on a new application or service
- You deploy a new SDK or update metric instrumentation
- You onboard a new team to Experimentation
- You migrate to a new context schema or change identity resolution
Always use frequentist statistics for A/A tests. Bayesian priors can nudge results toward a “winning” variation even when both groups receive the same experience. Frequentist analysis tests a clear null hypothesis and reports a p-value you interpret directly.
A successful A/A test shows no statistically significant difference between the two groups. If you see a significant result, investigate before running real experiments. Common causes: duplicate metric events, inconsistent context keys across SDKs, incorrect flag evaluation logic, or metric events firing before SDK initialization.
After the pilot team has run a successful A/A test and several real experiments, expand:
- Document the pilot team’s process, including templates for test plans and intake forms.
- Run cross-team workshops on problem-solution mapping and test planning.
- Pair experienced experimenters with new teams for their first experiments.
- Create a shared library of completed experiments.
- Establish a regular review cadence for presenting results and sharing lessons.
Common challenges
The following table describes common challenges and strategies:
| Challenge | Strategy |
|---|---|
| Teams do not have time to experiment. | Start small. Run experiments on changes already in the backlog rather than creating net-new work. |
| Leadership does not see the value. | Present results in business terms. Show the revenue or efficiency impact of experiment-informed decisions. |
| Experiments produce inconclusive results. | Review test plans for clear hypotheses and adequate sample sizes before launch. Inconclusive results still provide learning. |
| Only one team runs experiments. | Create visibility by sharing results in company-wide channels. Run workshops to lower the barrier for new teams. |
| Teams skip the planning process. | Make test plan review a required step before development begins. Provide templates to reduce friction. |
Your turn: Review the challenges above and check the ones your organization faces today. For each one you check, write one concrete next step you plan to take.
| Challenge applies to us | Challenge | Our next step |
|---|---|---|
| □ | Teams do not have time to experiment. | |
| □ | Leadership does not see the value. | |
| □ | Experiments produce inconclusive results. | |
| □ | Only one team runs experiments. | |
| □ | Teams skip the planning process. |
Building a Goal Tree for Experimentation
Overview
Experimentation programs often struggle not because of a lack of ideas, but because teams are not aligned on which metrics actually matter.
Different teams optimize for different outcomes, teams define success inconsistently, and interpreting results is difficult. This leads to disconnected experiments and unclear impact.
A goal tree solves this.
It provides a structured way to align teams around shared outcomes and break down high-level business goals into measurable components that experimentation can directly improve.
What is a goal tree
A goal tree is a framework that connects business outcomes to the metrics and experiments that drive them.

Each level answers a different question:
-
Primary goal, or key performance indicator (KPI) → What are we trying to achieve?
-
Diagnostic metrics → What are the key levers that drive this outcome?
-
Influencing variables → What user behaviors influence those levers?
-
Atomic metrics → What can we directly measure and experiment on?
Important distinction: goals vs. metrics
-
A metric is something you measure, for example, Revenue, Purchases, or Add to Cart events.
-
A goal is the change you want in that metric, for example, Increase Revenue by 15%.
Goal trees include both, but they serve different purposes.
Why goal trees matter
-
Align teams around shared outcomes.
-
Connect experiments to real business impact.
-
Make prioritization clearer.
-
Turn isolated tests into a coordinated system.
Anatomy of a goal tree
1. Primary goal
This is your top-level business outcome.
Examples:
-
Increase total revenue.
-
Increase monthly recurring revenue (MRR).
-
Increase customer lifetime value.
Behind every goal is a measurable metric, for example, Revenue or MRR, even if the exact target is tracked outside the tree.
2. Diagnostic metrics
These represent the core levers of your business model. They help explain why the primary goal moves.
Note: Diagnostic metrics can include derived metrics, for example, conversion rate, but should always be grounded in measurable underlying data.
| SaaS | E-commerce |
|---|---|
| Acquisition | Traffic (Sessions / Visitors) |
| Activation | Orders |
| Retention | Average Order Value |
| Expansion | Purchase Conversion Rate (derived) |
3. Influencing variables
Influencing variables describe the key user behaviors that drive your diagnostic metrics.
They are:
-
Closer to user behavior.
-
More actionable.
-
Where teams can influence change.
Examples:
-
Users view product pages.
-
Users add items to cart.
-
Users start checkout.
4. Atomic metrics
Atomic metrics are the most granular level of the tree.
They:
-
Represent specific user actions.
-
Are directly measurable.
-
Are where experiments typically happen.
Examples:
-
product_view -
add_to_cart -
checkout_started -
purchase
Derived metrics, for example, conversion rate, are calculated from atomic metrics and should not replace them.
Key insight
Improving atomic metrics leads to gains in influencing variables, which improve diagnostic metrics, and ultimately drive your primary goal.
Small improvements at the bottom of the tree add up to meaningful business impact.
Metric ownership
Each metric in your goal tree should have a clear owner to ensure accountability, faster decision-making, and focused experimentation. Without ownership, metrics stagnate and progress slows.
What kind of owner
Ownership should be a person or team, not a system.
The owner is responsible for:
-
Monitoring the metric regularly.
-
Interpreting changes and investigating anomalies.
-
Prioritizing experiments or actions to improve it.
Systems can collect and report metrics, but they cannot own outcomes.
How to choose an owner
Assign ownership to the person or team that:
-
Can directly influence the metric through changes or experiments.
-
Has the context to interpret why the metric moves.
-
Is accountable for outcomes, not just reporting.
Practical guidance
-
Diagnostic metrics → typically owned by a team, for example, Growth, Product, or Marketing.
-
Influencing variables → often owned by specific squads or functions.
-
Atomic metrics → owned by the team responsible for instrumentation and experimentation in that area.
If a metric has no clear owner, treat it as a gap to resolve before running experiments.
Running a goal tree workshop
Suggested agenda: 60–90 minutes
-
Define the primary goal (KPI).
-
Identify diagnostic metrics.
-
Map influencing variables.
-
Define atomic metrics.
-
Identify gaps in instrumentation, ownership, and experiments.
Facilitation tips
-
Start with problems, not metrics.
-
Focus on the most impactful drivers.
-
Involve cross-functional teams.
-
Push for clarity and measurability.
Expected outputs
-
A shared goal tree.
-
Clear metric ownership.
-
A defined set of measurable metrics across each level of the tree.
-
Identified gaps in instrumentation and measurement.
Common pitfalls
-
Confusing goals with metrics.
-
Using only derived metrics, for example, rates, without underlying measures.
-
Choosing metrics teams cannot influence.
-
Skipping the atomic level.
-
Lack of ownership.
Maintaining your goal tree
A goal tree is a living document, not a one-time artifact. Review it when:
-
Your business model or strategy changes.
-
A metric becomes unmeasurable or irrelevant.
-
A new team or product area is added.
-
The primary metric is hit or reset.
As a default, schedule a review every six months. Assign one person to own the tree overall, separate from individual metric owners, so there is always someone responsible for keeping it current.
Summary
A well-structured goal tree connects strategy to execution, linking business outcomes to measurable user behavior and experimentation opportunities.
Example goal trees
To explore visual examples, visit the Figma Template.
Generic company
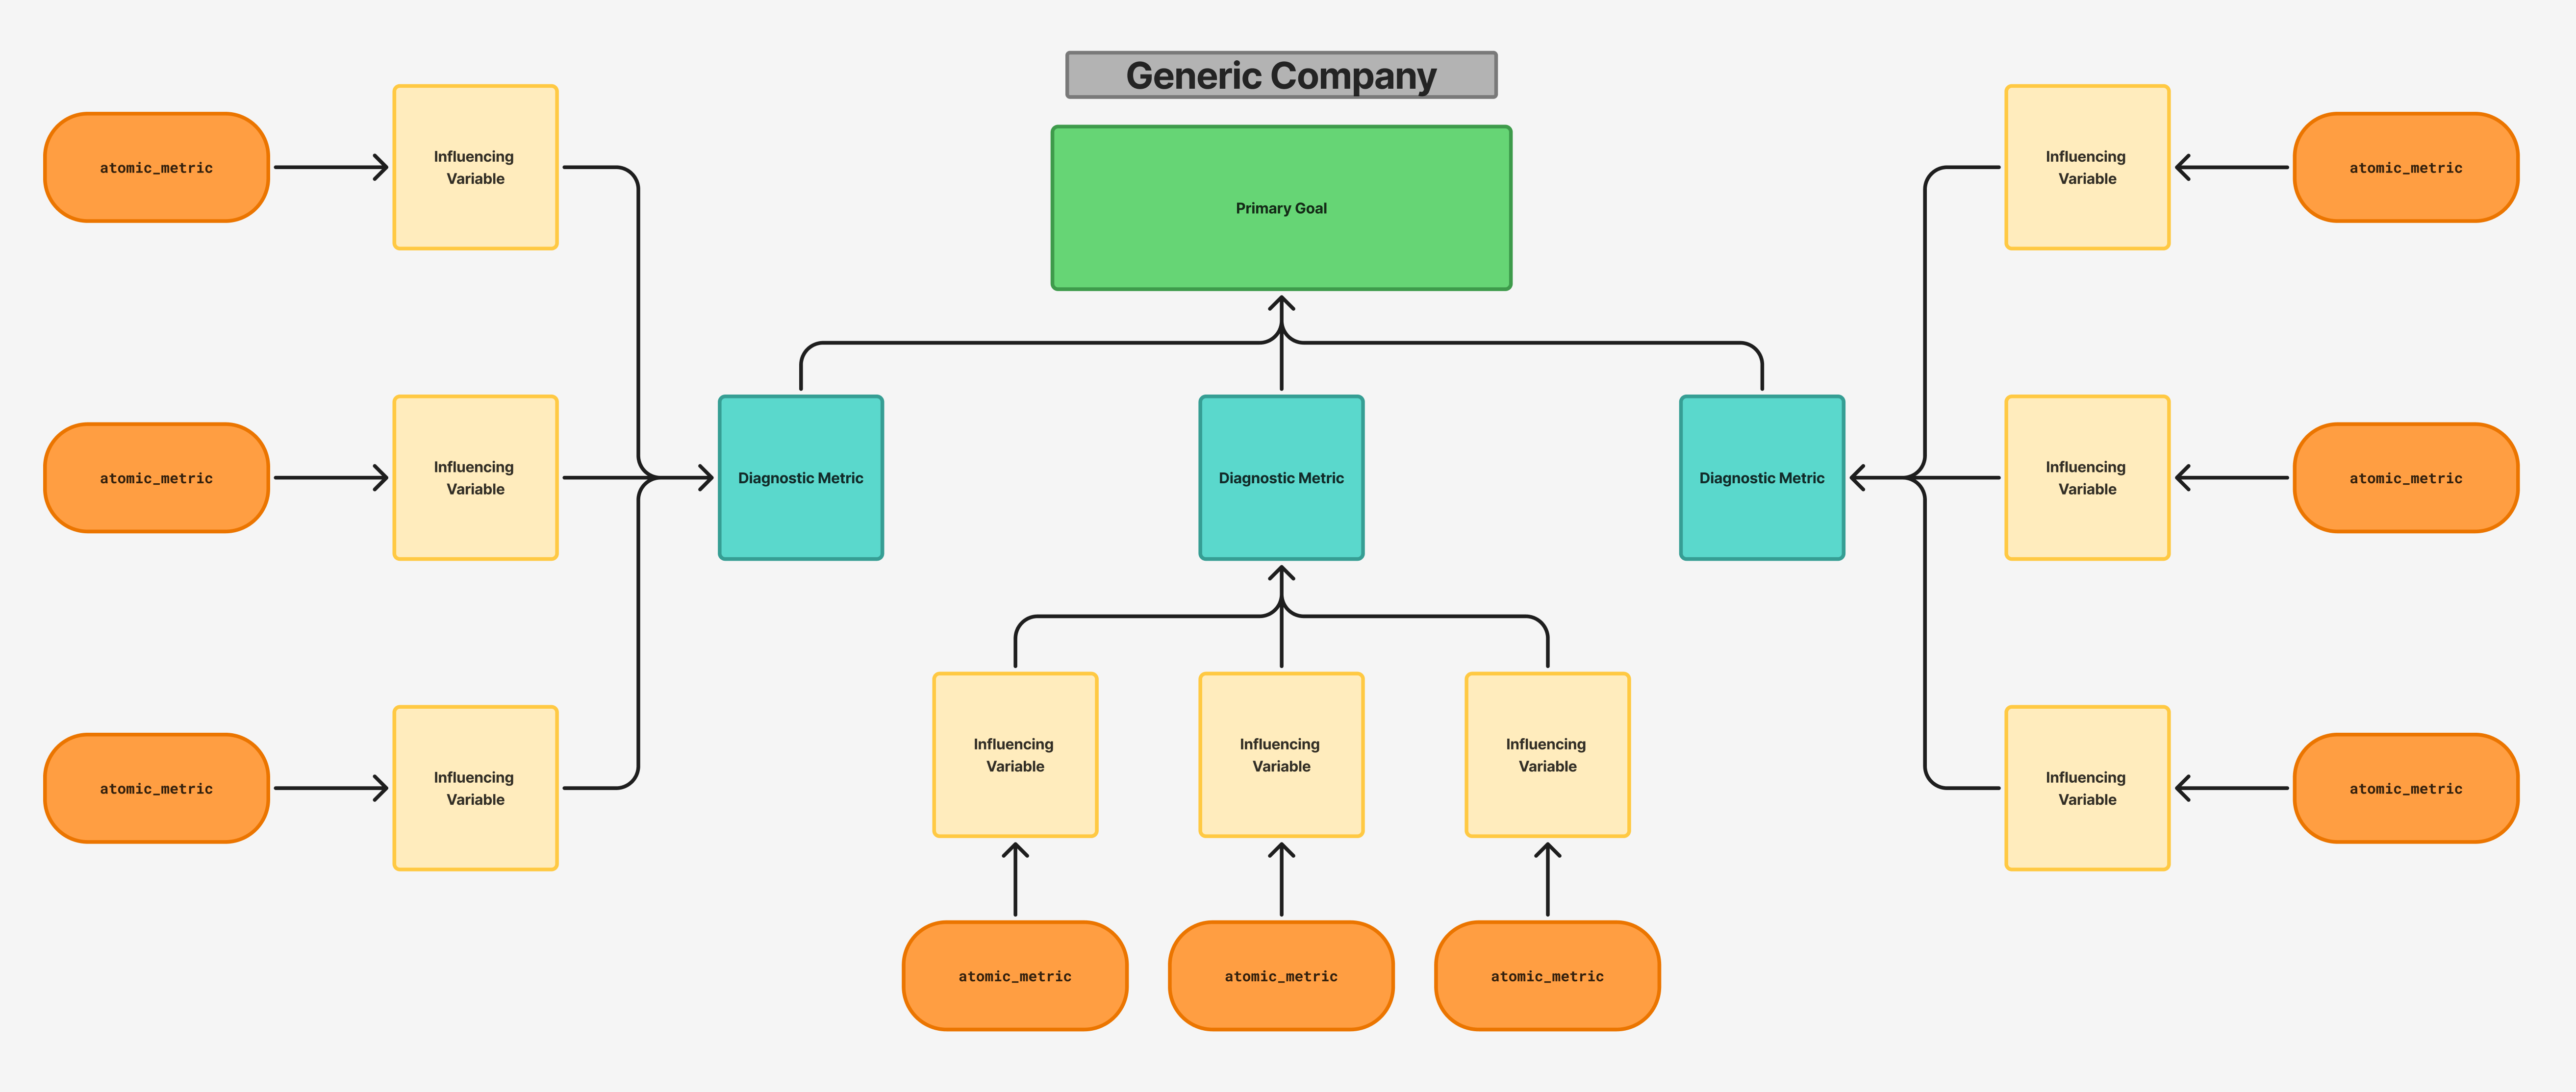
Ecommerce company

SaaS company
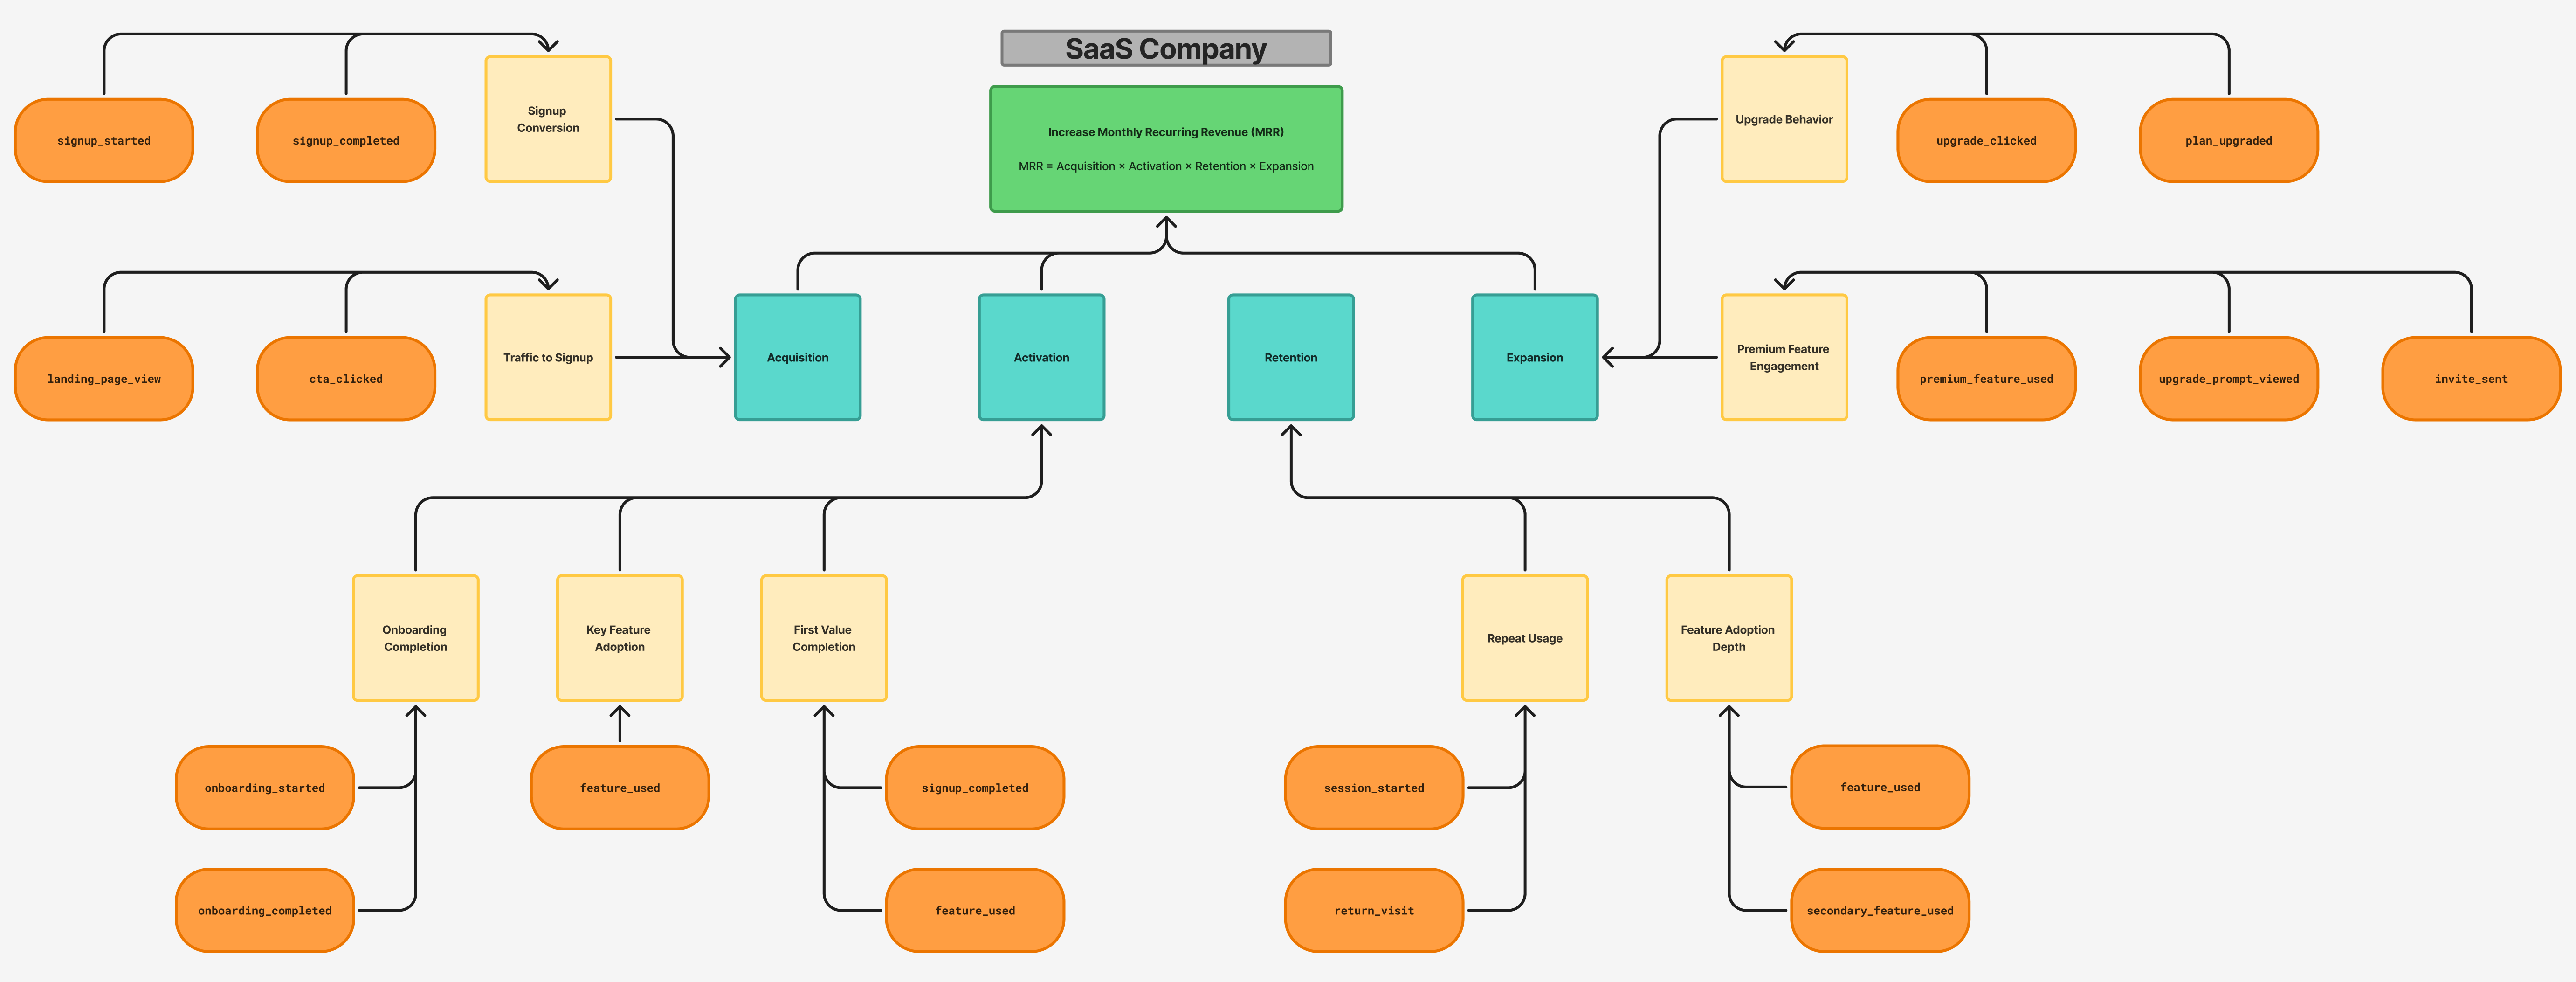
Rapid brainstorm
This topic explains how to run a rapid brainstorm session. The session quickly generates a backlog of experiment ideas tied to your organization’s business goals. It draws on perspectives from cross-functional teams.
Without a rapid brainstorm: Experiment ideas trickle in from individual contributors or a single team. The backlog stays thin, ideas are disconnected from business goals, and teams struggle to justify what they test and why.
With a rapid brainstorm: A facilitated session generates a large, diverse pool of ideas in under an hour. Each idea traces back to a business goal. Cross-functional input surfaces opportunities that siloed teams miss. The team walks away with a prioritized shortlist ready to move into test planning.
Overview
A rapid brainstorm is a structured ideation session for five to fifteen participants from diverse roles. The goal is quantity first. Generate as many experiment ideas as possible against a defined set of business goals. Then cluster and prioritize the ideas before the session ends.
A successful session produces a categorized idea backlog, a top-ten shortlist, and a clear path to the next step in the experimentation workflow.
Focus on no more than three to five business goals per session to maintain quality and keep ideas actionable.
Before the session
Preparation determines the quality of ideas the group generates. Incomplete preparation leads to unfocused discussion and ideas that are hard to prioritize afterward.
Set the scope
Confirm the following before scheduling the session:
- Which business goals are in scope for this session.
- Which areas are explicitly out of scope, for example, pricing experiments that require executive approval.
- Which functions should be represented, for example, product, engineering, design, data, marketing, and customer success.
Send a prep note
Send a brief pre-read to attendees 48 hours before the session. Ask each participant to come with two to three business goals or problems that are top of mind for them. Do not over-brief. A sentence or two per goal is enough.
Also ask participants to bring qualitative or quantitative data if it is available. Evidence grounds ideas in real user behavior and supports idea generation. Useful examples include:
- Analytics that show where users drop off, for example, a 10% drop-off at a checkout step.
- Session recordings that show where users struggle, for example, a user who could not find a button.
- Survey responses or support tickets that point to recurring friction.
Supporting data is a strong preference, not a requirement. Do not delay the session if data is unavailable.
Set up the FigJam board
Use the pre-built FigJam template to get started quickly. The template includes all four zones pre-configured. If you are setting up the board manually, lay out four distinct zones from left to right:
| Zone | Purpose |
|---|---|
| Goal Mapping | Captures the business goals that anchor ideation. Pre-populate with goals you already know and leave space for attendees to add more. |
| Idea Dump | The open area where participants place sticky notes during silent ideation. One idea per sticky. |
| Affinity Clusters | A blank area used to group related ideas by theme. Do not pre-label clusters. Let them emerge during the session. |
| Top 10 Shortlist | Where the highest-voted ideas land at the end. |
Assign a different sticky note color to each participant so idea attribution is visible without requiring names on each note.
Start an Open Session
FigJam’s Open Session feature lets participants join and edit the board without a Figma account. Start the Open Session before the call begins and drop the link in the meeting chat at the start.
Note: Open Sessions may require a paid Figma plan. Check Figma’s plan documentation for current availability. Any collaborative whiteboard tool that supports anonymous guest editing, such as Miro, also works.
Suggested agenda: 60 minutes
Use the following agenda to structure the session:
| Time | Block |
|---|---|
| 0–5 min | Board orientation and ground rules |
| 5–15 min | Goal mapping |
| 15–25 min | Silent ideation |
| 25–40 min | Share-out and build |
| 40–48 min | Prompt rounds, optional |
| 48–55 min | Affinity grouping and dot voting |
| 55–60 min | Top 10 shortlist and next steps |
Running the session
Orientation and ground rules: 5 minutes
Open the board on screen and walk participants through the four zones. Confirm that everyone can see their cursor on the board before moving on.
Establish three ground rules at the start of every session:
- No bad ideas. A weak idea now may spark the right idea in ten minutes.
- Quantity over quality. The goal is volume. Rough is fine.
- Defer judgment. Capture first. Evaluate at the end.
Goal mapping: 10 minutes
Ask each participant to add one to two sticky notes to the Goal Mapping zone. Each sticky should represent a business goal or problem that is most important to them right now.
After the round, narrate what you see. Group obvious duplicates and identify the three to five goals with the most representation. Keep those goals visible as the anchor for everything that follows.
Your turn: Before the session, draft your organization’s top goals to seed the Goal Mapping zone. Use specific, measurable goals. “Increase revenue” is too broad. “Increase mobile checkout conversion rate” gives participants a clear target. Use this table to draft your top three goals:
| Rank | Business goal | Primary KPI |
|---|---|---|
| 1 | ||
| 2 | ||
| 3 |
Silent ideation: 10 minutes
Direct participants to the Idea Dump zone. Set a visible ten-minute timer. Ask everyone to write as many experiment ideas as possible, one idea per sticky note, without talking.
Silent individual brainstorming produces more diverse ideas than open group discussion. Enforce the silence.
At the five-minute mark, prompt participants who have slowed down: ask them to pick one goal from the left and write one experiment they have been meaning to run but have not.
Share-out and build: 15 minutes
Go around the group. Each participant shares their sticky notes briefly, one sentence per idea. Keep explanations short. As others listen, encourage them to add new stickies if an idea sparks something. Participants can use reactions and stars in the FigJam toolbar to mark ideas they respond to.
Prompt rounds: optional, up to 8 minutes
Before starting this block, check the time. You need at least 12 minutes remaining to complete affinity grouping, dot voting, and closing. If you are short on time, skip this block and move directly to affinity grouping.
Run prompt rounds if the share-out produced fewer ideas than expected or energy has dropped. Use targeted prompts to surface ideas the group has not generated yet.
Effective prompts include:
- What do your best customers do that your average customers do not? Is there an experiment in that gap?
- What is the number one thing new users get confused by or give up on?
- What experiment has the team been meaning to run for months but keeps deprioritizing?
- If a competitor launched something tomorrow that displaced you, what would they have changed?
Affinity grouping and dot voting: 7 minutes
Move to the Affinity Clusters zone. Drag related ideas next to each other. Name the clusters as they form. Common themes include onboarding, activation, retention, conversion, and technical performance.
Once clustered, give each participant five dots using the stamp tool in the FigJam toolbar. Participants distribute their dots across the ideas they consider highest priority. Participants can place multiple dots on a single idea.
Note: Any emoji stamp works for voting if you prefer a different marker.
Top 10 shortlist and next steps: 5 minutes
Move the highest-voted ideas into the Top 10 Shortlist zone. Read them aloud to close the session.
Share the board link with all participants before ending the call. The shortlist feeds directly into a test planning session, where participants convert prioritized ideas into hypotheses and full test plans.
Facilitation tips
- Use a visible timer for every timed block. Participants work more efficiently with a shared countdown.
- If one participant dominates, redirect explicitly: “Let’s capture that and hear from [name] next.”
- If energy drops during silent ideation, give a verbal nudge without breaking the silence, such as a countdown or a short prompt in the chat.
- Keep the board visible on your screen at all times. Narrating what you see keeps remote participants oriented.
Common pitfalls
Use these responses to keep the session on track:
| Pitfall | What to do |
|---|---|
| Ideas are too vague to test | Ask: “What would you actually change, and how would you know it worked?” |
| Ideas are too large to test in a sprint | Ask: “What is the smallest version of this we could run in two weeks?” |
| Ideas do not connect to business goals | Ask: “Which goal on the left does this move, and why?” |
| One participant dominates | Name them and redirect: “Let’s hold that and hear from [name].” |
| Group edits ideas during silent ideation | Reinforce the rule: capture now, judge later. |
| Session runs long | Skip prompt rounds and go straight to affinity grouping. |
Expected outputs
A completed rapid brainstorm session produces:
- A raw idea backlog in FigJam, organized by affinity cluster and tied to business goals.
- A top-ten shortlist of prioritized experiment ideas.
- A shared board link distributed to all participants.
The shortlist is the input to your next session. To learn how to turn prioritized ideas into testable hypotheses and complete test plans, read Problem-solution mapping and Test planning.
Problem-solution mapping
This topic explains how to run a problem-solution mapping workshop to generate experiment ideas tied to your business goals. Problem-solution mapping produces a prioritized library of validated problems and testable hypotheses that feed directly into your experimentation backlog.
Without problem-solution mapping: Teams brainstorm experiment ideas ad hoc. Ideas lack clear ties to business goals, making it hard to prioritize and harder to demonstrate impact when results arrive.
With problem-solution mapping: Every experiment traces back to a ranked business goal. Prioritization is straightforward, results map directly to KPIs leadership tracks, and the team always has a backlog of high-value ideas ready to test.
Align to goals and KPIs
Problem-solution mapping is a structured brainstorming exercise for 5 to 15 participants from diverse roles. Participants identify problems that block business goals, then convert those problems into hypotheses. A successful session produces a categorized problem list, validation notes, and draft hypotheses ready for test planning.
Start with your organization’s goals. Ask leadership for the current quarter or year’s top priorities, ranked by importance. Use goals that are specific and measurable. “Increase revenue” is too broad. “Increase mobile checkout conversion rate” gives participants a clear target.
Focus on no more than three goals per session to maintain quality.
Your turn: Write your organization’s top goals ranked by priority, along with the KPIs that measure them. These goals become the anchor for your brainstorming session.
| Rank | Business goal | Primary KPI | Current baseline |
|---|---|---|---|
| 1 | |||
| 2 | |||
| 3 |
Define problem categories
Create 3 to 5 categories that relate to your goals and work across multiple goals when possible. Categories focus brainstorming and help you organize the problem library afterward.
Examples of effective categories:
- User experience, checkout process, inventory management
- Acquisition, activation, retention
- People, process, technology
Your turn: Draft your 3 to 5 problem categories. Choose categories that relate to your goals above and give participants a clear focus for each brainstorming round.
| Category | Why this category matters for our goals |
|---|---|
Generate problems
Run the problem generation exercise in timed rounds. Each round focuses on one category for one goal.
Follow these steps to run a round:
- Present the goal and the category for the current round.
- Give participants 5 to 10 minutes of silent, individual brainstorming. Each person writes one problem per note.
- Collect and group similar problems as participants write them.
- After the round, review notable submissions and invite brief clarification from authors.
- Repeat for each category, then move to the next goal.
Keep these principles in mind during the exercise:
- Lead with empathy. Do not attribute contributions by name. Encourage open sharing.
- Limit leadership participation. Invite leaders for a brief opening, then ask them to leave. Their presence can stifle candid discussion.
- Enforce silent working. Individual brainstorming produces more diverse ideas than group discussion.
- Frame problems positively. Treat every submission as valuable input, not a complaint.
Build a problem library
A well-organized problem library gives your team a persistent backlog of experiment ideas, each tied to evidence and a business goal. After the session, organize all problems into a shared tracking document.
Your turn: Use the following template to start your problem library. Fill in at least three problems from your brainstorming session or from known pain points:
| Problem statement | Category | Goal | Validation notes |
|---|---|---|---|
After the session, deduplicate entries and prioritize problems with strong data support.
Convert problems to hypotheses
For each prioritized problem, draft a hypothesis that describes a proposed change and its expected impact.
Use SMART criteria to evaluate each hypothesis before promoting it to test planning:
- Specific: The hypothesis names a concrete change and a measurable outcome.
- Measurable: You have access to the data needed to evaluate the outcome.
- Achievable: The proposed change is technically and organizationally feasible.
- Relevant: The hypothesis ties back to a prioritized business goal.
- Time-bound: The experiment has a realistic timeline for reaching statistical significance.
Examples of well-formed hypotheses:
Problem: Mobile app users abandon the checkout flow at the shipping step. Hypothesis: Reducing the number of required shipping fields from 8 to 5 increases mobile checkout completion rate by 10% within 30 days.
Problem: New users do not complete the onboarding tutorial. Hypothesis: Adding a progress indicator to the onboarding flow increases tutorial completion rate by 15% within 2 weeks.
Your turn: Pick one problem from your library and convert it into a testable hypothesis using the template below.
| Component | Your hypothesis |
|---|---|
| Problem statement | |
| Proposed change | |
| Target audience | |
| Primary metric | |
| Expected impact | |
| Time period | |
| Rationale |
Full hypothesis sentence: If we [proposed change] for [target audience], then [primary metric] will [increase/decrease] by [expected impact] within [time period], because [rationale].
To learn more about writing complete test plans for these hypotheses, read Test planning.
Test planning
This topic explains how to write a complete test plan for an experiment. Writing the plan before development begins prevents wasted effort and produces higher quality experiments.
Without test planning: Experiments launch with vague success criteria, missing metrics, or unclear rollback plans. Stakeholders disagree on what “success” means, and development effort is wasted.
With test planning: Every experiment launches with a shared definition of success, validated instrumentation, and a documented decision framework.
Elements of a test plan
A complete test plan contains the following elements:
- A validated problem statement
- A testable hypothesis
- SMART goals
- Treatment design for control and variation
- Primary, secondary, and guardrail metrics
- A risk assessment with early stopping criteria
- A review checklist
Define the problem and hypothesis
Start with the problem your experiment addresses, then write a hypothesis using the following format:
If we [make this specific change] for [this audience], then [this metric] will [increase/decrease] by [target amount] within [time period], because [rationale based on evidence].
Your turn: Draft the hypothesis for your next experiment using the template below. Fill in each component, then combine them into the full sentence.
| Component | Your value |
|---|---|
| Specific change | |
| Target audience | |
| Primary metric | |
| Target amount | |
| Time period | |
| Rationale |
Your hypothesis: If we ______ for ______, then ______ will ______ by ______ within ______, because ______.
Set SMART goals
The following table defines each SMART component:
| Component | Definition | Example |
|---|---|---|
| Specific | Name the exact metric and direction of change. | Increase checkout completion rate. |
| Measurable | Confirm you have instrumentation to track the metric. | Checkout completion events fire on the confirmation page. |
| Achievable | Validate that the expected change is realistic based on prior data. | Similar changes in the industry produced 5 to 15% lifts. |
| Relevant | Connect the metric to a business goal. | Checkout completion directly impacts quarterly revenue targets. |
| Time-bound | Set a duration for the experiment based on traffic and expected effect size. | Run for 4 weeks to reach 95% statistical power. |
Your turn: Fill in the SMART components for the hypothesis you drafted above.
| Component | Your experiment |
|---|---|
| Specific | |
| Measurable | |
| Achievable | |
| Relevant | |
| Time-bound |
Design treatments
Follow these guidelines when designing treatments:
- Test one change at a time. Multiple simultaneous changes make attribution impossible.
- Match the control to the current experience. The control group must see exactly what users see today.
- Document variations clearly. Include screenshots, copy, or specifications for developers.
- Ensure both treatments are functional. Do not ship broken or partial variations.
Select metrics
Choose three types of metrics for every experiment:
- Primary metric: The single metric your hypothesis predicts will change. This determines whether the experiment succeeded.
- Secondary metrics: Related metrics that reveal the full impact. For example, average order value alongside checkout completion.
- Guardrail metrics: Metrics that should not degrade. For example, page load time, error rate, or support ticket volume.
Confirm that all metrics are instrumented and reporting correct data before launch.
Validate instrumentation with an A/A test
If this is your first experiment on a new application, service, or SDK integration, run an A/A test first. An A/A test serves both groups the identical experience and validates that your metrics pipeline, flag evaluation, and user assignment work correctly end to end. Always analyze A/A tests using frequentist statistics, not Bayesian. Bayesian priors can report a “winning” variation even when both groups receive the same experience.
A successful A/A test shows no statistically significant difference between the two groups. If you see a significant result, investigate before proceeding. Common causes include duplicate metric events, inconsistent context keys, metric events that fire before the SDK initializes, or incorrect flag evaluation logic. To learn more about when to run A/A tests, read the A/A testing guidance in Building a culture of experimentation.
Your turn: Identify the metrics for your experiment. Defining these now ensures your instrumentation is complete before development starts.
| Metric type | Metric name | How it is measured | Current baseline |
|---|---|---|---|
| Primary | |||
| Secondary | |||
| Secondary | |||
| Guardrail | |||
| Guardrail |
Assess risks
Identify risks before launch. Common technical risks: performance regressions from flag implementation, incomplete metric instrumentation, and insufficient sample size. Common business risks: negative user experience, conflicts with active experiments, and premature decisions based on early results.
For each risk, define a mitigation strategy and early stopping criteria. Document your rollback plan, which typically means turning off the flag variation.
Review checklist
Use this checklist on your actual test plan before starting development:
- The problem is validated with data, not assumptions
- The hypothesis follows the standard format and includes a rationale
- SMART goals are defined with specific targets and a time period
- The control matches the current production experience
- Each variation changes only one variable from the control
- Primary, secondary, and guardrail metrics are defined
- All metrics are instrumented and firing correctly
- Sample size and experiment duration are estimated
- Technical and business risks are documented
- Early stopping criteria and rollback plans are in place
- If this is the first experiment on this application, an A/A test has passed
- The test plan has been reviewed by at least one other team member
Your turn: Review your test plan draft against this checklist. For any item you marked “no,” note the action needed to resolve it before development begins.
| Checklist item | Status | Action needed |
|---|---|---|
| Problem validated with data | ||
| Hypothesis follows standard format | ||
| SMART goals defined | ||
| Control matches production | ||
| Single variable per variation | ||
| Metrics defined | ||
| Metrics instrumented | ||
| Sample size estimated | ||
| Risks documented | ||
| Stopping criteria in place | ||
| A/A test passed (if first experiment) | ||
| Peer review completed |
To learn more about building the process around experiment intake and review, read Experimentation process design.
Experimentation process design
This topic explains how to design the operational process that supports experimentation at your organization.
Without process design: No one is sure who approves a test, when it should end, or how to act on results. Decisions stall and results sit in a dashboard no one checks.
With process design: Every experiment follows a defined path from idea to outcome. Decision ownership is explicit, handoffs are smooth, and results reach the people who act on them.
Map decision points
Before building a process, identify who owns each decision in the experiment lifecycle.
Your turn: Write the name or role of the person who owns each decision today. If there is no clear owner, leave the cell blank. Blank cells represent gaps in your current process.
| Decision | Owner |
|---|---|
| Who reviews and approves new experiment ideas? | |
| Who decides when an experiment starts and when it ends? | |
| Who analyzes the results and determines whether the experiment succeeded? | |
| Who decides what action to take based on the results? | |
| Who needs to be notified when an experiment launches or concludes? |
Use the answers to build a RACI for experimentation.
Build a RACI for experimentation
A RACI assigns each activity an owner at one of four levels: R (Responsible, performs the work), A (Accountable, owns the outcome), C (Consulted, provides input), I (Informed, notified after). Only one person is Accountable per activity.
The following table provides a starting template:
| Activity | Program owner | Product manager | Developer | Data analyst | Executive sponsor |
|---|---|---|---|---|---|
| Submit experiment idea | C | R | C | C | I |
| Write test plan | C | R | C | C | I |
| Review test plan | A | R | C | R | I |
| Implement experiment | I | C | R | C | I |
| Launch experiment | A | R | C | C | I |
| Monitor experiment | I | C | I | R | I |
| Analyze results | I | C | I | R | I |
| Decide next action | C | A | I | C | I |
| Communicate results | R | C | I | C | I |
Your turn: Create your own RACI using the blank template below. Replace the column headers with the actual roles or names from your organization. Use R, A, C, and I to fill in each cell.
| Activity | ______ | ______ | ______ | ______ | ______ |
|---|---|---|---|---|---|
| Submit experiment idea | |||||
| Write test plan | |||||
| Review test plan | |||||
| Implement experiment | |||||
| Launch experiment | |||||
| Monitor experiment | |||||
| Analyze results | |||||
| Decide next action | |||||
| Communicate results |
Integrate with development workflows
Experimentation works best when it fits into existing development processes rather than running as a separate track.
Backlog and planning. Add experiment work items to your existing backlog with clear acceptance criteria, estimated effort, and a linked test plan. Allocate capacity for experiment work during sprint or iteration planning.
Development and deployment. Implement experiments using feature flags. Each variation in the test plan maps to a flag variation in LaunchDarkly. Deploy all variations to production before launching. Validate that metric events fire correctly and that each variation renders as designed. For first experiments on a new application, run an A/A test as a required deployment step. To learn more, read the A/A testing guidance in Building a culture of experimentation.
Review and retrospective. After each experiment concludes, review results with the team and add findings to your shared experiment library. Include experimentation in your regular retrospectives.
Create an experiment intake process
The following five-step flow provides a starting point:
- Idea submission: Anyone submits an experiment idea using a standard template that captures the problem, draft hypothesis, target audience, and expected impact.
- Triage: The program owner evaluates submissions on a regular cadence for feasibility, goal alignment, and conflicts with active experiments.
- Test plan development: Approved ideas move to test plan writing using the guidance in the test planning section.
- Review and approval: The completed test plan goes through a checklist review, then moves to the development backlog.
- Execution and closeout: The team implements, launches, monitors, and analyzes the experiment. The program owner records the outcome.
Your turn: Sketch your intake flow by filling in who owns each step and what artifact they produce. Adapt the steps to match your organization’s workflow.
| Step | Owner | Artifact produced | Cadence |
|---|---|---|---|
| Idea submission | |||
| Triage | |||
| Test plan development | |||
| Review and approval | |||
| Execution and closeout |
Tell data stories
A well-told data story turns raw numbers into organizational momentum. Structure data stories around these four elements:
- The problem: The original problem and the business goal it connects to.
- The experiment: What you tested, who was included, and how long the experiment ran.
- The results: Primary metric outcome first, then secondary and guardrail metrics.
- The recommendation: What action the results support and what the team does next.
Combine quantitative results with qualitative context like user research or support feedback.
Your turn: Use this template to draft the data story for your first experiment. Fill in each section with one or two sentences.
| Section | Your data story |
|---|---|
| The problem | |
| The experiment | |
| The results | |
| The recommendation |
To learn more about generating experiment ideas, read Problem-solution mapping.
Coordinating releases
Coordinate releases across applications and teams using LaunchDarkly feature flags. These strategies enable autonomous teams to manage dependent releases with minimal overhead.
Overview
When multiple applications or teams need to coordinate releases, LaunchDarkly provides several strategies to manage dependencies without requiring synchronous communication or manual coordination.
Each coordination strategy describes:
- What people need to do: How teams work in LaunchDarkly (create flags, configure approvals, grant permissions)
- What technical setup is required: How developers implement the coordination (evaluate flags, pass metadata, handle dependencies)
Coordination strategies
Prerequisite flags
Use prerequisite flags when applications share a LaunchDarkly project and need to coordinate releases.
Best for:
- Tightly coupled applications and services
- Teams that share a project
- Large initiatives with multiple dependent releases
- Frontend and backend components that must be released together
To learn more, read Prerequisite flags.
Request metadata
Use request metadata when services communicate via APIs and need to manage breaking changes or versioning.
Best for:
- API services with external consumers
- Microservices communicating via HTTP or RPC
- Applications that need to maintain backward compatibility
- Services in separate projects
To learn more, read Request metadata.
Delegated authority
Use delegated authority when cross-functional teams need to manage flags across multiple projects.
Best for:
- Cross-functional collaboration with customer success, support, or sales teams
- Database administrators managing schema migrations
- Security engineers managing security features
- Teams that need to control flags in projects they do not own
To learn more, read Delegated authority.
Choosing a strategy
Use this guide to select the appropriate coordination strategy:
| Scenario | Strategy | Why |
|---|---|---|
| Frontend and backend for the same product | Prerequisite flags | Same project, tightly coupled |
| API with third-party consumers | Request metadata | Different projects, version management |
| Multiple microservices, same product | Prerequisite flags or Request metadata | Depends on coupling and API design |
| Customer success managing early access | Delegated authority | Cross-functional collaboration |
| Database team managing migrations | Delegated authority | Cross-project coordination |
Combining strategies
Strategies can be combined for complex scenarios:
Delegated authority with prerequisites:
Grant customer success teams permission to manage prerequisite flags that control early access programs across multiple applications.
Request metadata with delegated authority:
Allow API consumers to request custom targeting rules for their specific API versions or client configurations.
Project architecture considerations
Coordination strategy selection affects project architecture decisions:
- Applications using prerequisite flags should share a project
- Applications using request metadata or delegated authority can be in separate projects
- Applications in the same project have access to all coordination strategies
To learn more about project architecture, read Projects and environments.
Prerequisite flags
Coordinate releases for tightly coupled applications using prerequisite flags. Prerequisites enable teams to maintain autonomy over their releases while managing technical and business dependencies.
Overview
Prerequisite flags create dependencies between feature flags within a single project. When a flag has a prerequisite, the prerequisite must evaluate to a specific variation before the dependent flag can be enabled.
When to use prerequisite flags
Use prerequisite flags when:
- Applications execute in the same project
- Teams need to coordinate releases with minimal overhead
- Dependencies exist between frontend and backend components
- Multiple teams contribute to a single product release
How prerequisite flags work
Each coordination strategy has two parts:
Platform
What teams do in LaunchDarkly: Create prerequisites and allow teams to request, review, and apply targeting changes through approval workflows.
Application
What developers implement: Evaluate flags in the application. LaunchDarkly handles the prerequisite logic automatically. No additional code is required.
Prerequisites scope
Prerequisite flags work within specific boundaries:
| Architecture | Supported |
|---|---|
| Within a single project | Yes |
| Across multiple projects | No |
| Outside of projects | No |
Use cases
Technical dependencies
Coordinate releases when backend changes must be deployed before frontend changes.
Example scenario:
Release a new widget that requires both API and frontend changes.
Setup:
- Create flag: Release: Widget API
- Create flag: Release: Widget Mobile
- Add prerequisite to Release: Widget Mobile: requires Release: Widget API to be On
Result:
Teams maintain autonomy over their own domains without coordination overhead. The mobile team can enable their flag when ready, knowing the prerequisite ensures the API is available.
Business dependencies
Group multiple releases under a keystone flag to coordinate a product launch.
Example scenario:
Spring product launch requires new reporting features and AI assistant functionality.
Setup:
- Create keystone flag: Release: Spring Launch Event
- Create flag: Release: Advanced Reporting
- Create flag: Release: AI Assistant
- Add prerequisite to both feature flags: requires Release: Spring Launch Event to be On
- Delegate authority to product and marketing teams to control the keystone flag
Result:
Engineering teams can develop and test features independently. Product and marketing teams control the coordinated launch by managing only the keystone flag.
Implementation steps
Step 1: Create feature flags
Create flags for each component or feature that needs coordination:
- Navigate to the project in LaunchDarkly
- Click Create flag
- Provide a descriptive name and key
- Select the appropriate flag type
- Click Save flag
Step 2: Configure prerequisites
Add prerequisites to flags that depend on other flags:
- Navigate to the dependent flag’s settings
- Locate the Prerequisites section
- Click Add prerequisite
- Select the prerequisite flag
- Choose the required variation
- Click Save
Step 3: Test coordination
Verify that prerequisites work correctly:
- Ensure the prerequisite flag is Off
- Attempt to enable the dependent flag
- Verify that the dependent flag remains Off or serves the fallback variation
- Enable the prerequisite flag
- Verify that the dependent flag now evaluates correctly
Step 4: Document dependencies
Create documentation for your team:
- List all prerequisite relationships
- Document the intended release order
- Identify the owners of each flag
- Specify the communication plan for coordinated releases
Example configuration
Scenario: E-commerce checkout redesign
Flags:
| Flag | Description | Prerequisites |
|---|---|---|
| Release: Checkout | Keystone flag for the overall release | None |
| Release: Checkout API | Backend API changes | Release: Checkout must be On |
| Release: Checkout Web | Web frontend changes | Release: Checkout and Release: Checkout API must be On |
| Release: Checkout Mobile | Mobile app changes | Release: Checkout and Release: Checkout API must be On |
Configuration in LaunchDarkly:
Release: Checkout (Keystone)
├── Release: Checkout API
│   └── Release: Checkout Web
│   └── Release: Checkout Mobile
Release process:
- Backend team enables Release: Checkout API when ready
- Web team enables Release: Checkout Web when ready
- Mobile team enables Release: Checkout Mobile when ready
- Product team controls the overall release through Release: Checkout
Best practices
Use clear naming conventions
Name flags to indicate their role in the dependency chain:
- Keystone flags: Release: [Feature Name]
- Component flags: Release: [Feature Name] [Component]
Avoid deep chains
Limit prerequisite chains to 2-3 levels deep. Deeper chains increase complexity and make troubleshooting difficult.
Document ownership
Clearly document who owns each flag in the prerequisite chain. Teams should know who to contact when coordinating releases.
Test in lower environments first
Verify prerequisite relationships in development and staging environments before configuring them in production.
Use flag statuses
Track prerequisite flags with flag statuses to monitor when they are safe to remove.
To learn more, read Flag statuses.
Troubleshooting
Dependent flag not evaluating correctly
Symptom: A flag with a prerequisite does not evaluate as expected even though the prerequisite appears to be enabled.
Possible causes:
- Prerequisite is enabled in a different environment
- Prerequisite requires a specific variation that is not being served
- Targeting rules conflict with the prerequisite
Solution:
- Verify the prerequisite flag is On in the same environment
- Check that the prerequisite serves the required variation
- Review targeting rules for conflicts
Unable to create prerequisite
Symptom: LaunchDarkly prevents creating a prerequisite relationship.
Possible causes:
- Creating a circular dependency
- Flags are in different projects
- Insufficient permissions
Solution:
- Review the dependency chain for circular references
- Ensure both flags are in the same project
- Verify you have permission to modify both flags
Related strategies
Combine prerequisite flags with other coordination strategies:
- Delegated authority: Grant product teams permission to control keystone flags
- Request metadata: Use request metadata to coordinate with external services while using prerequisites internally
To learn more about project architecture, read Projects.
Request metadata
Coordinate releases across services using request metadata passed in API calls, headers, or RPC messages. This strategy enables version management and backward compatibility without requiring consumers to use LaunchDarkly.
Overview
Request metadata allows API providers to make targeting decisions based on information passed in requests. This enables coordinated releases with external consumers and loosely coupled services without requiring all participants to integrate with LaunchDarkly.
When to use request metadata
Use request metadata when:
- Services communicate via APIs, HTTP, or RPC
- API consumers do not use LaunchDarkly
- Services are in separate LaunchDarkly projects
- Services need to maintain backward compatibility
- Services have external or third-party consumers
How request metadata works
Each coordination strategy has two parts:
Platform
What teams do in LaunchDarkly: Create targeting rules based on API versions or client metadata to coordinate releases with external consumers.
Application
What developers implement:
Consumers attach metadata to requests through:
- HTTP headers
- Query parameters
- Request body fields
- RPC metadata
Providers use the metadata to define LaunchDarkly contexts for evaluation and targeting.
Request metadata scope
Request metadata works across boundaries:
| Architecture | Supported |
|---|---|
| Within a single project | Yes |
| Across multiple projects | Yes |
| Outside of projects | Yes |
Only the providing service needs to use LaunchDarkly. Consumers do not require LaunchDarkly integration.
Use cases
API version management
Manage breaking changes in public APIs by targeting based on API version.
Example scenario:
API service introduces breaking change to use UUID identifiers instead of integer IDs.
Setup:
-
API consumers include version in header:
X-API-Version: 2.0.0 -
API service extracts version and creates context:
const context = { kind: 'request', key: requestId, apiVersion: req.headers['x-api-version'] }; -
Create targeting rule:
If apiVersion >= 2.0.0 then serve Available
Result:
Newer API clients automatically receive the new identifier format. Legacy clients continue using integer IDs until they upgrade.
Client-specific feature rollouts
Target features to specific mobile app versions or web browser versions.
Example scenario:
Mobile app releases new offline mode that requires minimum app version 3.5.0.
Setup:
- Mobile app includes version in API calls
- Backend service creates context with app version
- Create targeting rule:
If appVersion >= 3.5.0 then serve Available
Result:
Backend enables offline sync features only for app versions that support offline mode.
Tenant-specific releases
Enable features for specific tenants in multi-tenant services.
Example scenario:
SaaS application wants to roll out advanced analytics to premium tier customers.
Setup:
- API gateway includes tenant information in header:
X-Tenant-Id: acme-corp - Backend service extracts tenant and subscription tier
- Create targeting rule:
If subscriptionTier equals "premium" then serve Available
Result:
Premium tier customers see advanced analytics. Standard tier customers do not see the feature.
Implementation steps
Step 1: Define metadata schema
Determine what metadata consumers should provide:
- API version
- Client version
- Client type (web, mobile, desktop)
- Tenant identifier
- User tier or subscription level
Step 2: Update API consumers
Instruct consumers to include metadata in requests:
HTTP headers:
X-API-Version: 2.1.0
X-Client-Type: mobile-ios
X-Client-Version: 3.5.2
Query parameters:
GET /api/widgets?api_version=2.1.0&client=mobile-ios
Request body:
{
  "data": { ... },
  "metadata": {
    "apiVersion": "2.1.0",
    "clientType": "mobile-ios"
  }
}
Step 3: Extract metadata in provider
Extract metadata from requests and create LaunchDarkly contexts:
Node.js example:
const express = require('express');
const { init } = require('@launchdarkly/node-server-sdk');

const app = express();
const ldClient = init(process.env.LD_SDK_KEY);

app.get('/api/widgets', async (req, res) => {
  // Extract metadata from request
  const apiVersion = req.headers['x-api-version'] || '1.0.0';
  const clientType = req.headers['x-client-type'] || 'unknown';

  // Create context for flag evaluation
  const context = {
    kind: 'request',
    key: req.requestId,
    apiVersion: apiVersion,
    clientType: clientType
  };

  // Evaluate feature flag
  const useNewFormat = await ldClient.variation(
    'use-new-response-format',
    context,
    false
  );

  // Return appropriate response
  if (useNewFormat) {
    res.json({ data: getNewFormatData() });
  } else {
    res.json({ data: getLegacyFormatData() });
  }
});
Step 4: Create targeting rules
Create targeting rules based on the extracted metadata:
- Navigate to the feature flag in LaunchDarkly
- Select the environment
- Create a new targeting rule
- Use the context attribute (for example, apiVersion)
- Configure the targeting logic (for example,
apiVersion >= 2.0.0) - Set the variation to serve
- Save the targeting rule
Step 5: Monitor and deprecate
Track usage of old API versions using flag evaluation metrics:
- Monitor which variations are being served
- Identify clients still using old versions
- Communicate deprecation timeline to affected clients
- Remove backward compatibility code when safe
Example configuration
Scenario: GraphQL API versioning
Context schema:
{
  "kind": "api-consumer",
  "key": "consumer-xyz",
  "apiVersion": "2023-11-01",
  "consumerType": "mobile-app",
  "consumerVersion": "4.2.0"
}
Targeting rules:
Flag: use-new-schema

Rule 1: Early access beta testers
  If consumerType equals "internal" then serve Available

Rule 2: New API version
  If apiVersion >= "2023-11-01" then serve Available

Rule 3: Opt-in consumers
  If consumer is one of ["consumer-abc", "consumer-xyz"] then serve Available

Default: Unavailable
Result:
- Internal testers always get the new schema
- Consumers using API version 2023-11-01 or later get the new schema
- Specific consumers can opt in to the new schema early
- All other consumers get the legacy schema
Best practices
Use semantic versioning
Use semantic versioning for API versions to enable meaningful comparisons:
- Major version: Breaking changes
- Minor version: Backward-compatible features
- Patch version: Backward-compatible fixes
Document metadata requirements
Provide clear documentation for API consumers:
- Required and optional metadata fields
- Format and valid values
- How metadata affects feature availability
- Deprecation timelines
Provide defaults
Handle missing or invalid metadata gracefully:
const apiVersion = req.headers['x-api-version'] || '1.0.0';
const parsed = parseVersion(apiVersion) || { major: 1, minor: 0, patch: 0 };
Use flag statuses
Track deprecated API versions with flag statuses. Monitor usage to determine when old versions can be safely removed.
To learn more, read Flag statuses.
Communicate deprecation timelines
Provide advance notice to API consumers:
- Include deprecation headers in API responses
- Send notifications to registered consumers
- Provide migration guides
- Offer support during the transition
Example deprecation header:
Deprecation: version="1.0", date="2024-06-01"
Sunset: date="2024-12-01"
Link: <https://api.example.com/docs/migration-guide>; rel="deprecation"
Test with multiple client versions
Verify targeting rules work correctly for all supported client versions:
- Test with minimum supported version
- Test with latest version
- Test with versions at version boundaries
- Test with missing or invalid metadata
Troubleshooting
All clients receiving the same variation
Symptom: Targeting rules based on metadata do not differentiate between clients.
Possible causes:
- Metadata not being extracted from requests
- Context not being created with the correct attributes
- Targeting rules using incorrect attribute names
Solution:
- Log extracted metadata to verify it is present
- Verify context creation includes the expected attributes
- Check targeting rule attribute names match context attribute names
Legacy clients breaking after rollout
Symptom: Clients using old API versions receive errors or unexpected behavior.
Possible causes:
- Default variation serves new behavior
- Targeting rule comparison logic is incorrect
- Missing fallback handling for old versions
Solution:
- Ensure default variation serves legacy behavior
- Verify version comparison logic (for example,
>=vs>) - Add explicit targeting rules for old versions if needed
Related strategies
Combine request metadata with other coordination strategies:
- Delegated authority: Grant API consumers permission to request custom targeting rules
- Prerequisite flags: Use prerequisites for internal coordination while using request metadata for external coordination
To learn more about context attributes, read Contexts.
Delegated authority
Enable cross-functional collaboration by granting teams authority to manage flags in projects they do not own. This strategy empowers support, security, and operations teams to coordinate releases without bottlenecking engineering teams.
Overview
Delegated authority uses LaunchDarkly’s custom roles and approval workflows to grant specific teams permission to manage subsets of flags across multiple projects. This enables cross-functional coordination while maintaining security and governance.
When to use delegated authority
Use delegated authority when:
- Cross-functional teams need to coordinate releases
- Customer success or support teams manage early access programs
- Database administrators control schema migration flags
- Security engineers manage security features
- Teams need to modify flags in projects they do not own
How delegated authority works
Each coordination strategy has two parts:
Platform
What teams do in LaunchDarkly:
Members are delegated authority to manage a subset of flags or segments inside other teams’ projects through:
- Custom roles with scoped permissions
- Approval workflows for change review
- API access for automation
Delegated authority can be combined with prerequisite flags.
Application
What developers implement: Applications evaluate flags as usual. No additional code is required.
Delegated authority scope
Delegated authority works across boundaries:
| Architecture | Supported |
|---|---|
| Within a single project | Yes |
| Across multiple projects | Yes |
| Outside of projects | No |
Both teams must have access to LaunchDarkly.
Use cases
Customer success early access programs
Empower customer success teams to manage early access enrollments without engineering involvement.
Example scenario:
Customer success team manages beta access to new analytics dashboard.
Setup:
- Create flag: Release: Analytics Dashboard
- Create custom role: Customer Success - Early Access
- Grant role permission to modify targeting rules for flags tagged with early-access
- Tag Release: Analytics Dashboard with early-access
- Assign role to customer success team members
Result:
Customer success can add customers to early access beta programs by modifying targeting rules. Engineering maintains control over flag creation and removal.
Database administrators schema migrations
Enable database administrators to signal migration completion across multiple services.
Example scenario:
Database team manages schema migration flags across multiple microservice projects.
Setup:
- Create flags in each project: DB: User Table Migration Complete
- Create custom role: DBA - Schema Migrations
- Grant role permission to manage flags tagged with schema-migration
- Assign role to database administrators
Result:
Database administrators can signal when migrations are complete. Engineering teams evaluate these flags to enable new code that depends on schema changes.
Security engineers rapid response
Allow security team to quickly enable security mitigations across multiple projects.
Example scenario:
Security team needs ability to enable rate limiting or security features in response to incidents.
Setup:
- Create flags in each project: Security: Enhanced Rate Limiting
- Create custom role: Security - Incident Response
- Grant role permission to manage flags tagged with security
- Configure approval workflow with security team as reviewers
- Assign role to security engineers
Result:
Security engineers can request activation of security features during incidents. Approvals ensure changes are reviewed while enabling rapid response.
Frontend team segment management
Grant frontend teams authority to manage browser support segments across backend services.
Example scenario:
Frontend team maintains list of supported browsers across multiple services.
Setup:
- Create segment: Supported Browsers in each relevant project
- Create custom role: Frontend - Browser Support
- Grant role permission to modify segments tagged with browser-support
- Assign role to frontend team members
Result:
Frontend team can update supported browser list once. Backend services use the segment for targeting decisions.
Implementation steps
Step 1: Identify delegated permissions
Determine what permissions to delegate:
- Which flags or segments can be modified
- Which environments can be accessed
- Whether changes require approval
- Which projects are in scope
Step 2: Create custom role
Create a custom role with scoped permissions:
- Navigate to Account settings → Roles
- Click Create role
- Provide a descriptive name
- Configure permissions using policies
Example policy for early access management:
[
  {
    "effect": "allow",
    "actions": ["updateOn", "updateFallthrough", "updateTargets"],
    "resources": ["proj/*:env/production:flag/*;early-access"]
  }
]
This policy allows:
- Updating targeting rules
- Only in production environment
- Only for flags tagged with early-access
- Across all projects
Step 3: Configure approval workflows
Require approvals for delegated changes in production:
- Navigate to environment settings
- Enable Approvals
- Configure approval requirements:
- Minimum number of reviewers
- Required reviewers
- Service tokens excluded from approvals
- Save configuration
Step 4: Assign role to team
Grant the custom role to appropriate team members:
- Navigate to Account settings → Team
- Select team member
- Click Add role
- Select the custom role
- Save changes
Step 5: Document delegation
Create documentation for delegated teams:
- Which flags they can modify
- How to request changes
- Approval process and timeline
- Escalation procedures
- Examples of appropriate changes
Example configuration
Scenario: Customer support troubleshooting
Custom role: Support - Customer Overrides
Policy:
[
  {
    "effect": "allow",
    "actions": ["updateTargets", "updateOn"],
    "resources": ["proj/support-enabled:env/production:flag/*"]
  }
]
Tagged flags:
- Enable Advanced Logging
- Enable Debug Mode
- Enable Experimental Features
Workflow:
- Support receives customer issue requiring advanced diagnostics
- Support creates approval request to enable advanced logging for specific customer
- Engineering reviews and approves request
- Support enables logging for customer
- After troubleshooting, support disables logging
Best practices
Use tag-based permissions
Grant permissions based on flag tags rather than specific flag names. This allows new flags to inherit permissions automatically:
{
  "resources": ["proj/*:env/production:flag/*;customer-success"]
}
Require approvals in production
Always require approvals for delegated changes in production environments. This provides an audit trail and ensures changes are reviewed.
Limit environment access
Grant delegated access only to necessary environments:
{
  "resources": ["proj/*:env/production:flag/*"]
}
Avoid granting access to development or test environments unless specifically needed.
Document flag ownership
Maintain clear documentation of flag ownership:
- Primary owner responsible for flag lifecycle
- Delegated teams authorized to modify targeting
- Change approval process
- Escalation contacts
Use flag descriptions
Document delegation in flag descriptions:
Flag: Enable Advanced Logging

Owner: Platform Engineering
Delegated to: Customer Support for troubleshooting
Requires approval: Yes
Approval reviewers: @platform-oncall
Monitor delegated changes
Track changes made through delegated authority:
- Review approval requests regularly
- Monitor flag evaluation metrics
- Audit delegated access quarterly
- Revoke access when no longer needed
Troubleshooting
Team member cannot modify flags
Symptom: Team member with delegated role cannot modify flags they should have access to.
Possible causes:
- Flags not tagged correctly
- Role policy scope too restrictive
- Approval workflow blocking direct changes
- Insufficient base permissions
Solution:
- Verify flags have the required tags
- Review role policy to ensure it matches flag resources
- Check if approval workflow requires request instead of direct modification
- Verify team member has base permissions to access the project
Approval requests not reaching reviewers
Symptom: Approval requests are created but reviewers do not receive notifications.
Possible causes:
- Reviewers not configured in approval workflow
- Notification settings disabled
- Role does not require approvals
- Approval workflow not enabled
Solution:
- Verify approval workflow configuration includes required reviewers
- Check reviewer notification settings in account preferences
- Review role policy for approval requirements
- Confirm approvals are enabled in the environment
Excessive approval requests
Symptom: Delegated team creates many approval requests that engineering teams struggle to review.
Possible causes:
- Delegated permissions too restrictive
- Approval workflow too strict
- Poor communication about appropriate changes
- Missing self-service capabilities
Solution:
- Review if delegated permissions should allow direct changes for low-risk modifications
- Adjust approval requirements such as reducing required reviewers
- Provide training and documentation on appropriate use
- Consider expanding delegated permissions for routine changes
Combining with other strategies
Delegated authority works well with other coordination strategies:
Delegated authority with prerequisite flags
Scenario: Product marketing team controls release timing for coordinated product launches.
Setup:
- Engineering creates prerequisite flags for feature components
- Engineering creates keystone flag with product-marketing tag
- Custom role grants product marketing team permission to modify keystone flag
- Product marketing controls launch timing by enabling keystone flag
Result:
Engineering maintains control over component flags and technical implementation. Product marketing controls the coordinated release without engineering involvement.
Delegated authority with request metadata
Scenario: API consumers can request custom targeting rules for their client versions.
Setup:
- API service evaluates flags using request metadata
- Custom role grants API consumers permission to create targeting rules
- Approval workflow requires API team review
- Consumers create approval requests for custom targeting
Result:
API consumers can request accommodations for their specific client versions. API team reviews and approves requests without custom code changes.
Related documentation
To learn more about roles and permissions:
To learn about project architecture:
Syncing flag settings across environments
Organizations often ask how to sync flag settings across environments. Before implementing a sync process, examine why you need to sync and whether alternative approaches better serve your use case.
Quick answers
Can I bulk sync flag settings between environments? No native bulk sync exists in the LaunchDarkly dashboard. You can compare and copy settings one flag at a time, or use the API for bulk operations.
Should I sync flag settings between environments? Rarely. Flag targeting rules typically serve different purposes in each environment. Syncing often indicates architecture decisions that create unnecessary overhead.
The reframe
Transform the question from “How do I sync environments?” to “Why am I syncing environments?”
Common reasons and better alternatives:
| Reason for syncing | Better approach |
|---|---|
| Keep preproduction in sync with production | Use different targeting rules per environment based on release stage |
| Ensure flags are enabled everywhere | Compare and copy completed releases, or consolidate environments |
| Test production-like configurations | Use targeting rules to create production-like conditions in staging |
| Manage multiple similar environments, such as qa1, qa2, and qa3 | Consolidate into one environment, use custom attributes to distinguish |
| Replicate setup across per-PR or per-developer environments | Consolidate ephemeral environments, pass identifiers as context attributes |
Why environments rarely need syncing
Progressive releases use different targeting strategies in each environment:
Preproduction environment:
- Target yourself:
If user key equals "alice@example.com" then serve Available - Target your team:
If team equals "platform" then serve Available - Enable for testing:
If qa_tester is true then serve Available
Production environment:
- Target internal users:
If email ends with "@example.com" then serve Available - Target beta program:
If beta_participant is true then serve Available - Progressive rollout:
Serve Available for 10% of users - Full release:
Serve Available for all users
These targeting rules serve different purposes. Syncing them defeats the purpose of progressive delivery.
When to use compare and copy
Compare and copy works well for specific scenarios:
Auditing operational flags
Verify operational flags have consistent configuration across environments:
- Feature flag kill switches
- Rate limiting thresholds
- Configuration values that should be uniform
To learn more, read Comparing and copying flag settings.
Verifying completed releases
After completing a release in production, verify the flag is also enabled in preproduction environments to maintain consistency for operational flags.
Copying base configuration
When creating a new flag, copy the initial structure from another environment, then customize targeting rules for the specific environment.
API-based sync workflows
For bulk operations, use the LaunchDarkly API or Terraform provider:
REST API
Use the REST API to copy flag configurations:
# Get flag configuration from source environment
curl -X GET https://app.launchdarkly.com/api/v2/flags/{projectKey}/{flagKey} \
  -H "Authorization: YOUR_API_KEY"

# Update target environment
curl -X PATCH https://app.launchdarkly.com/api/v2/flags/{projectKey}/{flagKey} \
  -H "Authorization: YOUR_API_KEY" \
  -H "Content-Type: application/json" \
  -d '{"environments": {...}}'
Terraform provider
Manage flag configurations as code:
resource "launchdarkly_feature_flag_environment" "staging" {
  flag_id = launchdarkly_feature_flag.example.id
  env_key = "staging"

  targeting_enabled = true

  rules {
    clauses {
      attribute = "team"
      op        = "in"
      values    = ["platform"]
    }
  }
}

resource "launchdarkly_feature_flag_environment" "production" {
  flag_id = launchdarkly_feature_flag.example.id
  env_key = "production"

  targeting_enabled = true

  rules {
    clauses {
      attribute = "email"
      op        = "endsWith"
      values    = ["@example.com"]
    }
  }
}
To learn more, read LaunchDarkly Terraform provider.
Consolidating environments
If you frequently need to sync flag settings, consider consolidating environments:
Signs you should consolidate
You maintain identical targeting rules across multiple environments:
Example: qa1, qa2, and qa3 all have the same targeting rules with no meaningful differences.
Solution: Create one QA environment, pass qa_instance: "1" as a context attribute, create targeting rules when instances need different behavior.
You replicate flag states across ephemeral environments:
Example: Per-PR environments where each PR needs the same flag configuration.
Solution: Create one staging environment, pass pr_number: "1234" as a context attribute, target specific PRs when needed.
You sync production-released flags to all environments:
Example: After releasing a flag in production, you copy settings to all preproduction environments.
Solution: Use compare and copy for operational flags that need consistency. For release flags, accept that preproduction environments serve different purposes and don’t need production targeting rules.
To learn more about consolidating environments, read Environments.
Best practices
Follow these practices when managing flag settings across environments:
Design environment-specific targeting rules: Create targeting rules appropriate for each environment’s purpose rather than copying production rules to preproduction.
Use compare and copy sparingly: Reserve compare and copy for operational flags and completed releases, not for active progressive rollouts.
Consolidate environments when possible: Reduce the number of environments to minimize management overhead.
Use the API for legitimate bulk operations: When you need to sync operational flags or configuration values, automate with the API rather than manual dashboard operations.
Question the need to sync: Each time you reach for sync functionality, ask whether the targeting rules should actually differ between environments.
Related topics
- Environments: Guidance on how many environments to create
- Coordinating releases: Strategies for coordinating releases across applications
- Comparing and copying flag settings: LaunchDarkly documentation on native compare and copy functionality
Targeting
This section covers recipes for targeting contexts with feature flags in scenarios that go beyond the standard operators.
Recipes
- Precalculated attributes - Target based on calculated values when built-in operators cannot express the required logic
Precalculated attributes
This recipe explains how to target contexts based on calculated values that LaunchDarkly’s built-in operators cannot express directly.
Use case
You want to target users based on relative time periods or calculated metrics. For example:
- Users who logged in more than 90 days ago
- Users whose subscription expires within 7 days
- Users with an account balance below a threshold percentage
LaunchDarkly provides before and after operators for date comparisons. These operators require absolute dates as arguments. There are no operators for relative date comparisons or mathematical calculations.
Solution
Precalculate the derived value in your application and pass it to LaunchDarkly as a context attribute. Your application code performs the calculation before the SDK evaluates any flags.
The pattern follows these steps:
- Calculate the value in your application code when building the context.
- Add the calculated value as a custom attribute on the context.
- Create targeting rules using standard numeric operators.
Example: days since last login
Your application calculates the number of days between the current date and the user’s last login date. Store this value as daysSinceLastLogin on the context.
In LaunchDarkly, create a targeting rule that checks if daysSinceLastLogin is greater than 90. The flag serves users who have not logged in for more than 90 days.
The following screenshot shows a targeting rule using the precalculated daysSinceLastLogin attribute:
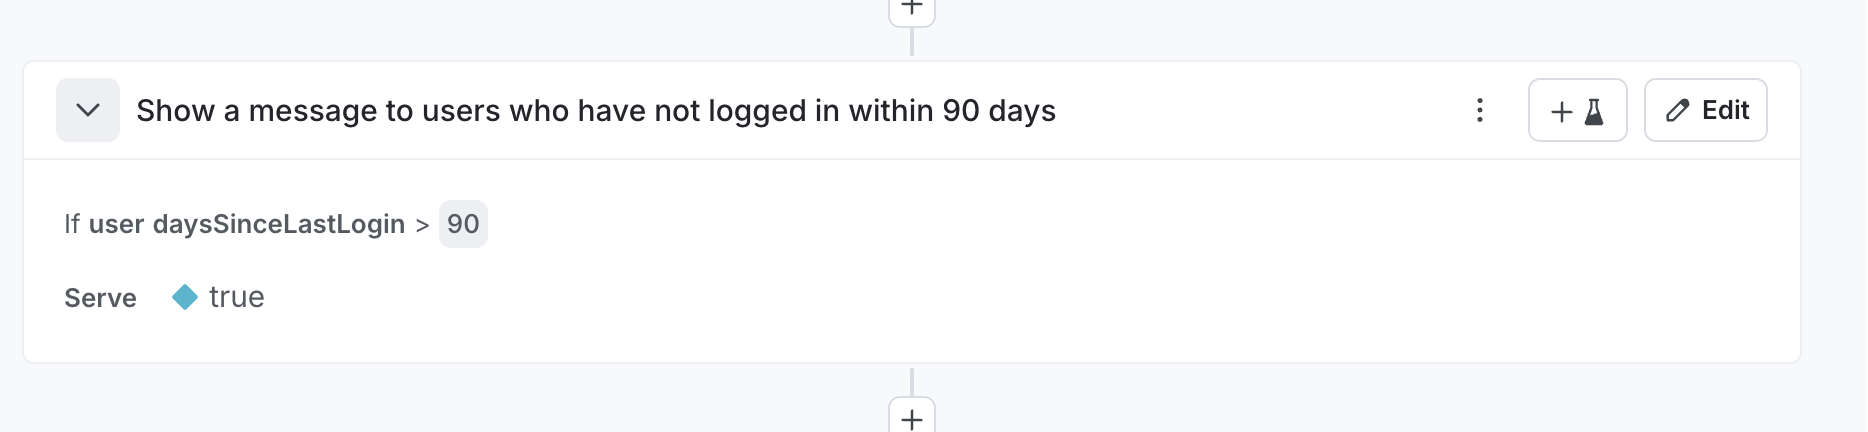
Other examples
This pattern applies to many scenarios:
daysUntilExpiration- target users whose subscriptions expire soonstorageUsedPercent- target users approaching storage limitslifetimeSpend- target high-value customers for loyalty programsdistanceToNearestStore- target users far from physical locationsfeaturesUsedCount- target users who might benefit from plan upgradesriskScore- target based on fraud or churn risk calculated from multiple signals
When to use this pattern
This pattern applies when your targeting logic requires:
- Relative date comparisons instead of absolute dates
- Mathematical operations like subtraction, addition, or percentage calculations
- Derived values that combine multiple source fields
- Complex business logic that cannot map to built-in operators
Considerations
Calculate the attribute value at the appropriate point in your application. For server-side applications, calculate the value when constructing the context before flag evaluation. For client-side applications, calculate the value before initializing the SDK.
Keep attribute names descriptive. Names like daysSinceLastLogin communicate the attribute’s purpose clearly.
Resources
Dependency Injection Frameworks
This section covers integrating LaunchDarkly SDKs with popular dependency injection frameworks.
Framework Integration Guides
.NET
- Ninject - Integrate the .NET server-side SDK with Ninject dependency injection
Why Use Dependency Injection
Dependency injection frameworks simplify SDK integration by:
- Managing SDK lifecycle as a singleton
- Centralizing configuration
- Enabling testability with mock implementations
- Reducing boilerplate initialization code
Key Requirements
When integrating LaunchDarkly SDKs with dependency injection containers:
MUST register SDK client as a singleton
The SDK must be instantiated once per application lifetime to prevent duplicate connections and ensure proper initialization.
MUST NOT block application startup
Configure initialization timeouts and allow the application to start with fallback values if the SDK cannot connect immediately.
SHOULD integrate with existing configuration management
Load SDK keys and configuration from your existing secrets management system rather than hardcoding values.
To learn more about SDK initialization best practices, read Init and Config.
Integrating LaunchDarkly .NET SDK with Ninject
Integrate the LaunchDarkly .NET server-side SDK with Ninject dependency injection framework using proper singleton registration and initialization patterns.
Use case
Configure LaunchDarkly SDK as a managed singleton in Ninject-based .NET applications to ensure:
- Single SDK instance per application
- Proper initialization before flag evaluations
- Clean integration with existing dependency injection patterns
- Testability with mock implementations
Challenge
Incorrect Ninject binding configuration causes common initialization failures:
Initializedproperty returnsfalse- All flag evaluations return fallback values
- SDK creates new instances on each resolution
- Application blocks on startup waiting for initialization
These occur when the SDK is not registered with singleton scope or when initialization is not properly awaited.
Solution
Register ILdClient as a singleton using Ninject’s .InSingletonScope() and ensure initialization completes during application startup.
Ninject module configuration
using LaunchDarkly.Sdk.Server;
using LaunchDarkly.Sdk.Server.Interfaces;
using Ninject.Modules;
using System;

public class LaunchDarklyModule : NinjectModule
{
    public override void Load()
    {
        Bind<ILdClient>()
            .ToMethod(ctx =>
            {
                var sdkKey = GetSdkKey();

                var config = Configuration.Builder(sdkKey)
                    .StartWaitTime(TimeSpan.FromSeconds(5))
                    .Build();

                var client = new LdClient(config);

                if (!client.Initialized)
                {
                    Console.WriteLine(
                        "LaunchDarkly client did not initialize within timeout. " +
                        "Flag evaluations will use fallback values until connected.");
                }

                return client;
            })
            .InSingletonScope();
    }

    private string GetSdkKey()
    {
        return Environment.GetEnvironmentVariable("LAUNCHDARKLY_SDK_KEY")
            ?? throw new InvalidOperationException(
                "LAUNCHDARKLY_SDK_KEY environment variable not set");
    }
}
Using the SDK in services
Define a service interface and inject ILdClient through the constructor:
using LaunchDarkly.Sdk;
using LaunchDarkly.Sdk.Server.Interfaces;
using System;

public interface IMyService
{
    void DoWork();
}
Implement the service with constructor injection:
public class MyService : IMyService
{
    private readonly ILdClient _ldClient;

    public MyService(ILdClient ldClient)
    {
        _ldClient = ldClient;
    }

    public void DoWork()
    {
        var context = Context.Builder("user-key-123")
            .Name("Example User")
            .Build();

        var showFeature = _ldClient.BoolVariation("my-feature-flag", context, false);

        if (showFeature)
        {
            Console.WriteLine("Feature is enabled");
        }
        else
        {
            Console.WriteLine("Feature is disabled");
        }
    }
}
Service registration
using Ninject.Modules;

public class ServicesModule : NinjectModule
{
    public override void Load()
    {
        Bind<IMyService>().To<MyService>();
    }
}
Complete startup example
using LaunchDarkly.Sdk.Server.Interfaces;
using Ninject;
using System;

public class Program
{
    private static IKernel _kernel;

    public static void Main(string[] args)
    {
        // .NET Framework 4.x does not enable TLS 1.2 by default. If targeting these runtimes,
        // configure the security protocol before initializing the SDK to ensure connectivity
        // to LaunchDarkly's streaming and events endpoints:
        //   ServicePointManager.SecurityProtocol = SecurityProtocolType.Tls12;
        // .NET Core 2.1+ and .NET 5+ enable TLS 1.2 by default; no additional configuration
        // is required.
        _kernel = new StandardKernel(
            new LaunchDarklyModule(),
            new ServicesModule()
        );

        var ldClient = _kernel.Get<ILdClient>();
        Console.WriteLine($"LaunchDarkly SDK initialized: {ldClient.Initialized}");

        if (!ldClient.Initialized)
        {
            Console.WriteLine(
                "WARNING: LaunchDarkly SDK not fully initialized. " +
                "Flag evaluations will use fallback values until connection establishes.");
        }

        RunApplication();

        Cleanup();
    }

    private static void RunApplication()
    {
        var service = _kernel.Get<IMyService>();
        service.DoWork();
    }

    private static void Cleanup()
    {
        _kernel.Dispose();
    }
}
Testing with test data sources
Use LaunchDarkly’s test data source to control flag values in tests without mocking:
using LaunchDarkly.Sdk.Server;
using LaunchDarkly.Sdk.Server.Integrations;
using LaunchDarkly.Sdk.Server.Interfaces;
using Ninject.Modules;

public class TestLaunchDarklyModule : NinjectModule
{
    private readonly TestData _testData;

    public TestLaunchDarklyModule()
    {
        _testData = TestData.DataSource();
    }

    public TestLaunchDarklyModule(TestData testData)
    {
        _testData = testData;
    }

    public override void Load()
    {
        Bind<ILdClient>()
            .ToMethod(ctx =>
            {
                var config = Configuration.Builder("test-sdk-key")
                    .DataSource(_testData)
                    .Events(Components.NoEvents)
                    .Build();

                return new LdClient(config);
            })
            .InSingletonScope();

        Bind<TestData>().ToConstant(_testData);
    }
}
Unit test example
using LaunchDarkly.Sdk;
using LaunchDarkly.Sdk.Server.Integrations;
using LaunchDarkly.Sdk.Server.Interfaces;
using Ninject;
using Xunit;

public class MyServiceTests
{
    [Fact]
    public void DoWork_WhenFeatureEnabled_PrintsEnabledMessage()
    {
        var testData = TestData.DataSource();
        testData.Update(testData.Flag("my-feature-flag").On(true));

        using var kernel = new StandardKernel(
            new TestLaunchDarklyModule(testData),
            new ServicesModule()
        );

        var service = kernel.Get<IMyService>();

        service.DoWork();
    }

    [Fact]
    public void DoWork_WhenFeatureDisabled_PrintsDisabledMessage()
    {
        var testData = TestData.DataSource();
        testData.Update(testData.Flag("my-feature-flag").On(false));

        using var kernel = new StandardKernel(
            new TestLaunchDarklyModule(testData),
            new ServicesModule()
        );

        var service = kernel.Get<IMyService>();

        service.DoWork();
    }
Testing with targeting rules
Test data sources support full targeting functionality:
    [Fact]
    public void DoWork_WithContextTargeting_ReturnsExpectedValue()
    {
        var testData = TestData.DataSource();

        testData.Update(testData.Flag("my-feature-flag")
            .On(true)
            .VariationForKey(ContextKind.Default, "user-key-123", true)
            .FallthroughVariation(false));

        using var kernel = new StandardKernel(
            new TestLaunchDarklyModule(testData),
            new ServicesModule()
        );

        var service = kernel.Get<IMyService>();
        service.DoWork();
    }
Why use test data sources instead of mocks:
- No need to implement the full
ILdClientinterface - Supports all SDK features including targeting, rules, and prerequisites
- Closer to production behavior than mocks
- Easier to maintain as SDK evolves
- No events sent to LaunchDarkly during tests
To learn more about test data sources, read Test data sources.
Key implementation points
MUST use InSingletonScope
Bind<ILdClient>()
    .ToMethod(ctx => { /* initialization */ })
    .InSingletonScope();
Without .InSingletonScope(), Ninject creates a new SDK instance for each resolution, causing:
- Multiple concurrent connections to LaunchDarkly
Initializedalways returnsfalsebecause each instance starts initialization from scratch- Increased resource usage and connection overhead
MUST configure initialization timeout
var config = Configuration.Builder(sdkKey)
    .StartWaitTime(TimeSpan.FromSeconds(5))
    .Build();
Set a reasonable timeout based on your application type:
- Web applications: 1-3 seconds
- Background services: 3-5 seconds
- Console applications: 5-10 seconds
MUST load SDK key from configuration
    private string GetSdkKey()
    {
        return Environment.GetEnvironmentVariable("LAUNCHDARKLY_SDK_KEY")
            ?? throw new InvalidOperationException(
                "LAUNCHDARKLY_SDK_KEY environment variable not set");
    }
Never hardcode SDK keys. Use:
- Environment variables
- Configuration files
- Secret management systems
- Azure Key Vault
- AWS Secrets Manager
SHOULD check initialization status
var client = new LdClient(config);

if (!client.Initialized)
{
    Console.WriteLine(
        "LaunchDarkly client did not initialize within timeout. " +
        "Using fallback values until connected.");
}
The StartWaitTime configuration handles the timeout automatically. The constructor blocks until either the SDK connects successfully or the timeout elapses. After timeout, the SDK continues connecting in the background while your application proceeds with fallback values.
SHOULD dispose on shutdown
    private static void Cleanup()
    {
        _kernel.Dispose();
    }
Disposing the Ninject kernel disposes all singleton bindings, including the LdClient. This ensures:
- Pending events are flushed
- Connections are closed gracefully
- Resources are released properly
Common mistakes
Creating new instance on each call
Incorrect:
Bind<ILdClient>()
    .ToMethod(ctx => new LdClient(sdkKey));
Correct:
Bind<ILdClient>()
    .ToMethod(ctx => new LdClient(sdkKey))
    .InSingletonScope();
Blocking application startup
Incorrect:
var config = Configuration.Builder(sdkKey)
    .StartWaitTime(TimeSpan.FromMinutes(5))
    .Build();
var client = new LdClient(config);
Correct:
var config = Configuration.Builder(sdkKey)
    .StartWaitTime(TimeSpan.FromSeconds(5))
    .Build();
var client = new LdClient(config);

if (!client.Initialized)
{
    Console.WriteLine("Continuing with fallback values");
}
The StartWaitTime automatically controls how long the constructor blocks. Set it to a reasonable timeout based on your application type. Do not use DataSourceStatusProvider.WaitFor after construction. StartWaitTime handles all the waiting.
Hardcoding SDK keys
Incorrect:
var sdkKey = "sdk-12345678-1234-1234-1234-123456789abc";
Correct:
var sdkKey = Environment.GetEnvironmentVariable("LAUNCHDARKLY_SDK_KEY");
Related topics
Resources
Implementing identify timeouts
What this recipe does
This recipe shows you how to implement timeouts for identify calls in client-side and mobile SDKs. When you call identify, the SDK makes a network request to retrieve flags for the new context. By adding a timeout, your application can continue functioning even if the network request is slow or fails, rather than blocking indefinitely.
Note: Some SDKs have built-in timeout parameters for the
identifymethod. Always prefer using native SDK timeout support when available. The iOS SDK includes native timeout support as documented below. Android and JavaScript SDKs require custom timeout implementations.
Why use this pattern
In production applications, network conditions are unpredictable. A slow or failing identify call can freeze your UI or delay critical user workflows. By implementing a timeout:
- Improve user experience: Your app remains responsive even when LaunchDarkly services are unreachable
- Maintain availability: Continue serving users with existing flag values instead of waiting indefinitely
- Follow best practices: Implements the preflight checklist recommendation to not block on identify
Note: The timeout does not cancel the underlying
identifyrequest. The SDK continues processing the request in the background. If it completes after the timeout, the SDK updates flag values and fires change listeners normally.
iOS
The iOS SDK includes native timeout support for the identify method. Use the built-in timeout parameter instead of implementing a custom wrapper.
Usage
import LaunchDarkly

let client = LDClient.get()!
let userContext = LDContext(key: "user-123", kind: .user)

// Call identify with native timeout parameter
client.identify(context: userContext, timeout: 0.5) { result in
    switch result {
    case .complete:
        print("Identify completed successfully")
    case .error(let error):
        print("Identify failed with error: \(error)")
    case .timeout:
        print("Identify timed out - continuing with existing flags")
    case .shed:
        print("Identify was replaced by newer request")
    }
}
Key behaviors
The SDK’s native timeout implementation:
- Timeout validation: Warns when timeout exceeds
LDClient.longTimeoutInterval(15 seconds) - Race condition prevention: Ensures completion fires exactly once
- Parallel execution: Timer and identify operation run simultaneously
- Non-canceling: The underlying identify request continues processing in the background
- Consistent semantics: Matches the behavior of the SDK’s initialization timeout
Android
For Android applications, use Kotlin coroutines with withTimeoutOrNull to implement a clean, idiomatic timeout.
Implementation
import com.launchdarkly.sdk.LDContext
import com.launchdarkly.sdk.android.LDClient
import kotlinx.coroutines.CompletableDeferred
import kotlinx.coroutines.withTimeoutOrNull
import kotlin.time.Duration
import kotlin.time.Duration.Companion.milliseconds

/**
 * Identifies a new context with a timeout matching SDK initialization semantics
 *
 * @param context The context to identify
 * @param timeout Maximum time to wait for completion
 * @return true if identify completed successfully, false if timed out or failed
 */
suspend fun LDClient.identifyWithTimeout(
    context: LDContext,
    timeout: Duration = 500.milliseconds
): Boolean {
    val deferred = CompletableDeferred<Boolean>()

    // Start the identify operation
    this.identify(context) { success ->
        deferred.complete(success)
    }

    // Race against timeout
    return withTimeoutOrNull(timeout) {
        deferred.await()
    } ?: false // Return false on timeout
}
Usage
import kotlinx.coroutines.launch
import kotlinx.coroutines.CoroutineScope
import kotlinx.coroutines.Dispatchers
import kotlin.time.Duration.Companion.milliseconds

// In a coroutine context
CoroutineScope(Dispatchers.Main).launch {
    val client = LDClient.get()
    val context = LDContext.builder("user-123")
        .build()

    val success = client.identifyWithTimeout(
        context = context,
        timeout = 500.milliseconds
    )

    if (success) {
        println("Identify completed successfully")
    } else {
        println("Identify timed out or failed - continuing with existing flags")
    }
}
Key behaviors
- Idiomatic Kotlin: Uses coroutines and Kotlin’s
Durationtype - Clean timeout handling:
withTimeoutOrNullprovides built-in timeout semantics - Non-canceling: The underlying identify request continues processing
- Return value: Returns
trueon success,falseon timeout or error
JavaScript (Client-side)
For JavaScript client-side applications, use Promise.race to implement a timeout that matches the SDK’s initialization behavior.
Implementation
/**
 * Identifies a new context with a timeout matching SDK initialization semantics
 *
 * @param {import('launchdarkly-js-client-sdk').LDClient} client - The LaunchDarkly client
 * @param {import('launchdarkly-js-client-sdk').LDContext} context - The context to identify
 * @param {number} timeout - Maximum time to wait in milliseconds
 * @returns {Promise<'complete' | 'timeout'>} Result of the identify operation
 */
async function identifyWithTimeout(client, context, timeout = 500) {
  // Create timeout promise
  const timeoutPromise = new Promise((resolve) => {
    setTimeout(() => resolve('timeout'), timeout);
  });

  // Create identify promise
  const identifyPromise = client
    .identify(context)
    .then(() => 'complete')
    .catch(() => 'error');

  // Race them
  return Promise.race([identifyPromise, timeoutPromise]);
}
Usage
import * as LDClient from 'launchdarkly-js-client-sdk';

const client = LDClient.initialize('YOUR_CLIENT_SIDE_ID', {
  key: 'anonymous-user',
});

// Wait for initial initialization
await client.waitForInitialization();

// Later, when identifying a new user
const newContext = {
  kind: 'user',
  key: 'user-123',
  email: 'user@example.com',
};

const result = await identifyWithTimeout(client, newContext, 500);

switch (result) {
  case 'complete':
    console.log('Identify completed successfully');
    break;
  case 'error':
    console.log('Identify failed with error');
    break;
  case 'timeout':
    console.log('Identify timed out - continuing with existing flags');
    break;
}
TypeScript version
import * as LDClient from 'launchdarkly-js-client-sdk';

type IdentifyResult = 'complete' | 'error' | 'timeout';

async function identifyWithTimeout(
  client: LDClient.LDClient,
  context: LDClient.LDContext,
  timeout: number = 500
): Promise<IdentifyResult> {
  const timeoutPromise = new Promise<'timeout'>((resolve) => {
    setTimeout(() => resolve('timeout'), timeout);
  });

  const identifyPromise = client
    .identify(context)
    .then((): IdentifyResult => 'complete')
    .catch((): IdentifyResult => 'error');

  return Promise.race([identifyPromise, timeoutPromise]);
}
Key behaviors
- Promise-based: Uses standard JavaScript promises with
Promise.race - Clean timeout: Timeout and identify promises race against each other
- Error handling: Catches identify errors and returns ‘error’ result
- Non-canceling: The underlying identify request continues processing
- TypeScript support: Includes typed version for type-safe usage
Recommended timeout values
| Platform | Recommended Timeout | Notes |
|---|---|---|
| iOS | 100-500 ms | Match client-side init timeout recommendations |
| Android | 100-500 ms | Match client-side init timeout recommendations |
| JavaScript | 100-500 ms | Match client-side init timeout recommendations |
These values align with the preflight checklist recommendations for client-side initialization timeouts.
Testing your implementation
To verify your timeout implementation works correctly:
-
Block SDK endpoints in your development environment:
clientsdk.launchdarkly.comclientstream.launchdarkly.comapp.launchdarkly.com
-
Call identify with your timeout wrapper
-
Verify behavior:
- Application continues functioning after the timeout period
- Timeout handler is called
- No crashes or UI blocking
For more testing strategies, see Emulating LaunchDarkly Downtime.
Testing
This section covers testing strategies for applications using LaunchDarkly feature flags.
Testing Recipes
Integration Testing
- Emulating LaunchDarkly Downtime - Validate your application behaves correctly when LaunchDarkly is unavailable
Unit Testing
- Unit Testing React Components - Test React components that use LaunchDarkly hooks in isolation
Choosing a Testing Strategy
Integration testing validates that your application handles LaunchDarkly service unavailability gracefully. Use these patterns to test:
- Application startup with LD unreachable
- Fallback value behavior
- Timeout and retry logic
Unit testing validates component behavior with specific flag values. Use these patterns to test:
- Component rendering with different flag states
- Flag-dependent logic and branches
- Component interactions with LaunchDarkly hooks
Emulating LaunchDarkly Downtime
This topic covers strategies for emulating LaunchDarkly downtime in your tests.
Use Case
Validate that your application behaves correctly when LaunchDarkly is unavailable. The goal of these tests is to ensure:
- The application does not block indefinitely for initialization
- Fallback values are updated and well maintained
Methods
Relay Proxy
If SDKs connect through the Relay Proxy, read Emulating Relay Proxy issues for how to test when the proxy is down or when LaunchDarkly is unreachable upstream of the proxy.
Emulating LaunchDarkly Downtime in Playwright
You can use a fixture in Playwright to abort all network calls to LaunchDarkly before the test runs. This allows for flexibility of the user to:
- Invoke running different tests when the LaunchDarkly connection is blocked. The customer may expect different behavior.
- Allows for a user to run tests as they were prior, assuming the connection to LaunchDarkly is made.
- The user can invoke one test against both scenarios. For example, my application should return a 200 whether I can connect to LaunchDarkly or not.
Create a fixture
const { test: base } = require('@playwright/test');

const blockLaunchDarkly = base.extend({
  page: async ({ page }, use) => {
    // Block all requests to LaunchDarkly before the test runs
    await page.route('**/*launchdarkly.com/**', route => route.abort());
    await use(page);
  },
});

const connectedLaunchDarkly = base;

module.exports = {
  blockLaunchDarkly,
  connectedLaunchDarkly,
  expect: base.expect,
};
Example test
const { blockLaunchDarkly, connectedLaunchDarkly, expect } = require('./fixtures');

/**
 * Shared tests that run against BOTH scenarios:
 * - LaunchDarkly blocked (unreachable)
 * - LaunchDarkly connected (working)
 *
 * This ensures the app works regardless of LaunchDarkly availability.
 */

const scenarios = [
  { testFn: blockLaunchDarkly, name: 'LD blocked' },
  { testFn: connectedLaunchDarkly, name: 'LD connected' },
];

// Run the same test for each scenario
for (const { testFn, name } of scenarios) {
  testFn(`app returns 200 (${name})`, async ({ page }) => {
    const response = await page.goto('/');
    expect(response.status()).toBe(200);
  });
}
Unit Testing React Components
This topic covers strategies for unit testing React components that use LaunchDarkly feature flags.
Use Case
Test React components that use LaunchDarkly hooks (useFlags, useLDClient, etc.) in isolation without requiring a live connection to LaunchDarkly. This enables:
- Fast, reliable unit tests that don’t depend on network connectivity
- Testing component behavior with specific flag values
- Testing flag-dependent logic and conditional rendering
Challenge
Unlike Jest which has built-in module mocking, Mocha requires external libraries or code patterns to mock the LaunchDarkly React SDK.
Methods
- Mocha - Three approaches for mocking LaunchDarkly in Mocha tests
Unit Testing React Components with Mocha
Three approaches for mocking LaunchDarkly React SDK hooks in Mocha tests.
Background
Mocha doesn’t include built-in module mocking like Jest. To test React components that use LaunchDarkly hooks (useFlags, useLDClient), you need to either:
- Mock the module using a library
- Inject dependencies as props
- Use a mock context provider
Each approach has tradeoffs in terms of code changes required and test complexity.
Approach 1: Monkey Patch Dependencies
Replace the LaunchDarkly module at import time using a mocking library. This allows testing components without any code modifications.
Using ESMock (ES Modules)
import esmock from "esmock";
import { render, screen, cleanup } from "@testing-library/react";
import { expect } from "chai";

describe("App with ESMock", () => {
  afterEach(() => {
    cleanup();
  });

  it("renders new header when simpleToggle is true", async () => {
    const { default: App } = await esmock("../src/App.jsx", {
      "launchdarkly-react-client-sdk": {
        useFlags: () => ({ simpleToggle: true })
      }
    });

    render(<App />);
    expect(screen.getByTestId("header").textContent).to.equal("New Header Experience");
  });

  it("renders legacy header when simpleToggle is false", async () => {
    const { default: App } = await esmock("../src/App.jsx", {
      "launchdarkly-react-client-sdk": {
        useFlags: () => ({ simpleToggle: false })
      }
    });

    render(<App />);
    expect(screen.getByTestId("header").textContent).to.equal("Legacy Header Experience");
  });
});
Component (unchanged):
import React from "react";
import { useFlags } from "launchdarkly-react-client-sdk";

export default function App() {
  const { simpleToggle } = useFlags();

  return (
    <div>
      <h1 data-testid="header">
        {simpleToggle ? "New Header Experience" : "Legacy Header Experience"}
      </h1>
    </div>
  );
}
Using ProxyRequire (CommonJS)
const proxyquire = require("proxyquire");
const { render, screen, cleanup } = require("@testing-library/react");
const { expect } = require("chai");
const React = require("react");

describe("App with ProxyRequire", () => {
  afterEach(() => {
    cleanup();
  });

  it("renders new header when simpleToggle is true", () => {
    const App = proxyquire("../src/App", {
      "launchdarkly-react-client-sdk": {
        useFlags: () => ({ simpleToggle: true })
      }
    });

    render(React.createElement(App));
    expect(screen.getByTestId("header").textContent).to.equal("New Header Experience");
  });

  it("renders legacy header when simpleToggle is false", () => {
    const App = proxyquire("../src/App", {
      "launchdarkly-react-client-sdk": {
        useFlags: () => ({ simpleToggle: false })
      }
    });

    render(React.createElement(App));
    expect(screen.getByTestId("header").textContent).to.equal("Legacy Header Experience");
  });
});
Component (unchanged):
const React = require("react");
const { useFlags } = require("launchdarkly-react-client-sdk");

function App() {
  const { simpleToggle } = useFlags();

  return React.createElement(
    "div",
    null,
    React.createElement(
      "h1",
      { "data-testid": "header" },
      simpleToggle ? "New Header Experience" : "Legacy Header Experience"
    )
  );
}

module.exports = App;
Important: When mocking the entire module, you must provide all exports used in your component (e.g., both useFlags and useLDClient if both are used).
Pros:
- No code changes required
- Test-runner agnostic
- Component remains production-focused
Cons:
- Async-only (must use
awaitwith ESMock) - Requires
--import=esmockloader flag (can be slow) - Must mock all used exports from the module
Approach 2: Hook/Flag Map Injection
Pass the hook function or flag values as props instead of importing directly.
Component with dependency injection:
import React from "react";
import { useFlags } from "launchdarkly-react-client-sdk";

export default function App({ useFlags: useFlags_prop }) {
  // Use injected hook for testing, or real hook for production
  const useFlagsHook = useFlags_prop || useFlags;
  const { simpleToggle } = useFlagsHook();

  return (
    <div>
      <h1 data-testid="header">
        {simpleToggle ? "New Header Experience" : "Legacy Header Experience"}
      </h1>
    </div>
  );
}
Test:
import React from "react";
import { render, screen, cleanup } from "@testing-library/react";
import { expect } from "chai";
import App from "./hook-injection.jsx";

describe("App with Hook Injection", () => {
  afterEach(() => {
    cleanup();
  });

  it("renders new header when simpleToggle is true", () => {
    const mockUseFlags = () => ({ simpleToggle: true });
    render(<App useFlags={mockUseFlags} />);
    expect(screen.getByTestId("header").textContent).to.equal("New Header Experience");
  });

  it("renders legacy header when simpleToggle is false", () => {
    const mockUseFlags = () => ({ simpleToggle: false });
    render(<App useFlags={mockUseFlags} />);
    expect(screen.getByTestId("header").textContent).to.equal("Legacy Header Experience");
  });
});
Pros:
- No mocking library required
- Clear dependency injection pattern
- Fast test execution
Cons:
- Requires component code changes
- Additional props to pass through
- Props only used for testing
Approach 3: Mock Context Provider
Create a mock React context that matches the LaunchDarkly structure. Requires modifying components to accept an optional test context.
Mock Provider:
import React, { createContext, useContext } from "react";

const MockLDContext = createContext({ flags: {} });

function MockLDProvider({ flags = {}, children }) {
  const value = { flags };
  return React.createElement(MockLDContext.Provider, { value }, children);
}

export { MockLDProvider, MockLDContext };
Component with optional context:
import React, { useContext } from "react";
import { useFlags } from "launchdarkly-react-client-sdk";

export default function App({ testContext } = {}) {
  let flags;

  if (testContext) {
    // In TEST: use the mock context
    const ctx = useContext(testContext);
    flags = ctx.flags;
  } else {
    // In PROD: use the real LaunchDarkly hook
    flags = useFlags();
  }

  const { simpleToggle } = flags;

  return (
    <div>
      <h1 data-testid="header">
        {simpleToggle ? "New Header Experience" : "Legacy Header Experience"}
      </h1>
    </div>
  );
}
Test:
import React from "react";
import { render, screen, cleanup } from "@testing-library/react";
import { expect } from "chai";
import App from "./mock-context.jsx";
import { MockLDProvider, MockLDContext } from "./MockLDProvider.jsx";

describe("App with Mock Context Provider", () => {
  afterEach(() => {
    cleanup();
  });

  it("renders new header when simpleToggle is true", () => {
    render(
      React.createElement(
        MockLDProvider,
        { flags: { simpleToggle: true } },
        React.createElement(App, { testContext: MockLDContext })
      )
    );
    expect(screen.getByTestId("header").textContent).to.equal("New Header Experience");
  });

  it("renders legacy header when simpleToggle is false", () => {
    render(
      React.createElement(
        MockLDProvider,
        { flags: { simpleToggle: false } },
        React.createElement(App, { testContext: MockLDContext })
      )
    );
    expect(screen.getByTestId("header").textContent).to.equal("Legacy Header Experience");
  });
});
Pros:
- No mocking library required
- Can test provider wrapping behavior
- Reusable mock provider across tests
Cons:
- Requires component modifications
- Adds conditional logic to production code
- More complex test setup
Choosing an Approach
| Criterion | Monkey Patch | Hook Injection | Mock Context |
|---|---|---|---|
| Code changes required | None | Minimal | Moderate |
| Test complexity | Moderate | Low | Moderate |
| Test speed | Slow (ESMock) | Fast | Fast |
| External dependencies | Yes | No | No |
| Production code impact | None | Minor (extra prop) | Moderate (conditional logic) |
Recommendations:
- Monkey Patch: Choose when you cannot modify production code or need to test existing components
- Hook Injection: Choose for new components where dependency injection is acceptable
- Mock Context: Choose when you need to test multiple components with provider wrapping